
On this Nioh 3 Newbie Information, we’re going to show you every little thing you could know to start your time-travelling journey by historical Japanese mythos.
As you possibly can count on from a Crew Ninja title, Nioh 3 is an extremely complicated recreation with quite a few techniques and mechanics that may overwhelm you utterly as a brand new participant.
No matter whether or not you’ve performed a Nioh title earlier than or not, this information will offer you a great basis, overlaying each single main system that you could use.
Since it is a very lengthy information, we’ve put chapters within the description of this information so you’ll find subjects which can be particularly vital to you, however I do suggest watching this full video to avoid wasting your self a variety of confusion in your first playthrough, as tutorials can generally be lackluster.
Associated
Nioh 3 Evaluate: Is It the New King of Motion RPGs? A Deep Dive After 100 Hours
On this Evaluate, we will be taking a deep dive into the most recent Crew Ninja title and my most hyped recreation of the yr to this point, Nioh 3.
Fundamental Fight
Ki Meter & Max Ki
To start out, let’s go over the pure fundamentals of fight. You’ll have your white well being bar within the middle of the display, and a blue bar beneath it which is your Ki bar. Ki is your stamina, which is consumed once you dash or bounce, assault enemies, or block/dodge.

In case your Ki is decreased to zero and you might be hit, you enter a staggered state the place you can not transfer till half your Ki meter is restored.
This is applicable to all enemies you face as nicely; attacking enemies will cut back their Ki Meter and their complete Max Ki. In case you cut back a primary enemy’s Ki meter to zero, it is going to depart them in a staggered state and open to a Grapple, a essential hit dealing large harm.
Stronger enemies will want their Max Ki bar to be decreased to 0 to be grappled (not their Ki Meter), however will stagger with each hit when their Ki Meter is at 0.
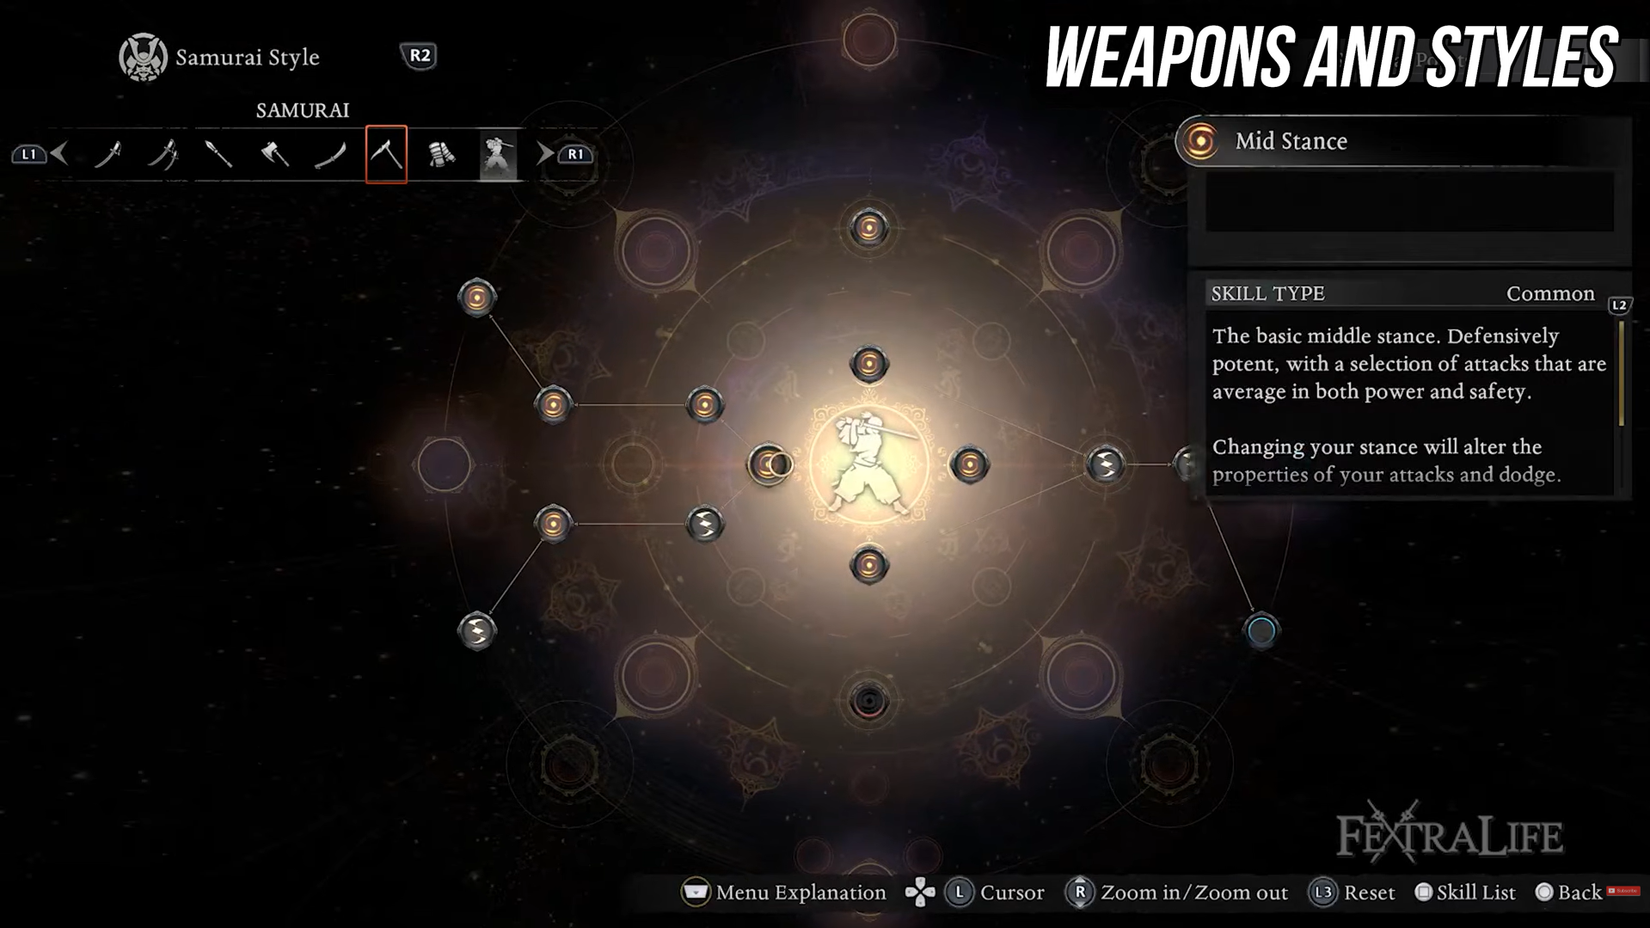
Samurai and Ninja Types
The core fight of Nioh 3 revolves across the new function of swapping between Samurai Fashion and Ninja Fashion. You’ll equip a distinct weapon on every of those two types, and you may tailor the Types to your liking as you progress by the sport.
For these of you who’ve performed Nioh earlier than, Samurai Fashion is your typical Nioh fight expertise. Your geared up weapon can have 3 totally different stances: Low, Medium, and Excessive.
You may swap between these on the fly, with every offering totally different assault patterns and abilities which let you adapt to any enemy or boss.
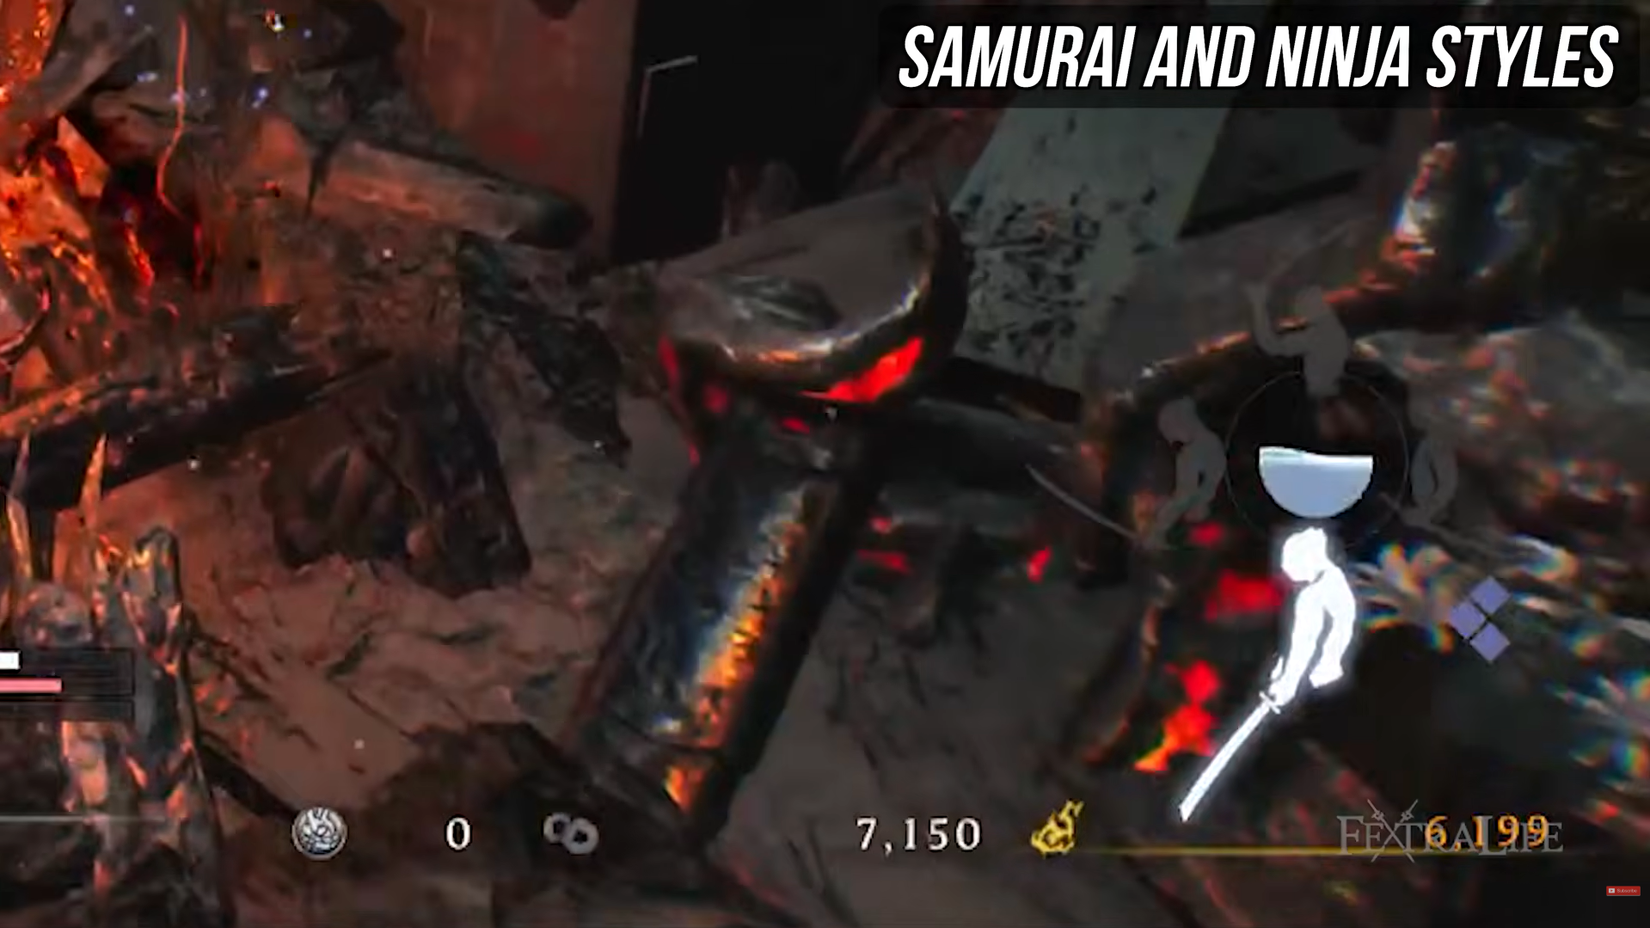
You’ll primarily be utilizing this model for head-on fight, because it has a lot much less mobility than the Ninja Fashion, and has a better equip load to put on heavier armor.
Attacking enemies and guarding will fill a gauge on the underside proper referred to as the Arts Gauge. Whereas it is energetic, your subsequent Martial Artwork or Robust Assault will likely be enhanced. Martial Arts are primarily abilities, which we’ll get into in a second, however simply know which you could combo a number of assaults into 1 use of the Arts Gauge, so attempt making tremendous lengthy combos to take advantage of out of 1 gauge.
Moreover, you additionally even have a built-in parry referred to as Deflect in Samurai Mode. Urgent L1/LB earlier than getting hit utterly negates all harm, restores your Ki, and costs your Useful resource Gauges (extra on that later). In case you simply maintain down L1/LB, you’ll Guard enemy assaults, which does not negate elemental harm, and consumes Ki.
Ki Pulse
One final extremely vital, key issue that you need to be taught utilizing this mode is Ki Pulsing. After you carry out any assaults in Samurai type, a pink bar overlaying a portion of your spent Ki will seem, and refill when you cease attacking.
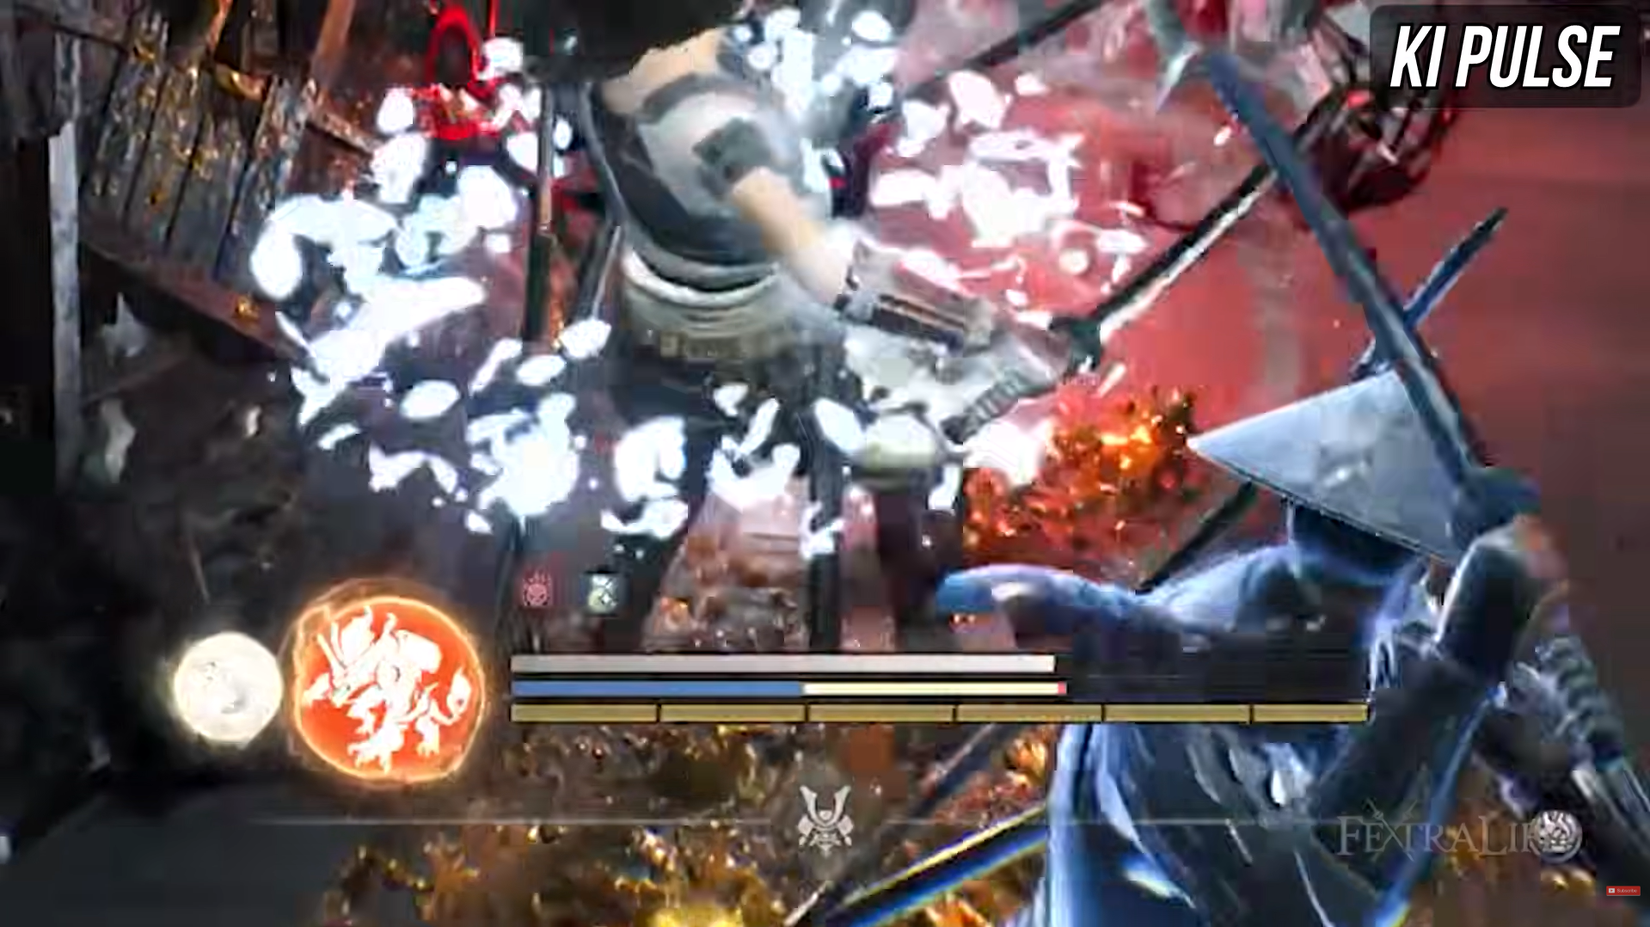
In case you press R1/RB when that meter is full, you’ll execute an ideal Ki Pulse, which recovers virtually all of the Ki you spent immediately.
If you’re a brand new participant, I can not stress how vital it’s to construct this muscle reminiscence for Ki Pulsing after each assault chain so you possibly can hold combos going, and cease enemy assaults from exhausting you.
tip on that is to attend for the blue lights round your character for the timing, so you do not even have to take a look at your Ki meter.
Yokai Realms
Enemies may also spawn a Yokai Realm.

This manifests as a puddle of shadows on the ground, and whereas standing on it, your Ki restoration will likely be decreased; doing a Ki Pulse whereas contained in the realm will Purify it, eradicating the realm and presumably providing you with buffs relying on the construct you may have.
Ninja Fashion
Transferring onto Ninja Fashion, this model is extremely nimble and has low Ki consumption for any of your actions. The principle purpose of the Ninja Fashion is getting behind enemies, as dealing harm from behind them will double your output.
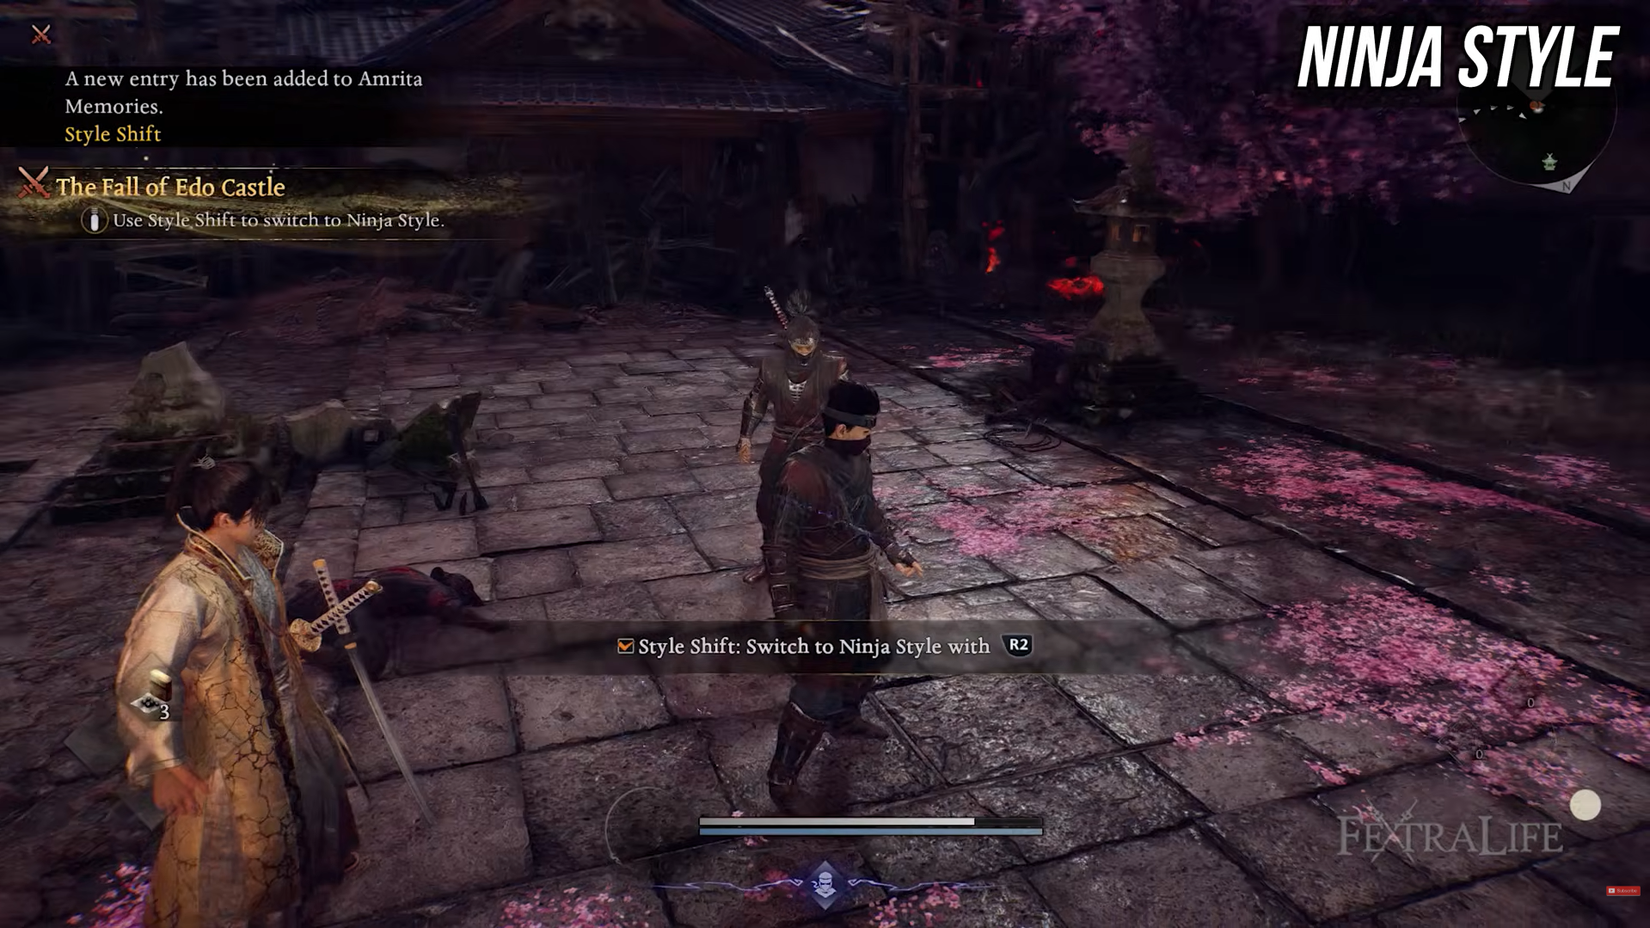
To accommodate that, as an alternative of a Ki Pulse, Ninja Fashion has Mist, which shortly evades in any course with out consuming Ki after utilizing an assault. This implies there is no such thing as a strategy to get well Ki on this type or purify yokai realms, however you’ll be consuming much less Ki as a tradeoff.
Ninjutsu
The principle gimmick of Ninja Fashion is Ninjutsu; there are 3 Ninjutsu slots so that you can slot in any Ninjutsu skill you may get from the Ninja ability tree.
Attacking enemies fills all Ninjutsu Gauges concurrently, and you may slot some very helpful gadgets in right here when you get the correct abilities.

Swapping between these two Types on the fly is helpful for preventing sure forms of enemies; generally you’ll find yourself behind an enemy and swap to Ninja for bonus harm, and different occasions you may have a charged artwork prepared for some large harm in Samurai model.
It is as much as you the way you swap them, however I like to recommend utilizing Ninja for kiting enemies you don’t know find out how to combat, and Samurai for that constant head-on harm.
You’ll generally be compelled to swap when enemies use a Burst Assault; that is after they begin glowing pink, then assault. In case you swap types on the actual second the assault comes, you then do a Burst Break which massively reduces the enemies’ Max Ki, and is a should to be taught to beat boss fights.
Weapons & Types
Transferring onto the weapon, there are a complete of 14 totally different weapon varieties in Nioh 3, break up into 7 for Samurai Fashion, and seven for Ninja Fashion.
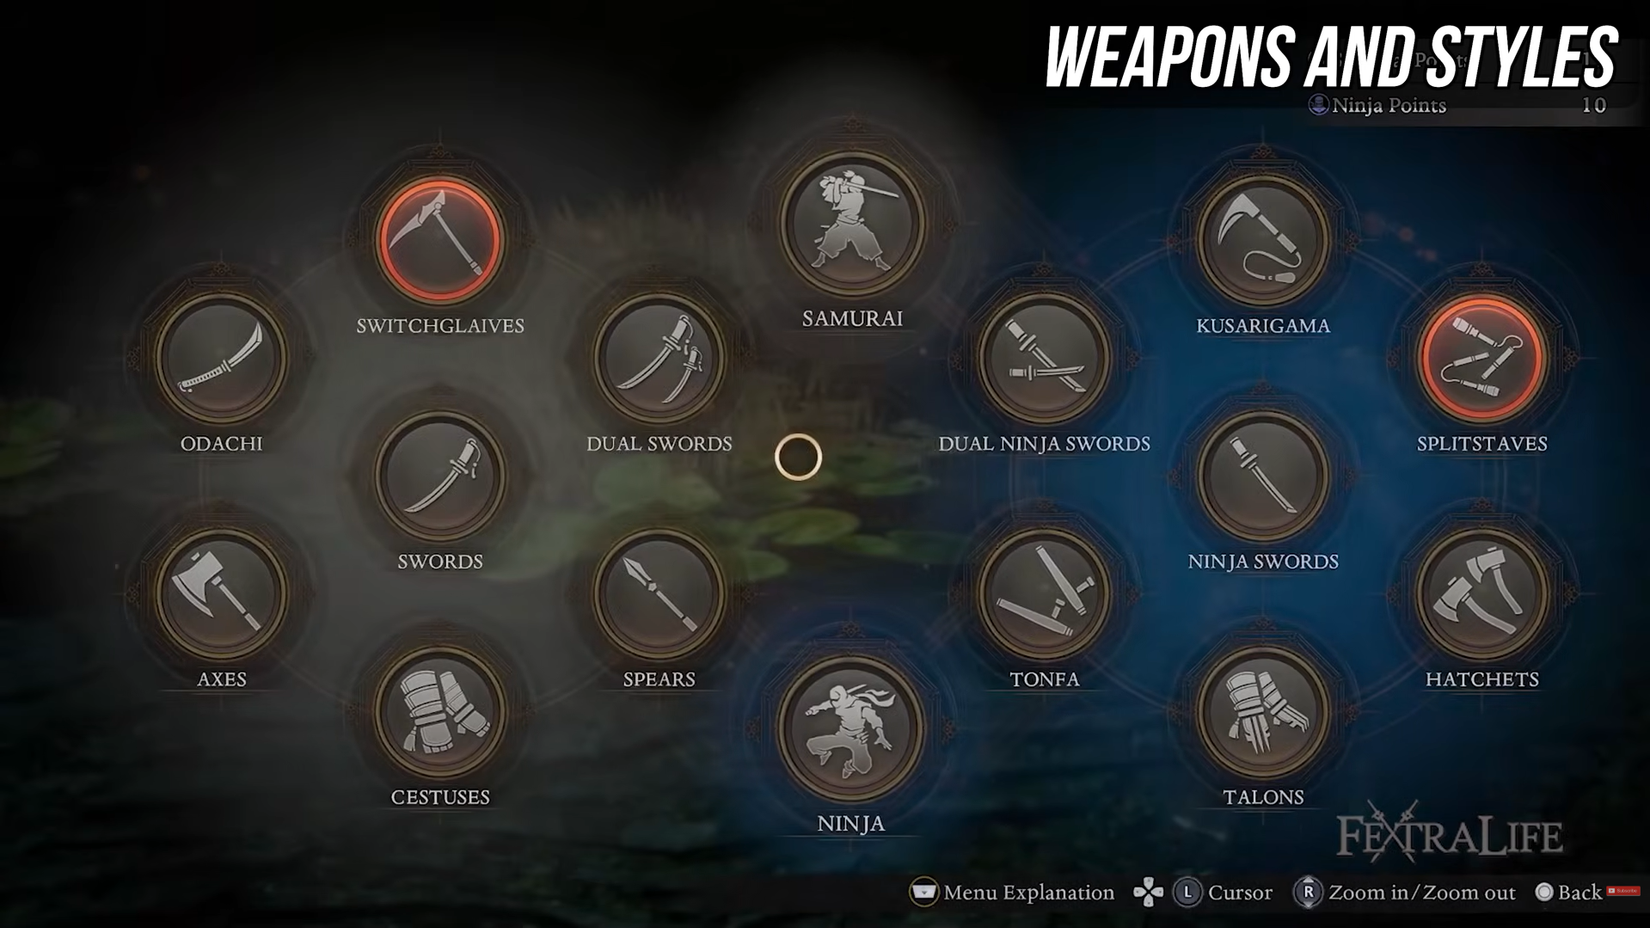
For Samurai, you possibly can select between Swords, Twin Swords, Spears, Axes, Odachi, Switchglaives, and Cestuses.
For Ninja, there are Ninja Swords, Twin Ninja Swords, Kusarigama, Tonfa, Hatchets, Splitstaves, and Talons.
Each weapon has their very own abilities unlocked from their respective Martial Arts tree, which you get factors for as you progress the sport within the type of Samurai/Ninja Locks. Martial Arts are primarily new abilities, combos, and passives for the weapons, which generally embrace the next inputs:
Flick up + triangle
Flick down + triangle
Heavy assault after Mild assault
Mild assault after Heavy assault
Maintain gentle/heavy assault
Airborne Assaults
These bushes may also normally have a number of abilities utilizing the identical inputs, through which case you need to choose and select which abilities you need geared up from the Customise menu.
It’s additionally value mentioning that since every stance can have its personal inputs for Samurai weapons, Ninja weapons can have only some inputs for Martial Arts, making them a lot much less versatile.
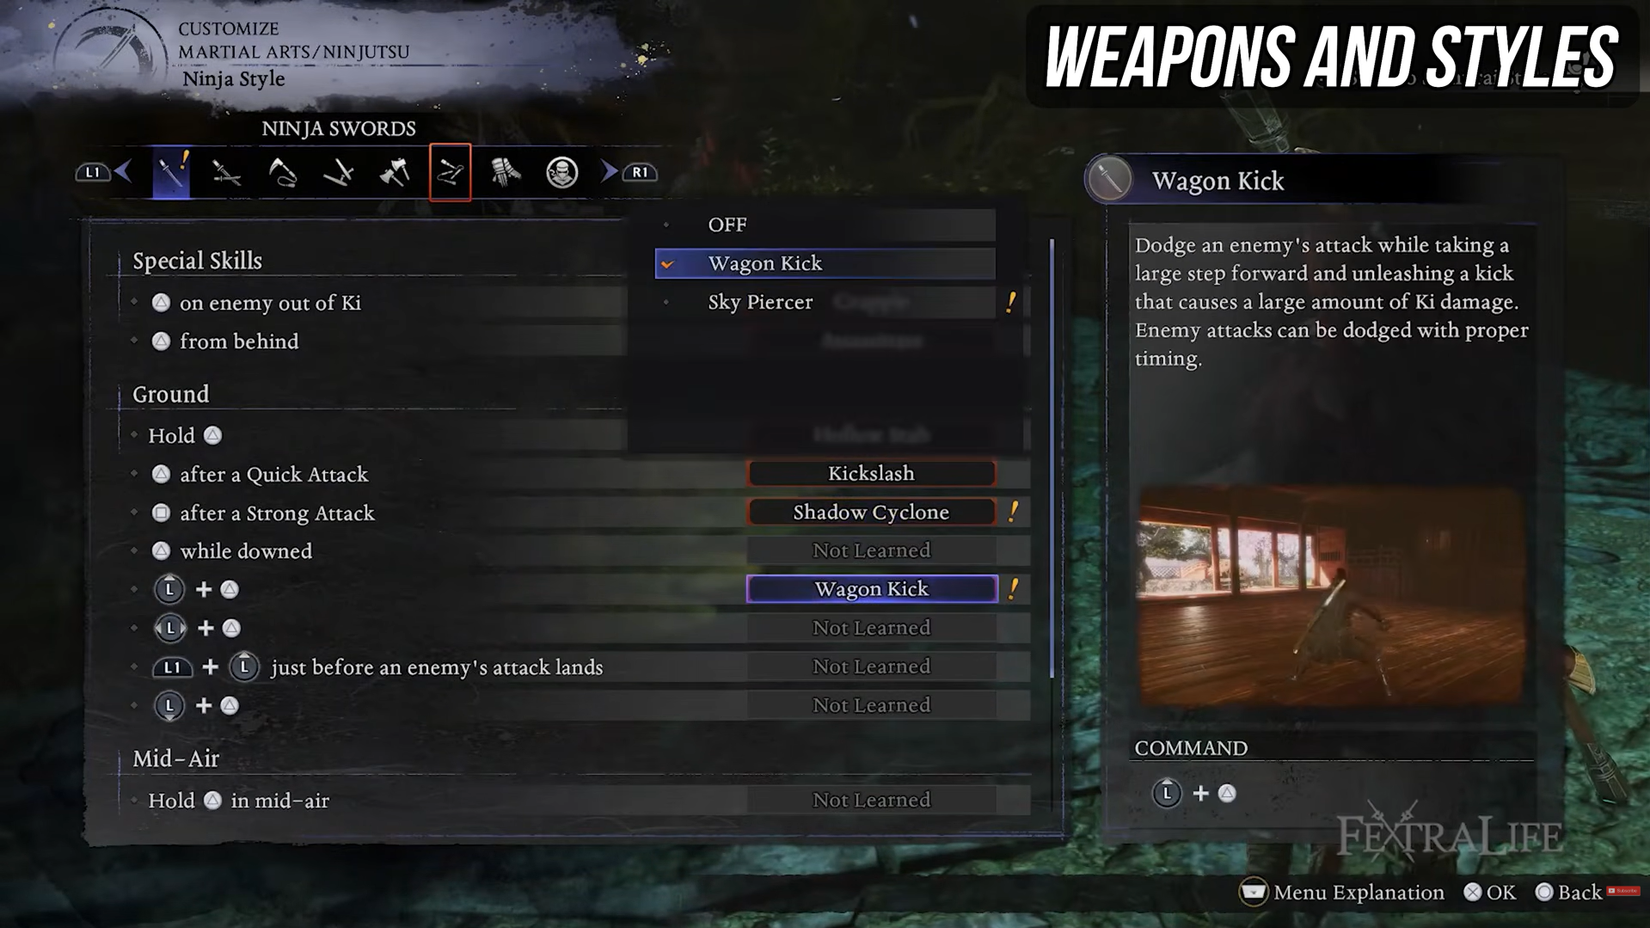
To provide an instance, with the Sword you possibly can have “Kurama Sword Dance” as your Up + Triangle on low stance, then Heaven Flash in your Up + Triangle for Excessive Stance. However, for the Ninja Sword, you can not have each Sky Piercer and Wagon Kick since they’re each Up + Triangle.
To have adaptability to most conditions, you ought to be making an attempt to make your Samurai playstyle fill in gaps that your Ninja model doesn’t have.
For instance, an Odachi + Splitstaff playstyle would provide the possibility of huge and hulking harm or quick and nimble harm interchangeable instantaneously.
Guardian Spirits and Dwelling Artifact
Lastly on this lengthy, exhaustive record of your primary fight choices, we have now Guardian Spirit Expertise and the Dwelling Artifact. Your guardian spirit is an geared up spirit that offers you some particular stats, Guardian Expertise, and a singular Dwelling Artifact Kind.
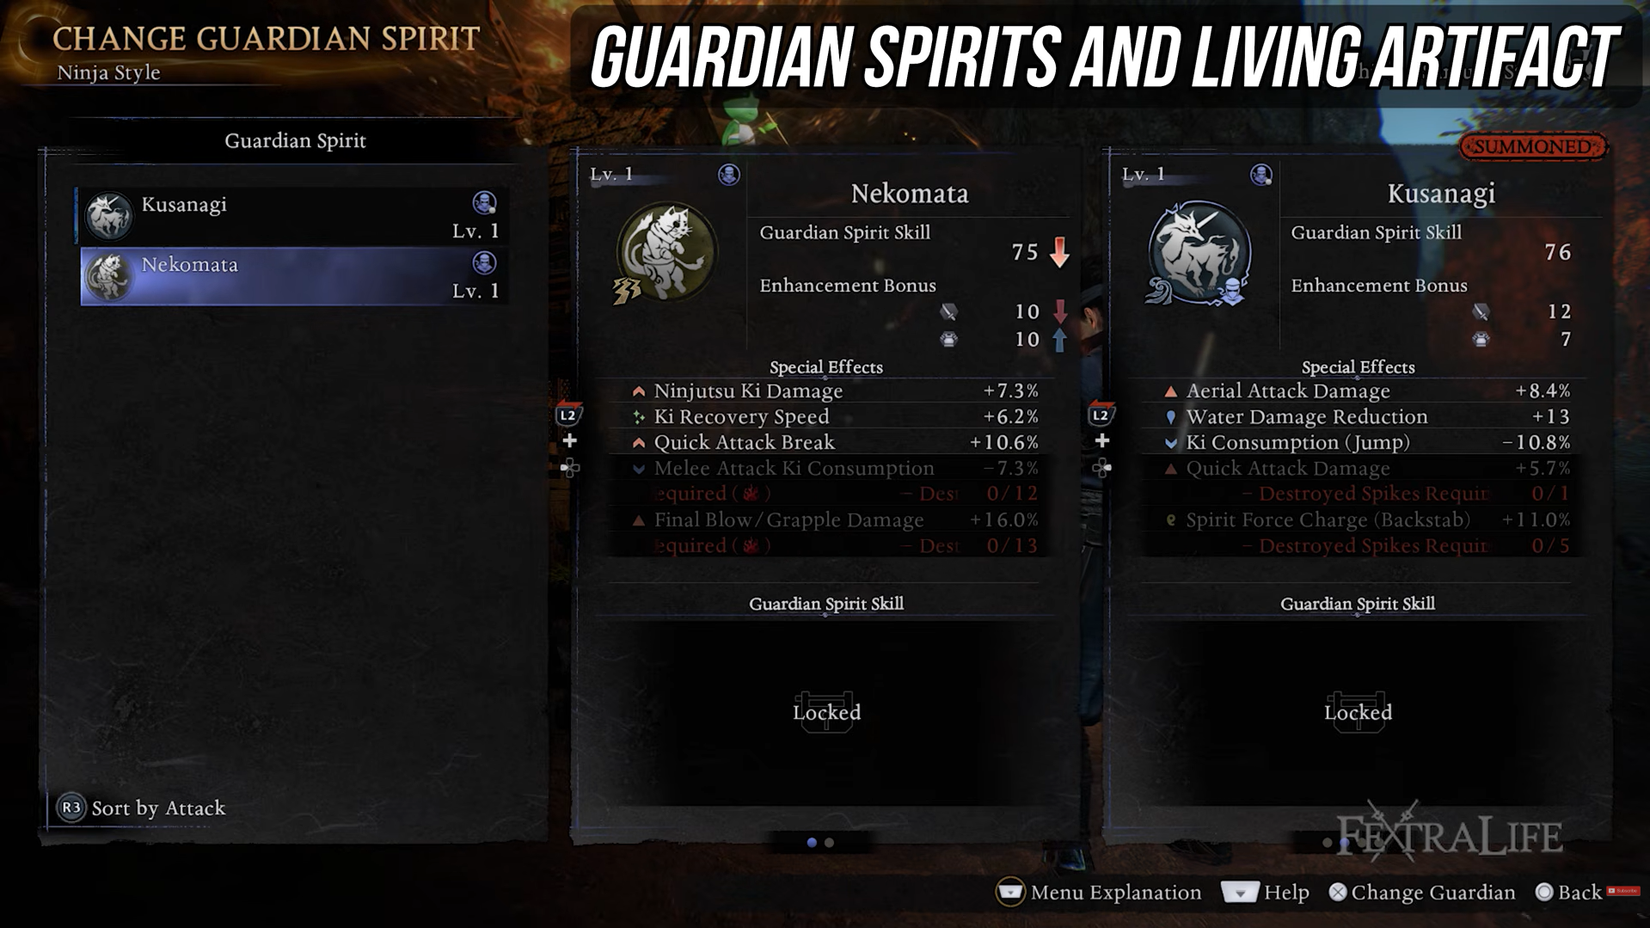
The Dwelling Artifact Gauge is basically your tremendous mode, with the gauge stuffed by Amrita as proven on the left of the well being bar.
Subsequent to it are 1, and afterward 2 Guardian Spirit Expertise which closely cut back an enemies’ max Ki, and can be utilized in many alternative methods relying on the one you may have geared up.
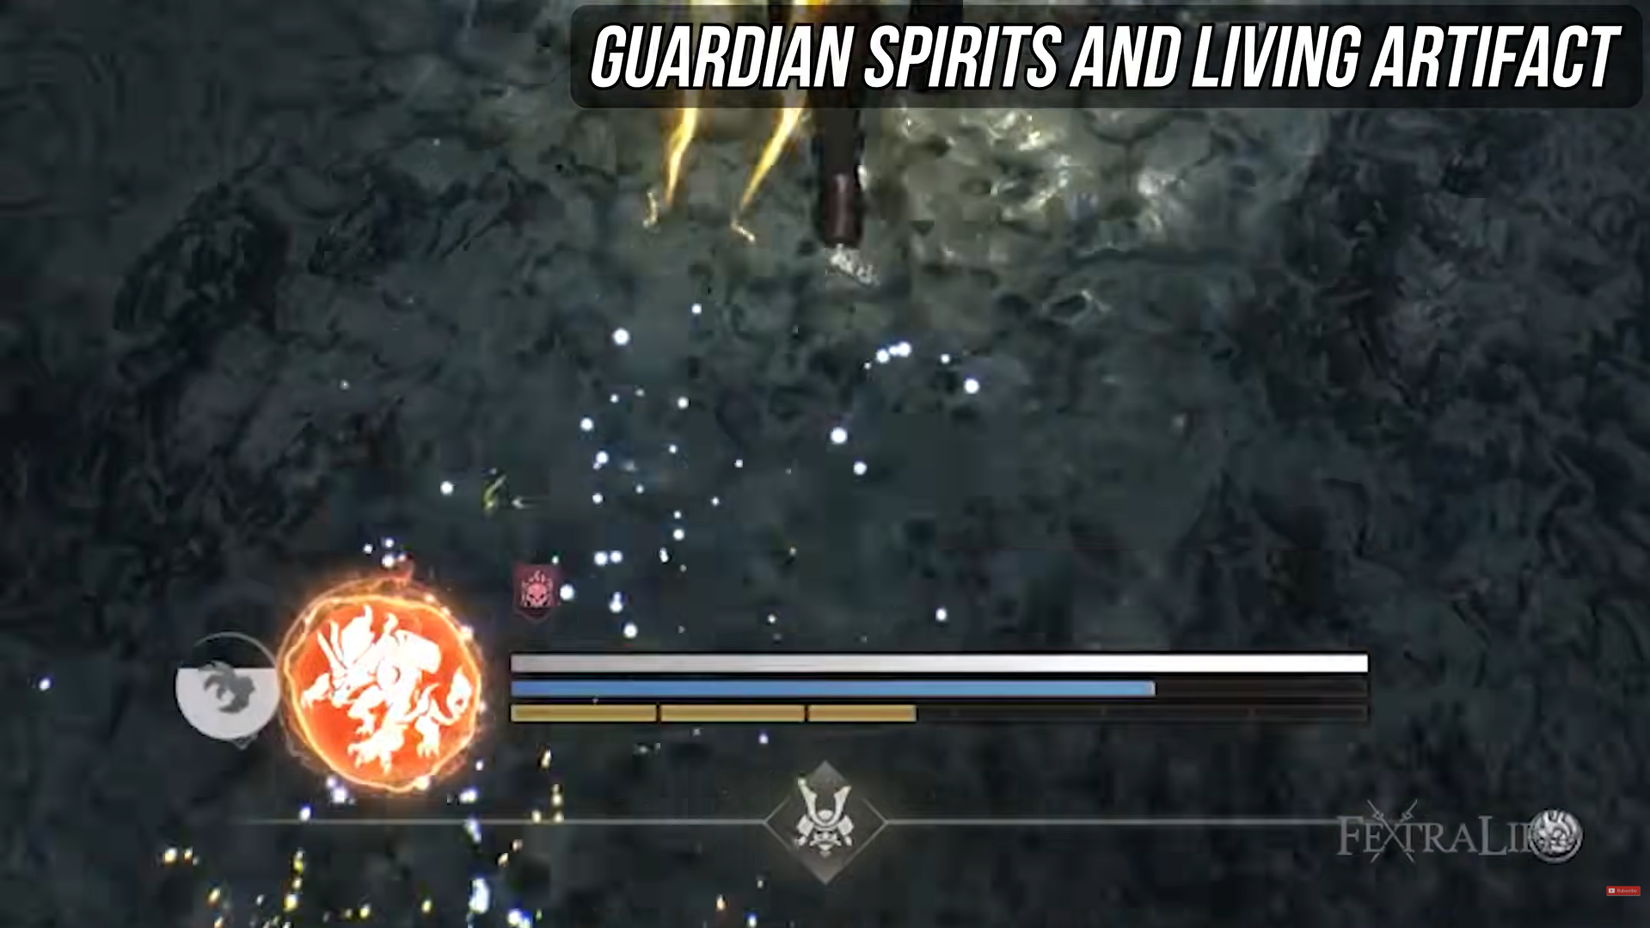
To make use of the Expertise, you’ll should land assaults to generate Spirit Drive, the divided yellow bar beneath your Ki Meter.
These abilities are literally extremely helpful for once you get staggered, as you possibly can cancel your staggered animation with a Guardian Talent to presumably get out of hazard. Nonetheless, don’t use the abilities sparingly to take action; the Spirit Drive gauge costs surprisingly shortly, so you possibly can spam Guardian Expertise very often.
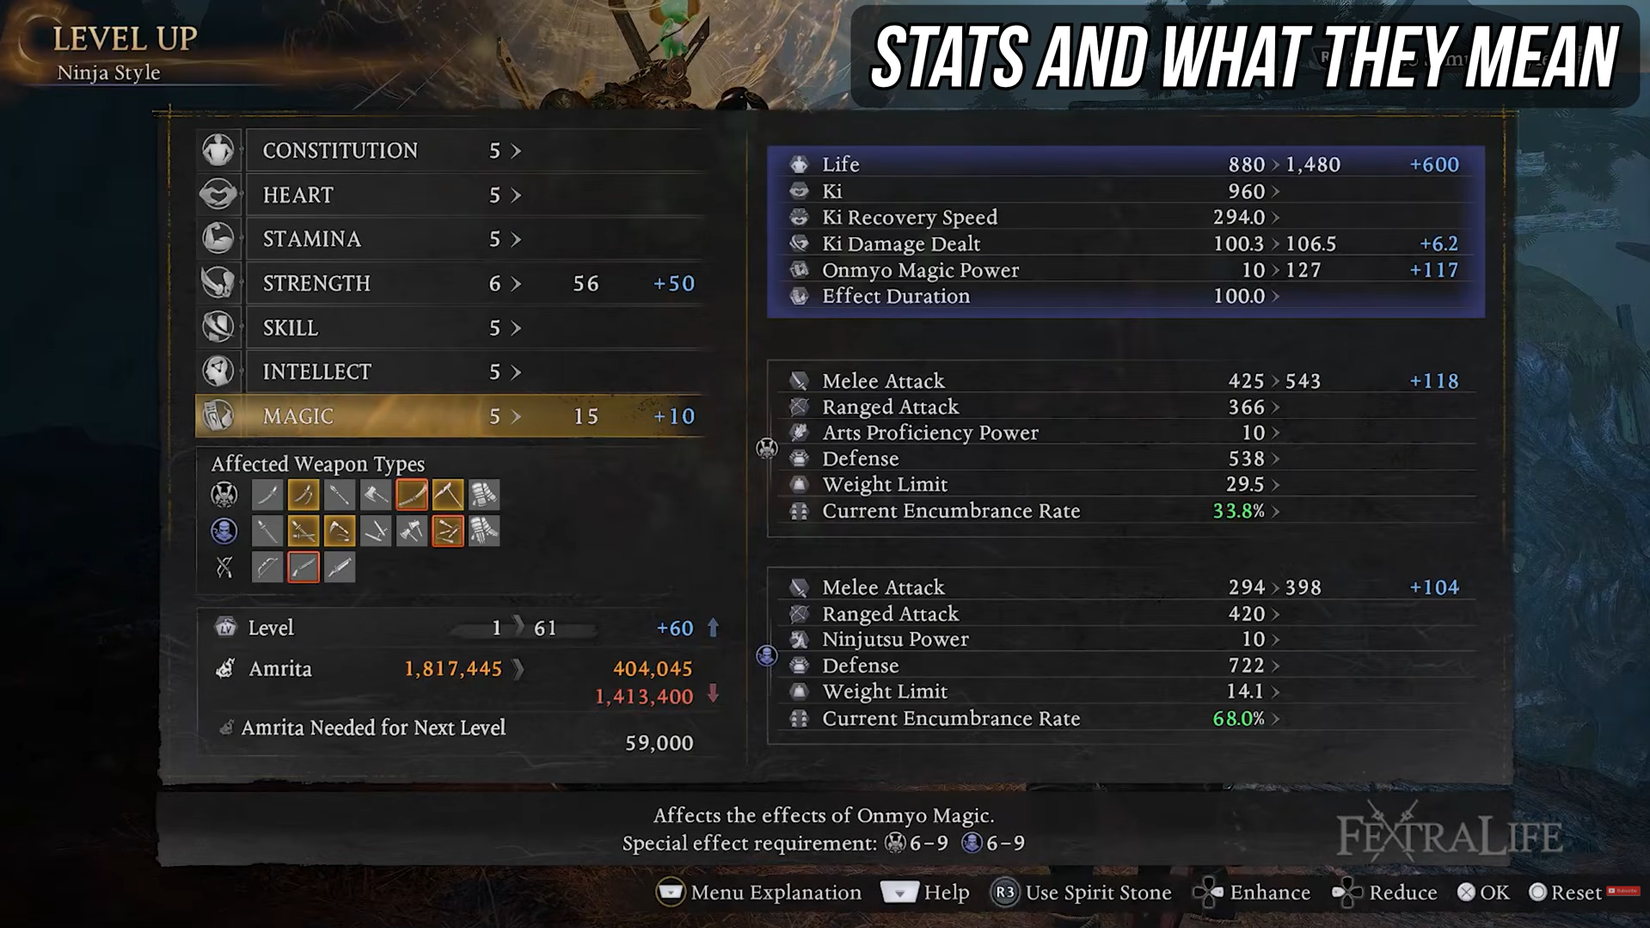
Stats and What They Imply
Transferring on from the fundamentals of fight, we will now discuss your core stats. These had been fairly complicated to me beginning out since rather a lot has modified since earlier Nioh titles, nevertheless it’s really fairly easy when you perceive what is going on on behind the display.
As you full quests, kill enemies, and loot areas within the open world, you’ll achieve Amrita, which is used to degree your character up at Shrines discovered all through the map. There are 7 totally different stats you possibly can degree in Nioh 3:
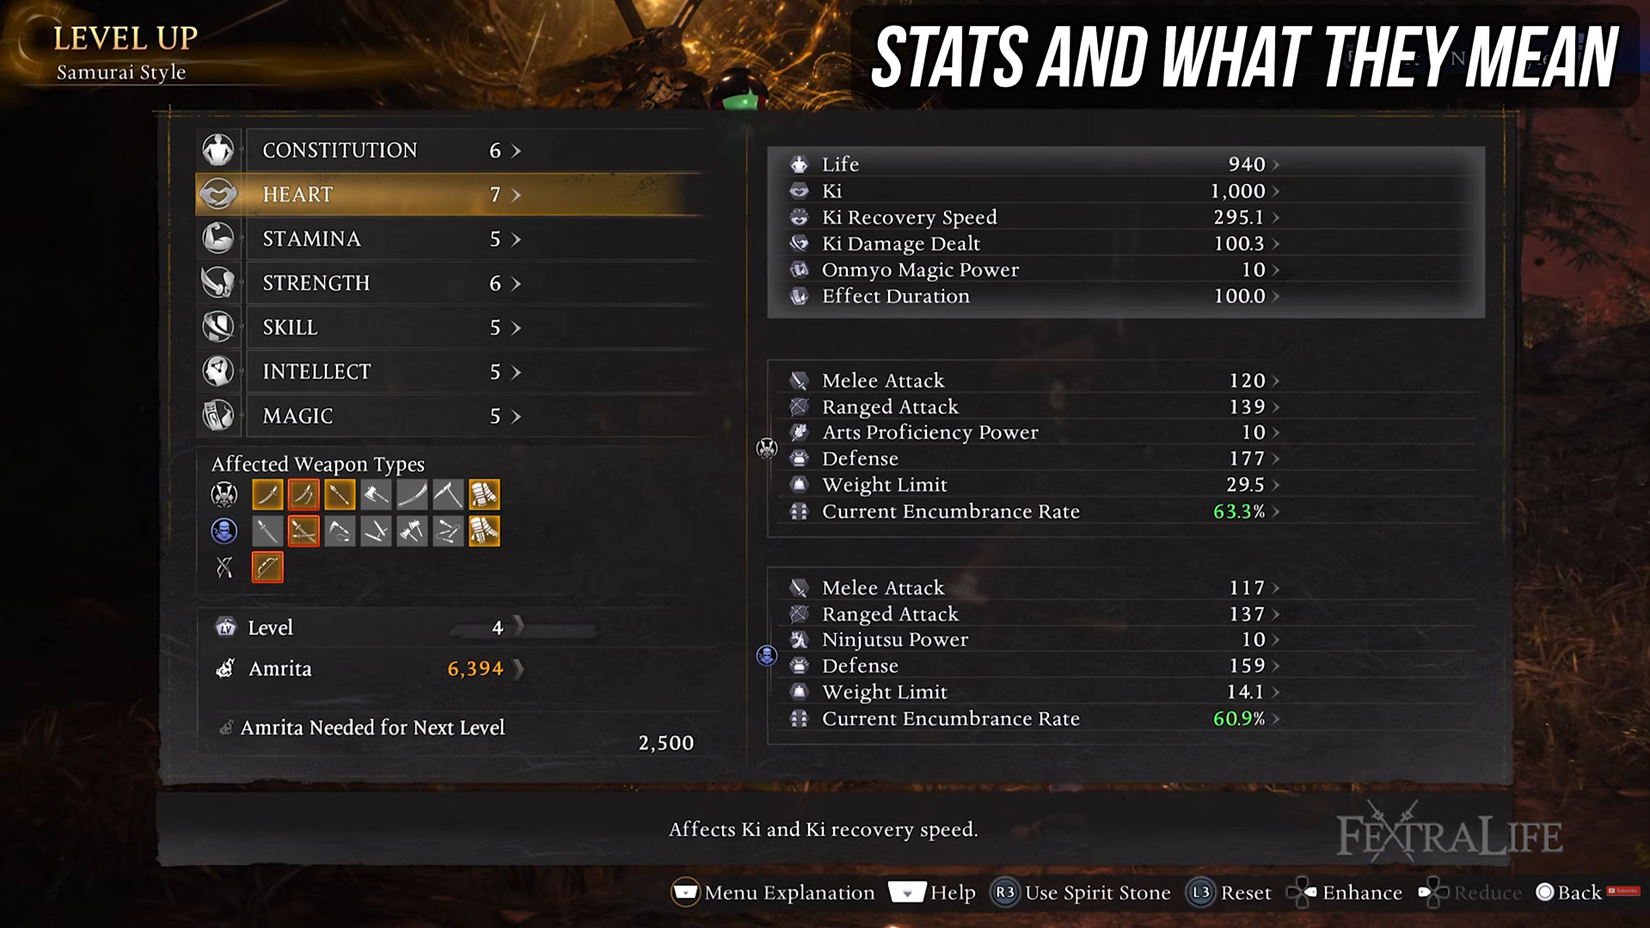
Structure: Significantly will increase max HP
Coronary heart: Will increase max Ki, Ki Restoration velocity, and Ranged Assault Harm (Flintlocks & Bows)
Stamina: Will increase max HP and most equip weight (Carrying heavier armor)
Power: Will increase Ki Harm with weapons
Talent: Will increase the facility of Arts (Empowered assaults) and Ninjutsu
Mind: Will increase Ki Restoration Pace, Ranged Assault Harm, and Magic Impact Period
Magic: Will increase Magic Assault Energy
The way in which you wish to distribute stats is to favor the stats that improve the harm of your chosen weapons; each weapon kind can have 3 totally different stats that scale favorably with it.
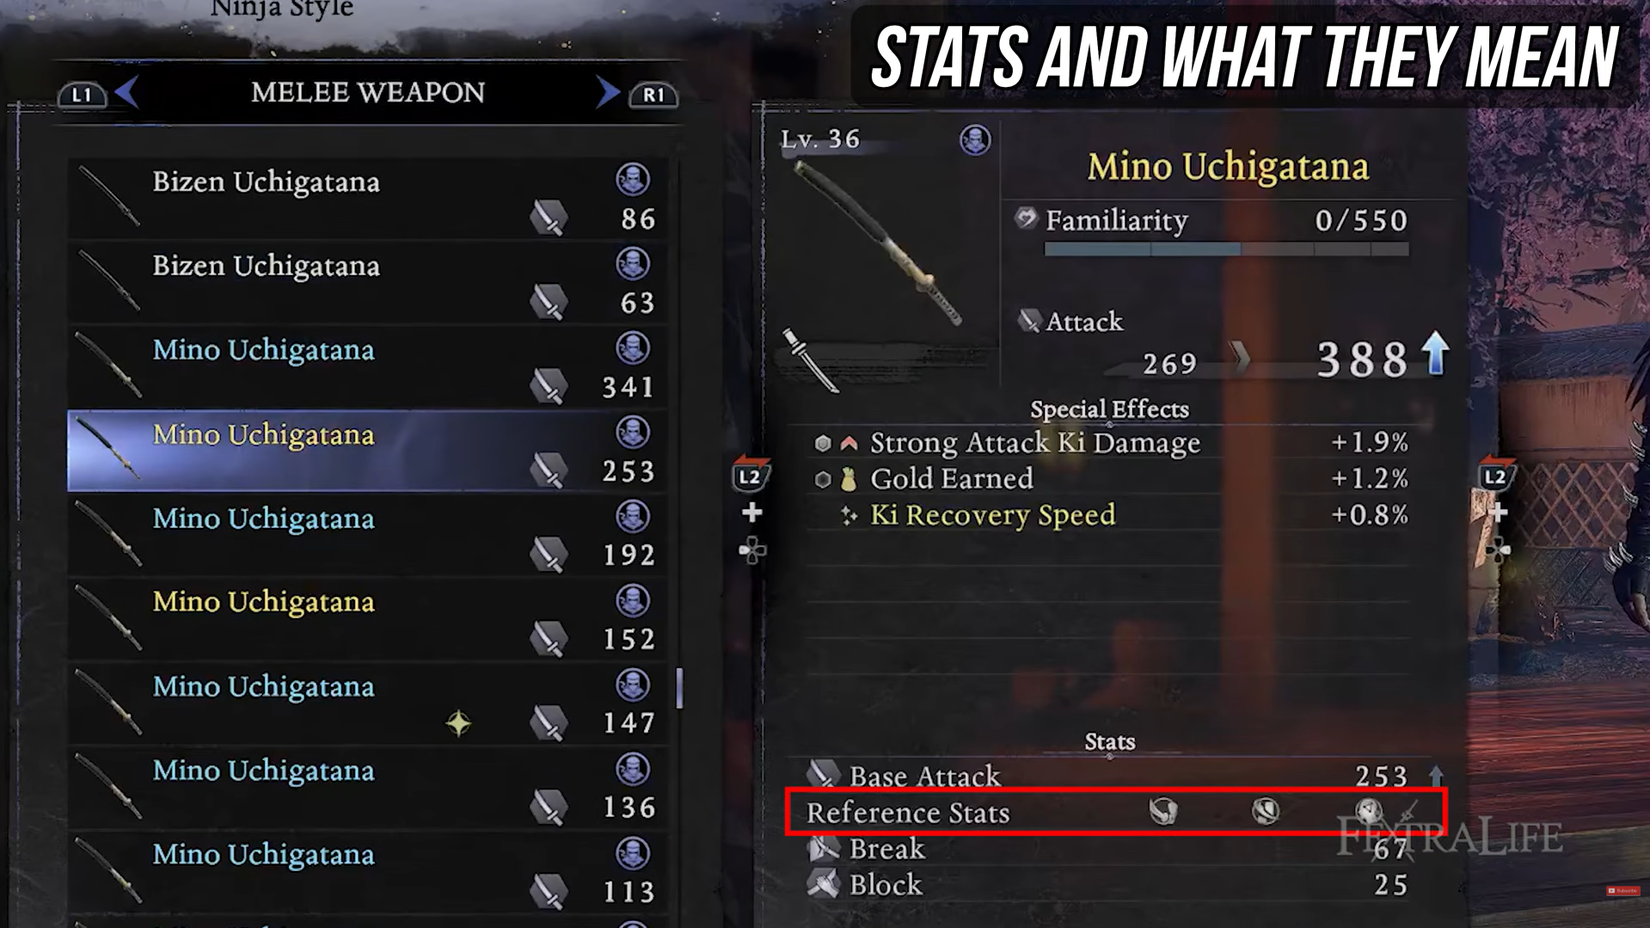
For instance, the Sword can scale with Coronary heart, Power, or Mind, and the Ninja Sword scales with Power, Talent, and Mind.
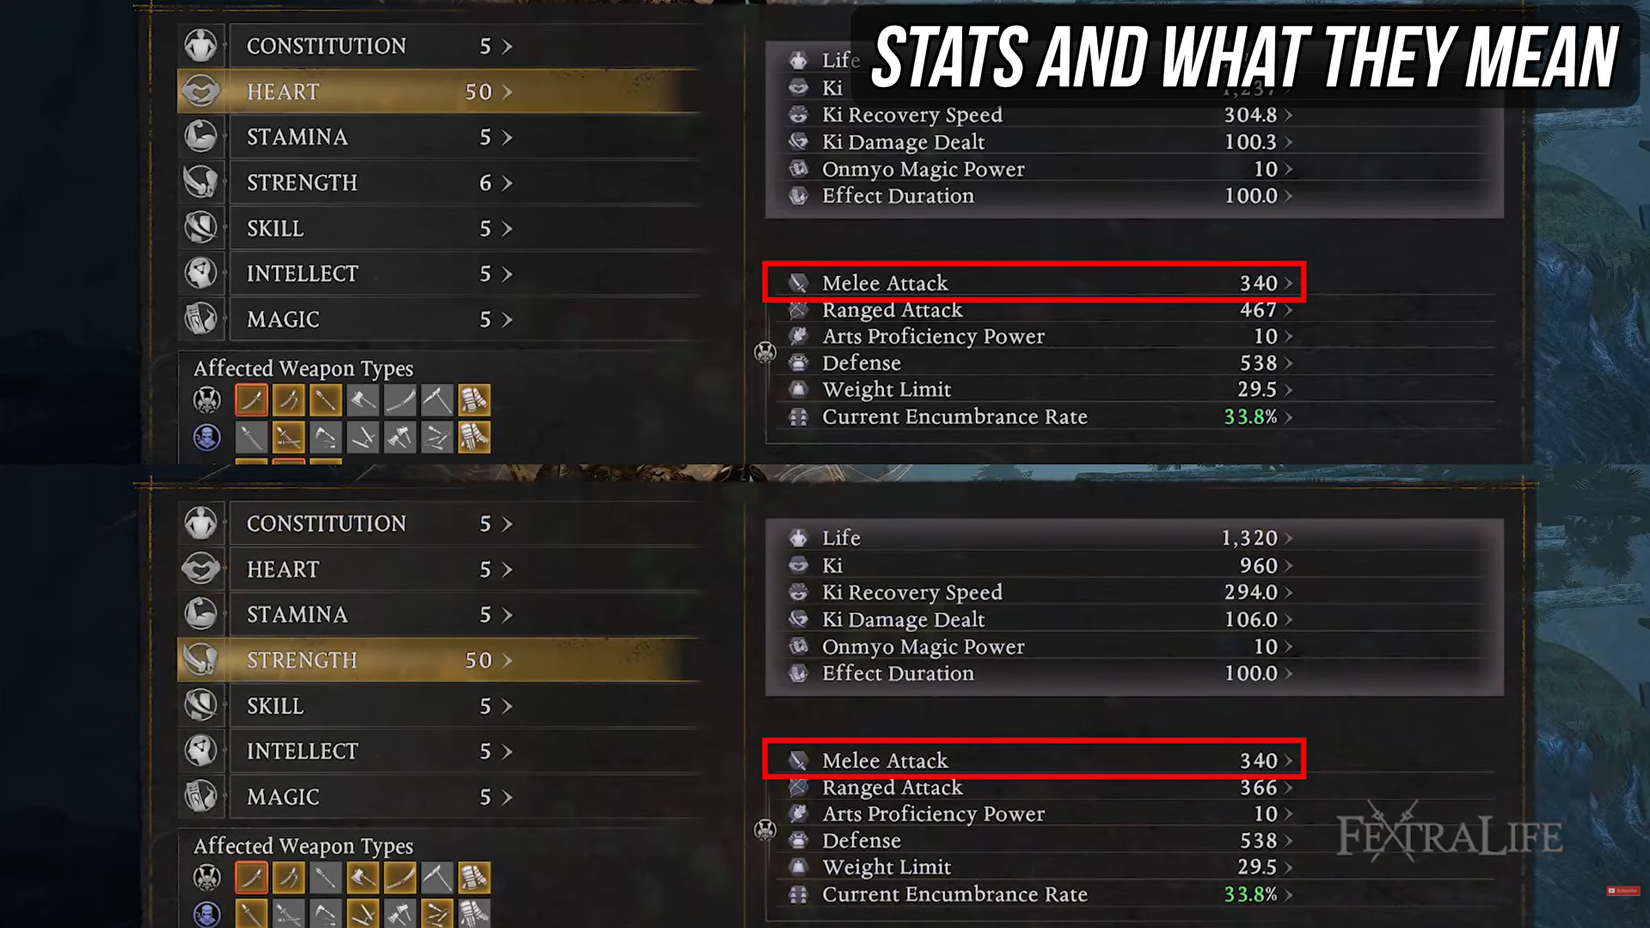
The distinction between these Reference stats and typical Soulslike video games or earlier Nioh video games is that each one 3 stats are utterly equal; there is no such thing as a S scaling or B scaling for every stat. You may select any of the three stats to max and get the identical harm outcomes regardless.
For instance, utilizing a Sword and leveling to 50 Coronary heart will give the very same harm as when you went 50 Power.
Which means for essentially the most perfect construct, you’ll wish to have a Samurai Weapon and Ninja Weapon with a minimum of 1 related Reference Stat, ideally 2 related reference stats.
HOWEVER, there will likely be an possibility to alter the reference stats of particularly uncommon gear afterward, so there’s a little flexibility right here.
To provide some examples, these are some good combos that synergize nicely:
Spear + Kusarigama: Each scale with Structure + Talent
Sword + Twin Ninja Swords: Each scale with Coronary heart + Mind
Odachi + Splitstaff: Each scale with Power + Magic
To provide an instance of a horrible combo, Spear + Splitstaff would don’t have any synergy since they don’t have any related stats, until you modify these reference stats afterward.
The related reference stat with the best worth will likely be used for scaling, then the following highest reference stat will likely be used for minor scaling.
So when you use the Odachi + Splitstaff with 50 Power and 15 Magic, you’ll get main harm scaling from Power, and slight scaling from Magic.
Having weapons with 2 widespread stats lets you diversify your construct’s focus and get different stats reasonably than utterly hardline on 1 stat; so in that instance, you may get a bit of additional Magic Harm along with your Ki Harm, or a bit of additional Ki Harm with Magic Harm.
Nonetheless, there are 2 stats which can be virtually necessary to degree, that are Structure and Coronary heart. Even when your weapons’ chosen stats don’t align with Structure and Coronary heart, you’ll have to speculate some factors into them since they’re only a base improve to your Life and Stamina.
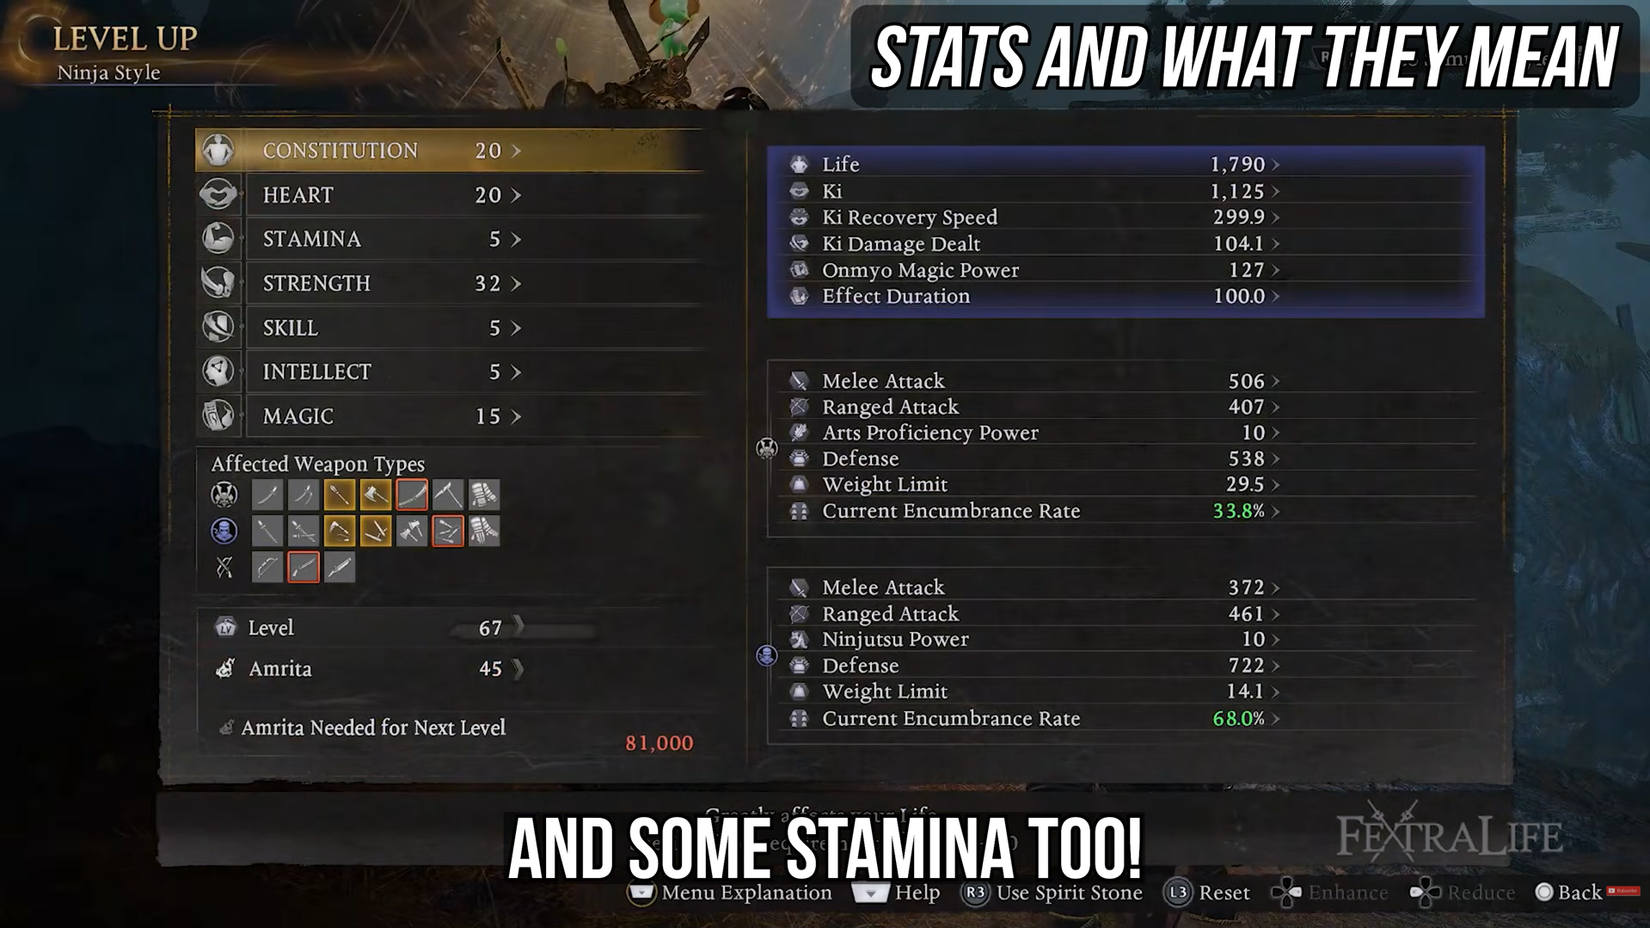
I like to recommend going as much as 20 or 25 Con/Hrt at a most for builds not centered round it as you will notice diminishing returns with extra ranges at round that time.
Then with the remainder of your ranges, you possibly can pump all of your factors into your important stat and have your secondary stat at perhaps 15/20.
It is clearly not an actual science for any min-maxers on the market, particularly contemplating which you could change reference stats later, however that is the best technique which I’ve discovered works finest for newcomers making an early construct.
Afterward, you’ll additionally must consider Stat Necessities for Armor Units and Onmyo Magic, which we’ll talk about. However do observe which you could reset all of your stats everytime you need with completely no charges, so you possibly can be at liberty to experiment with different playstyles and min-max with out the fear of being locked into your leveling decisions.
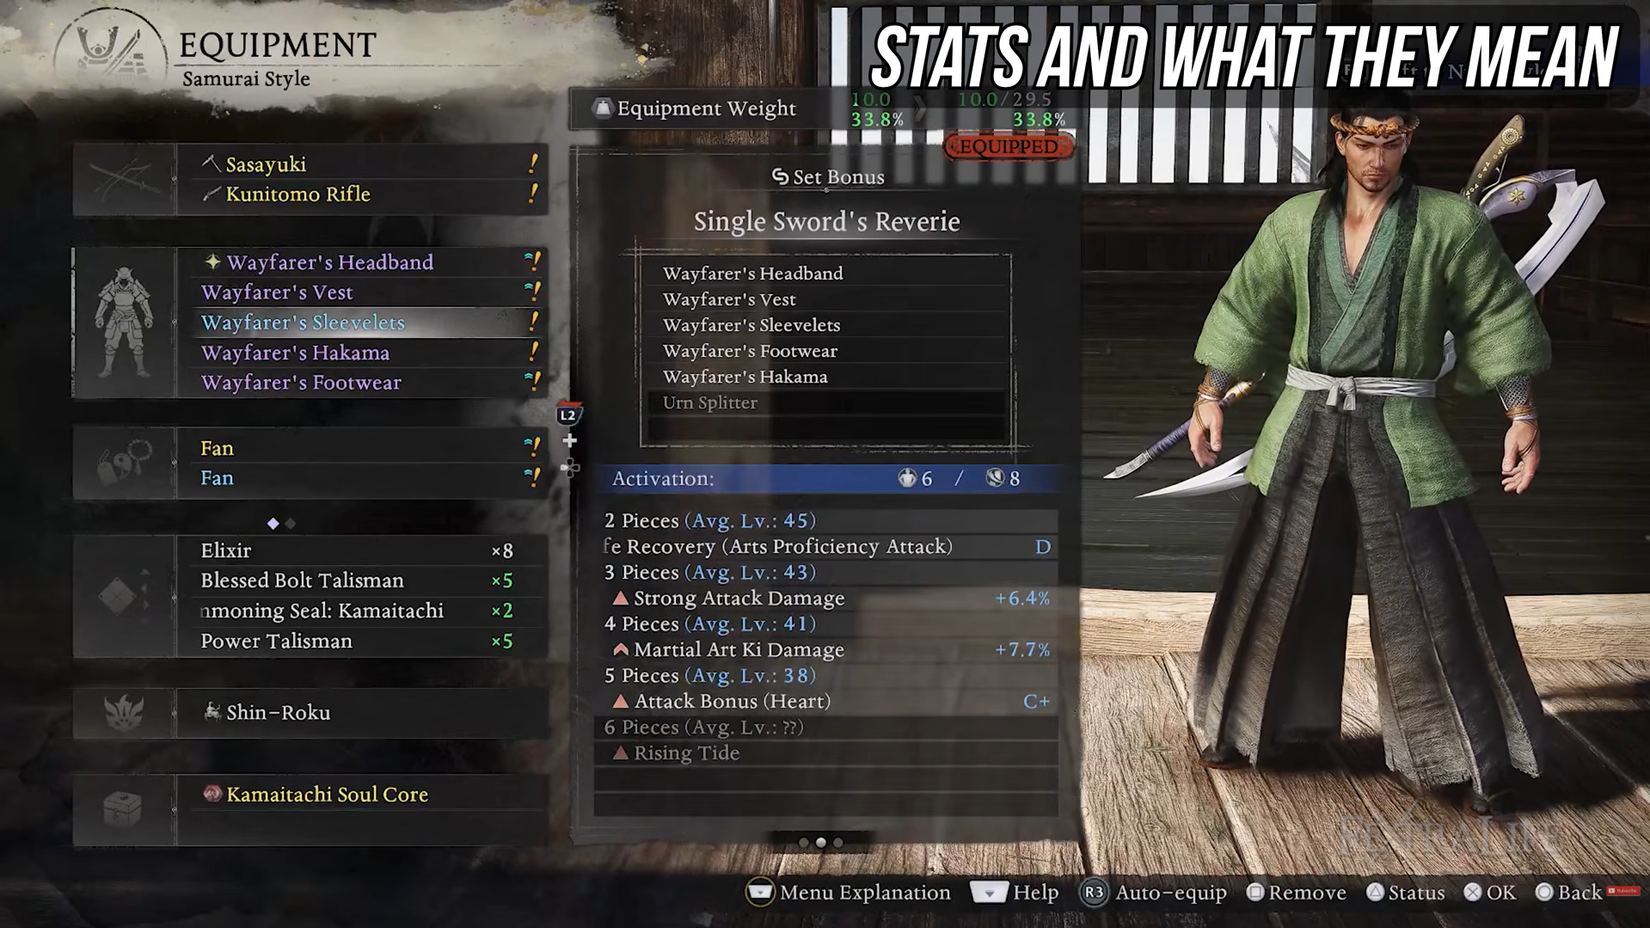
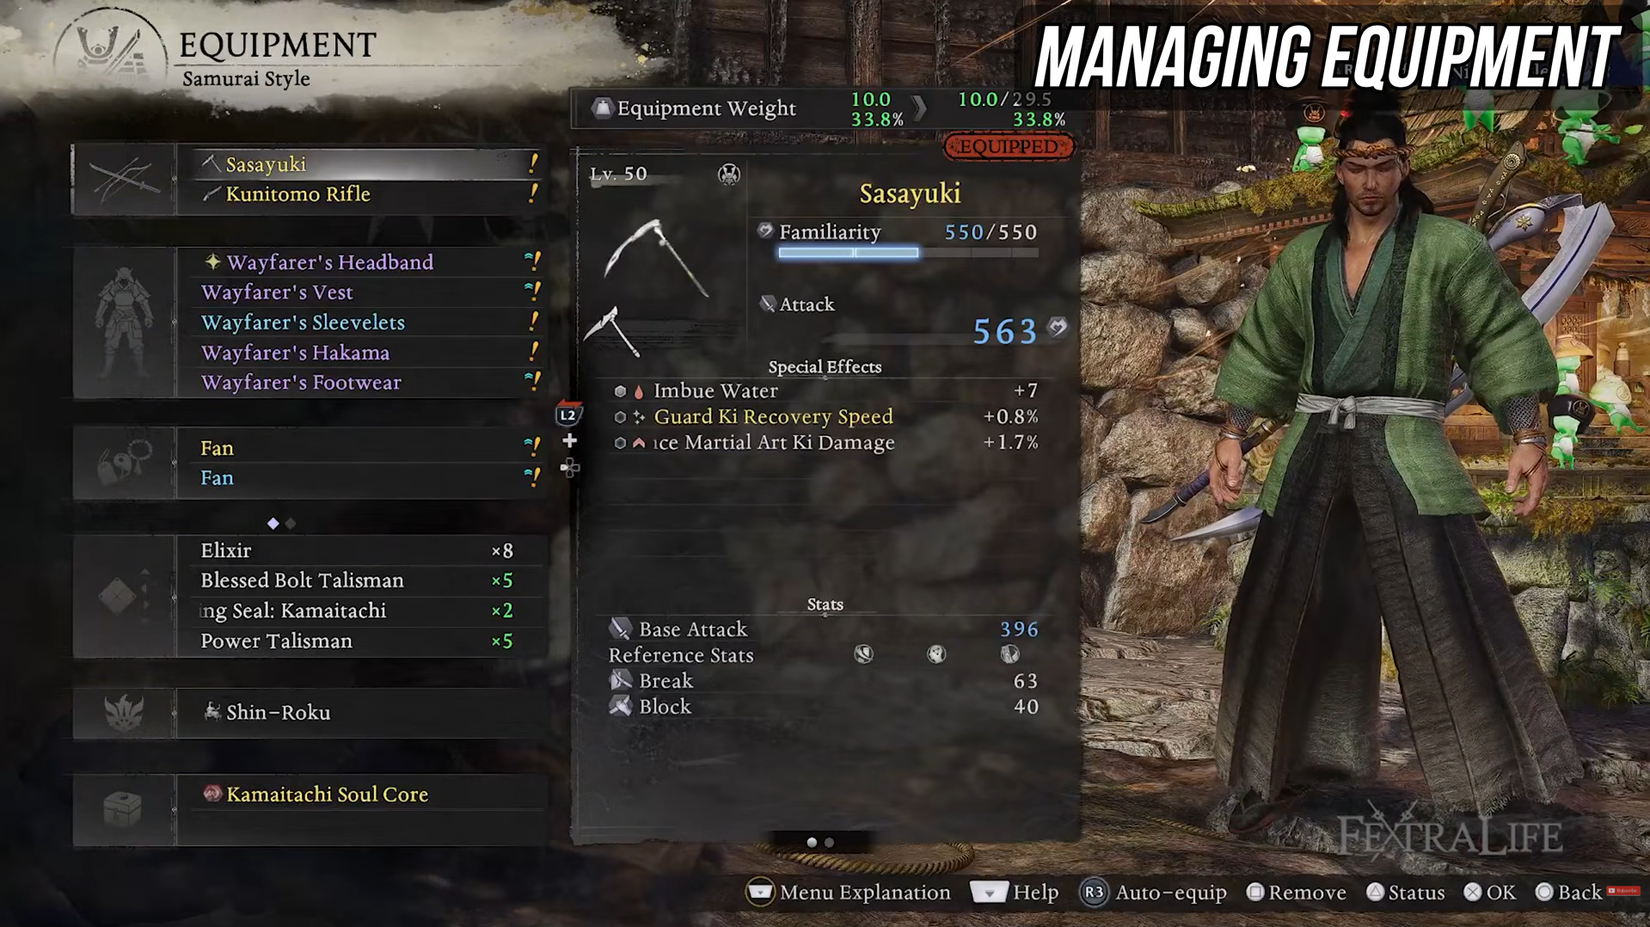
Managing Gear Fundamental Gear in Nioh 3 is split into a couple of classes:
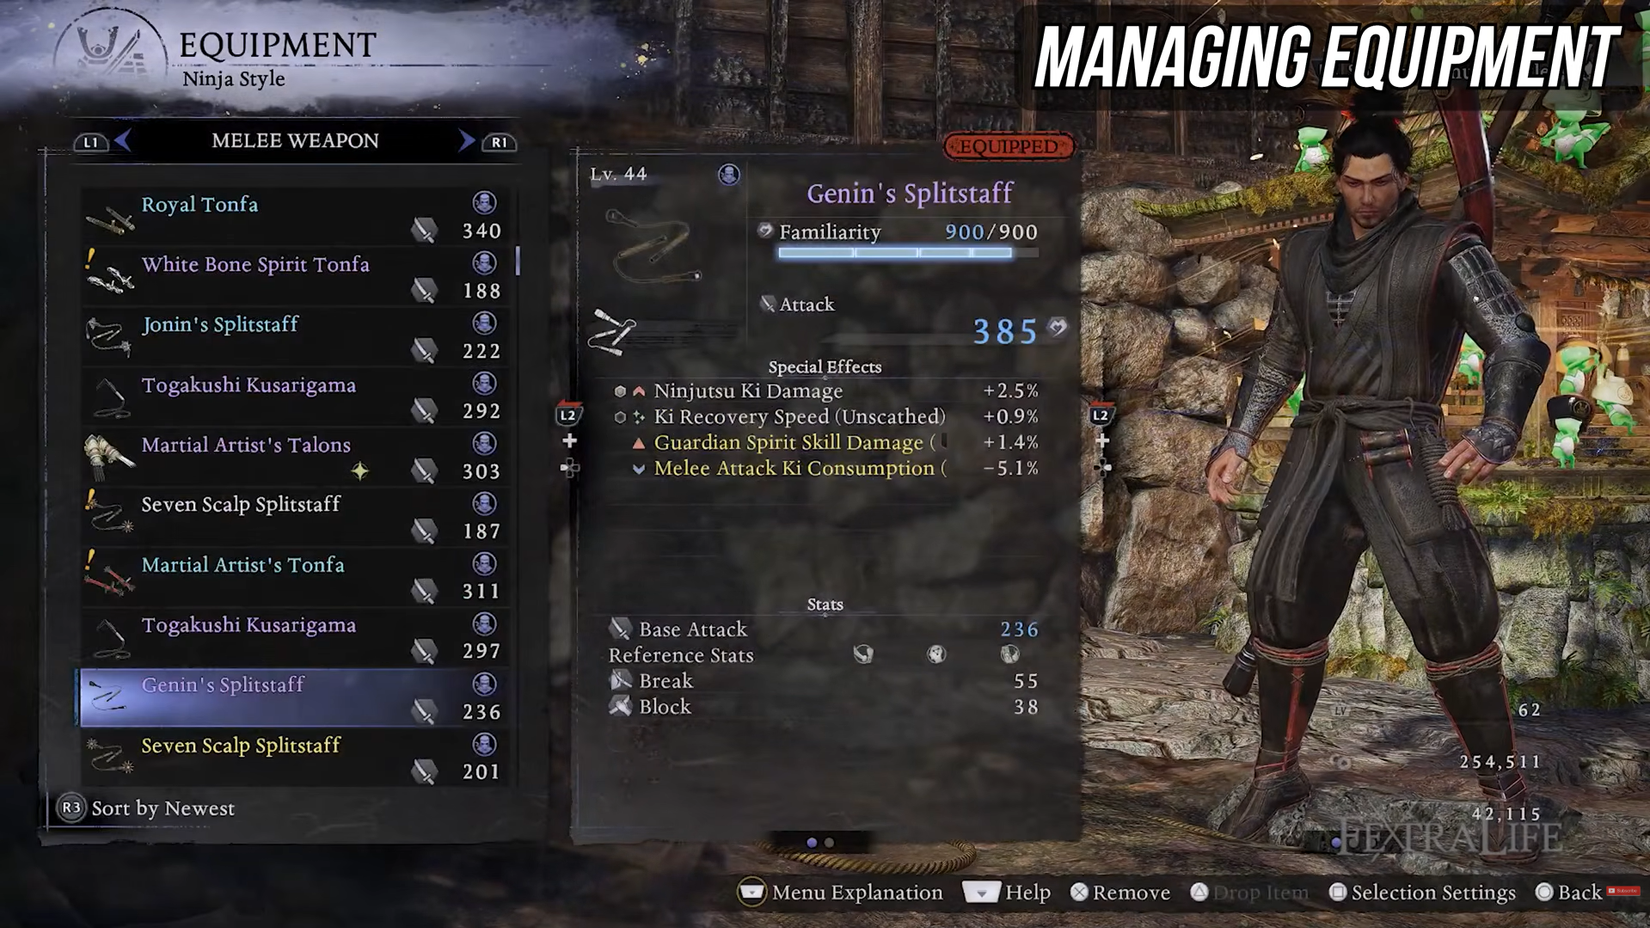
Samurai Weapons
Ninja Weapons
Ranged Weapons
Head/Torso/Arm/Leg/Foot Armor
Samurai Accent
Ninja Accent * Usable Gadgets
Spirit Guardian
Soul Cores
For the primary area, the Warring States, you’ll be positive utilizing the brand new Auto Equip perform from the tools menu as you get used to the opposite recreation mechanics.
This may auto equip the best Assault weapon of the identical kind you may have geared up, and your highest protection armor for a selected Agility. Agility determines your Ki Consumption when attacking and dodging, so getting a minimum of C is a should.

When you get to the top of Warring States or the following period, then it is best to actually begin on the lookout for units or stats on items of armor or gear which accommodate your construct.
Every bit of kit you get will are available both White, Yellow, Blue, or Purple, which denote Widespread, Unusual, Uncommon, and Epic respectively. With greater rarity tools, you’ll get each higher stats in your tools, and extra stats.
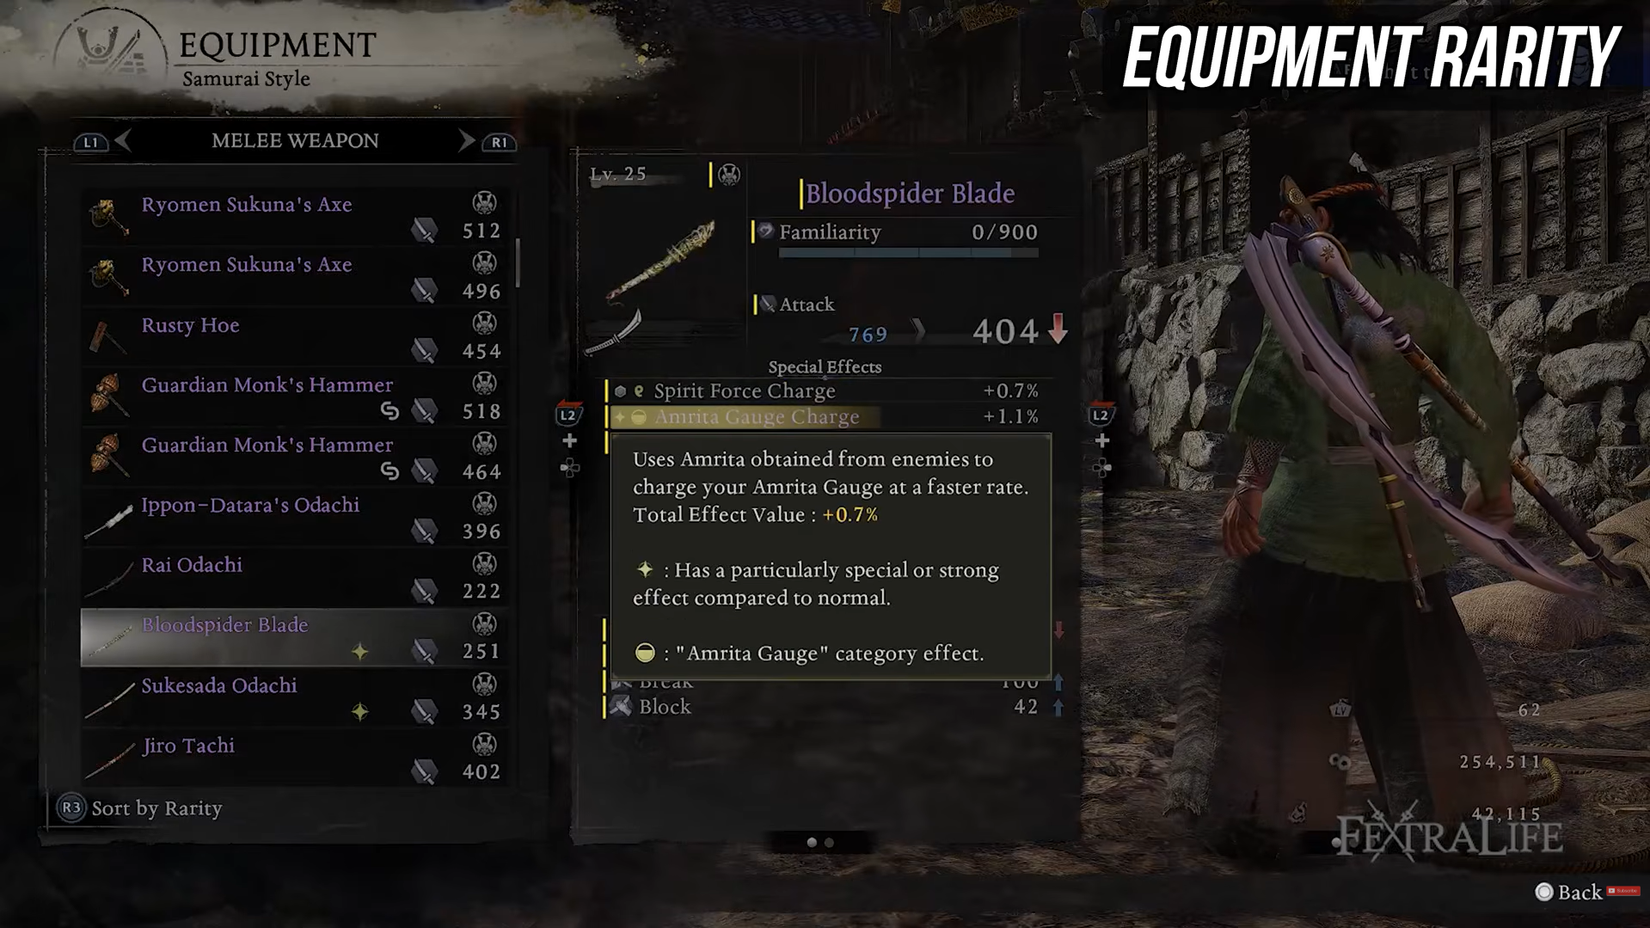
Maintain a glance out for any Epic tools with a star on it, as meaning it is going to have an particularly enhanced random stat, and in addition look out for + worth weapons, which we’ll go over later.
Good armor stats to look out for that usually work for any construct are +Life, Something Ki Associated, Life Restoration from Amrita, Spirit Talent Buffs, and Base Protection.
For weapons, Base Assault, any elemental imbuement, and most +Harm buffs.
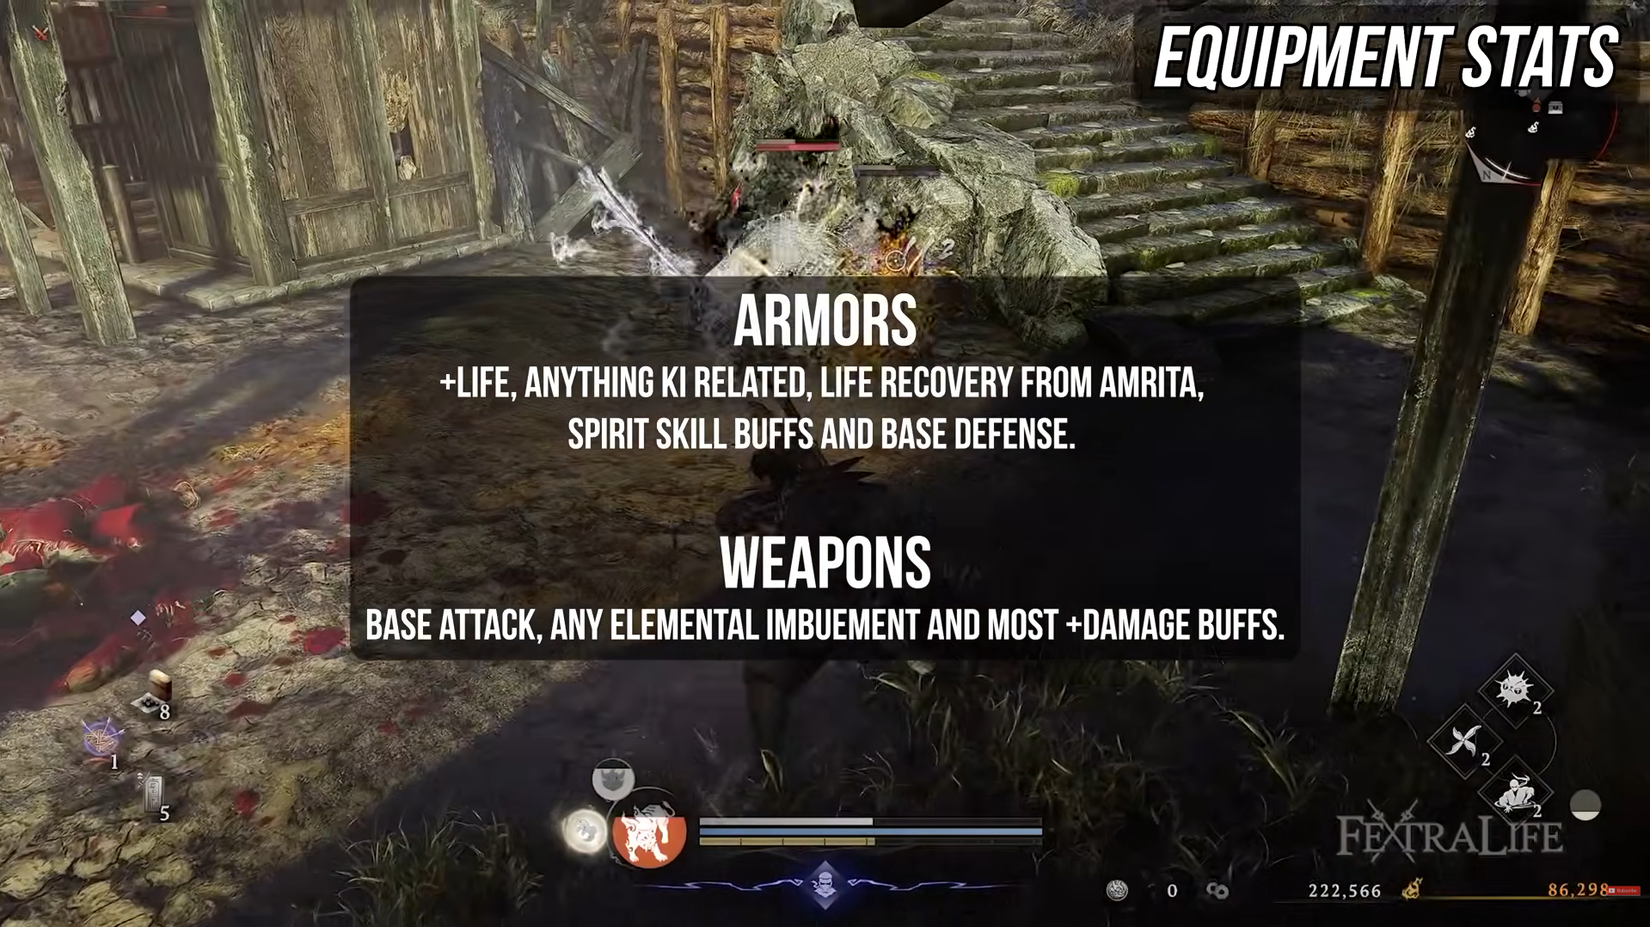
The imbuements make an enormous distinction, so ensure you hold your imbuement drops. Afterward, you’ll wish to construct round particular Imbuements by pairing them with the pure factor of your chosen weapon (Discovered within the Martial Arts Tree), and get bonuses centered round these parts.
When it comes to equipment, for completionists attempt to get the Prayer Beads for an Amrita sensor which exhibits all close by Amrita on the minimap when exploring.
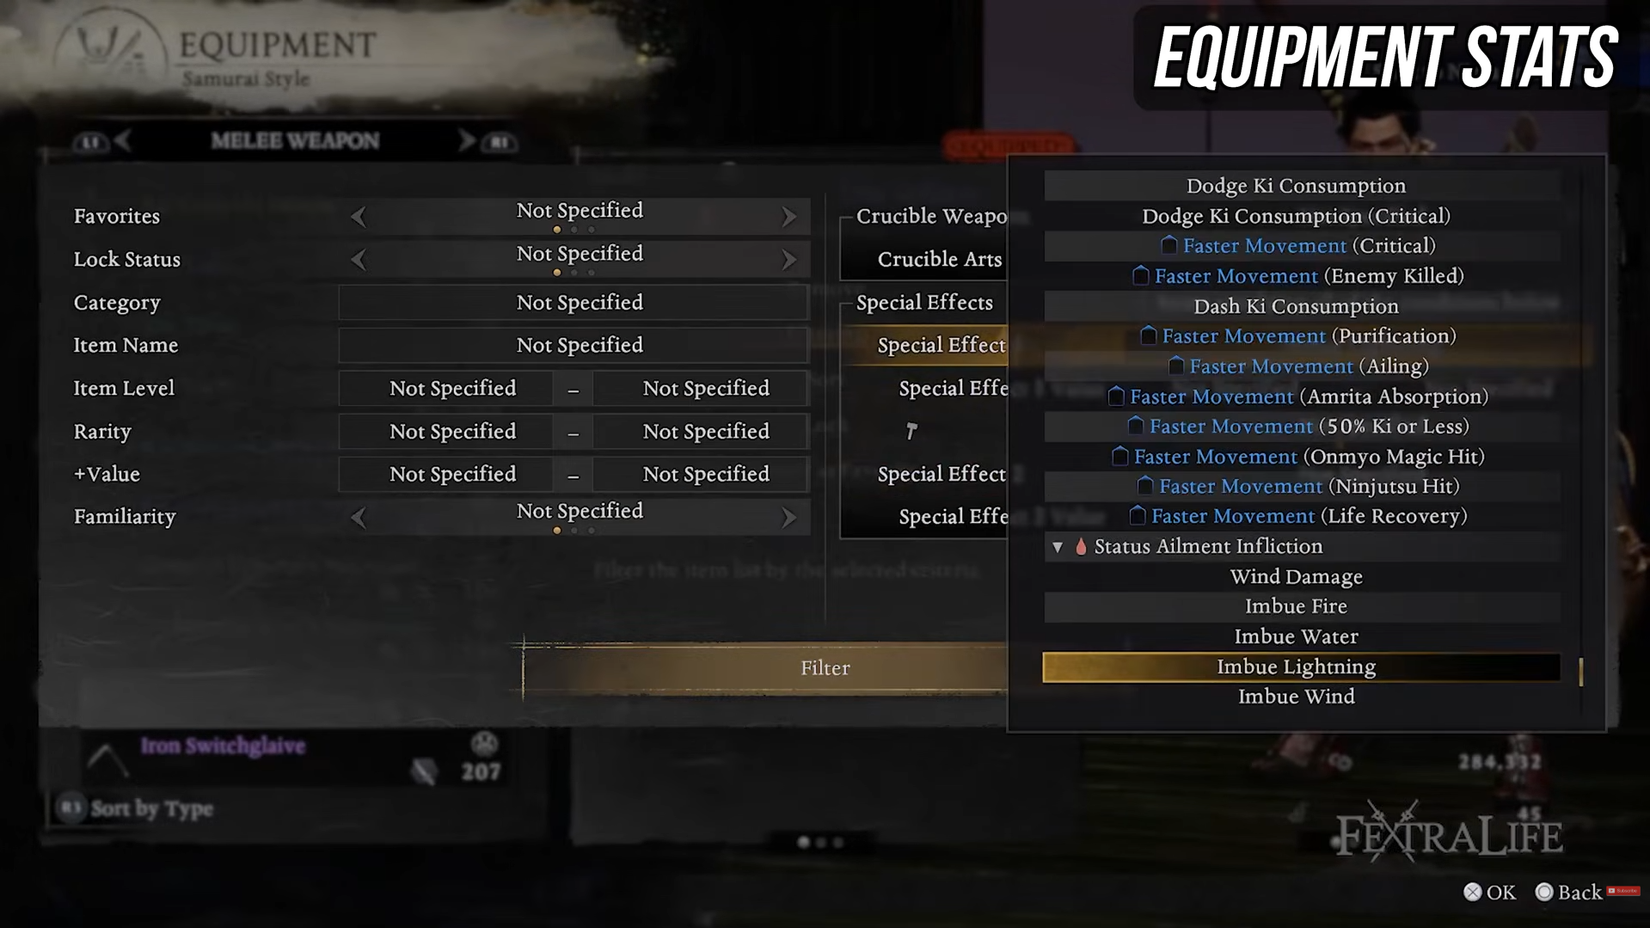
For the remainder of the stats, until they’re particularly focused to your playstyle preferences, attempt to keep away from overly particular stats comparable to “Life restoration on soul core gained”, since you will not get a variety of worth from them. In case you discover an adjunct that rolled nice stats however is low degree, it could be value it to simply use it since Stage primarily impacts Protection, and equipment do not present a lot of it.
Subsequent on tools, let’s go over the Blacksmith, and the way you ought to be using them.
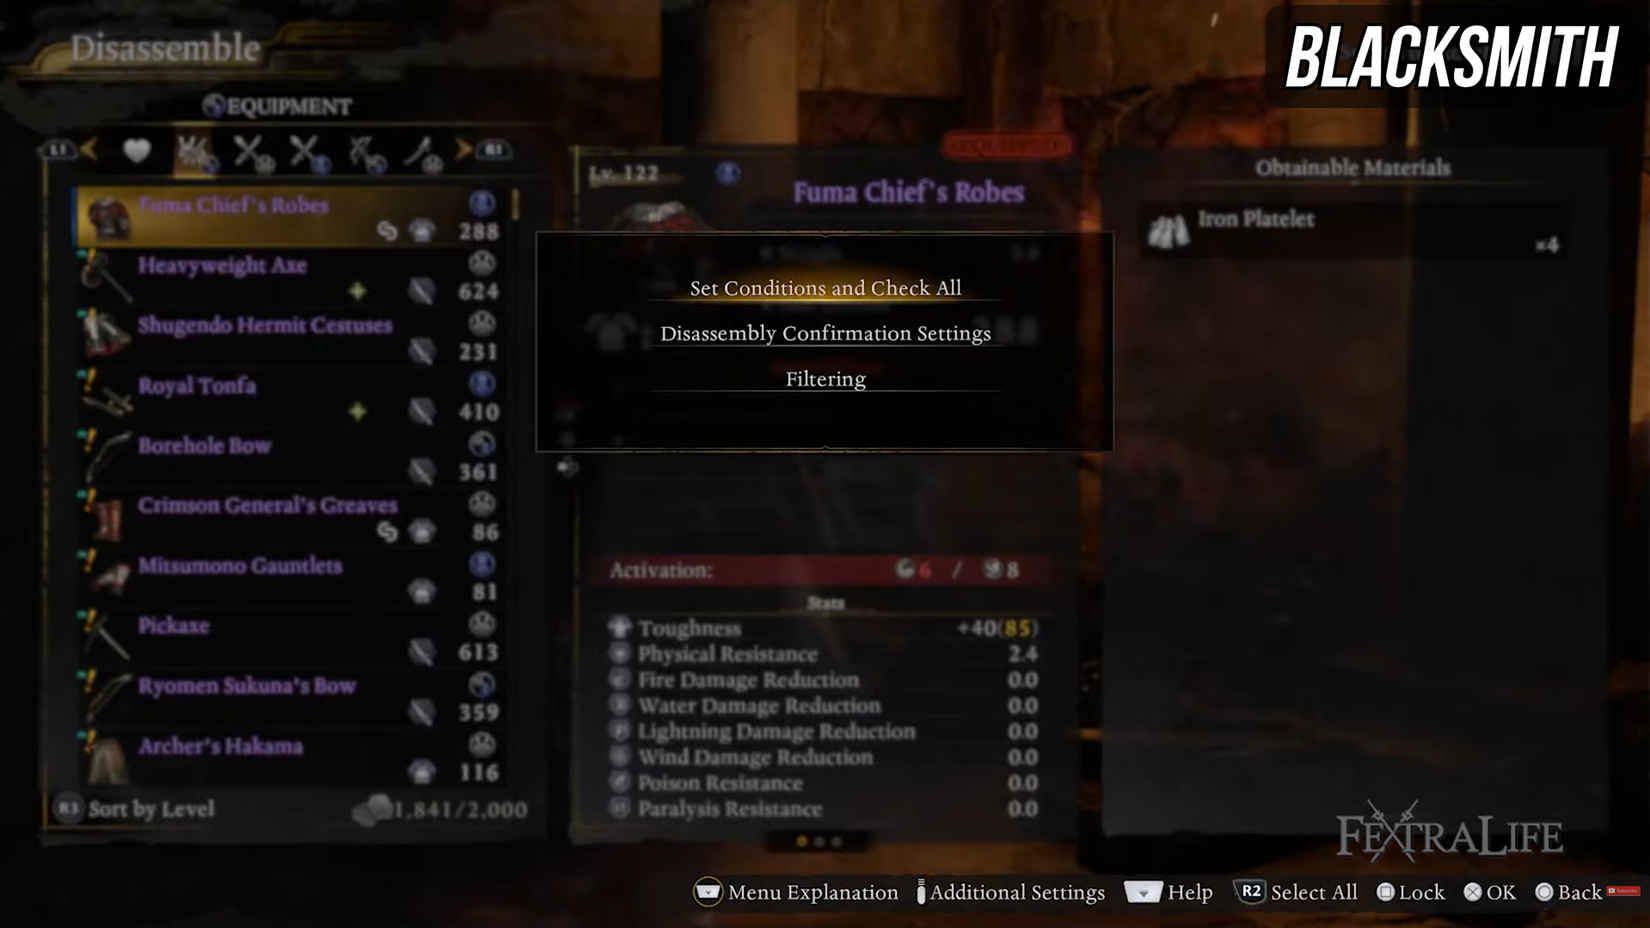
There’s a set stock house restrict of 2000 earlier than gadgets begin disappearing or going to the Storehouse, so you’ll have to both promote your tools at a Sudama, provide it on the shrine, or dismantle it on the blacksmith.
Dismantling is normally your best option so you may get crafting supplies to forge your individual gear afterward. As for what it is best to dismantle, something 30 ranges decrease than you that is not epic or a part of a set might be safely thought-about trash.
You’ll should undergo your stock and lock a minimum of 1 piece of each set with this logic nevertheless, since there’s no filter to exclude set items as of the primary patch.
There’s one other Dismantle possibility for gear referred to as Soul Extraction, which supplies you Yellow or Azure Soul Cores relying on when you dismantle Regular Gear, or + worth gear. These are the supplies used for Soul Matching.
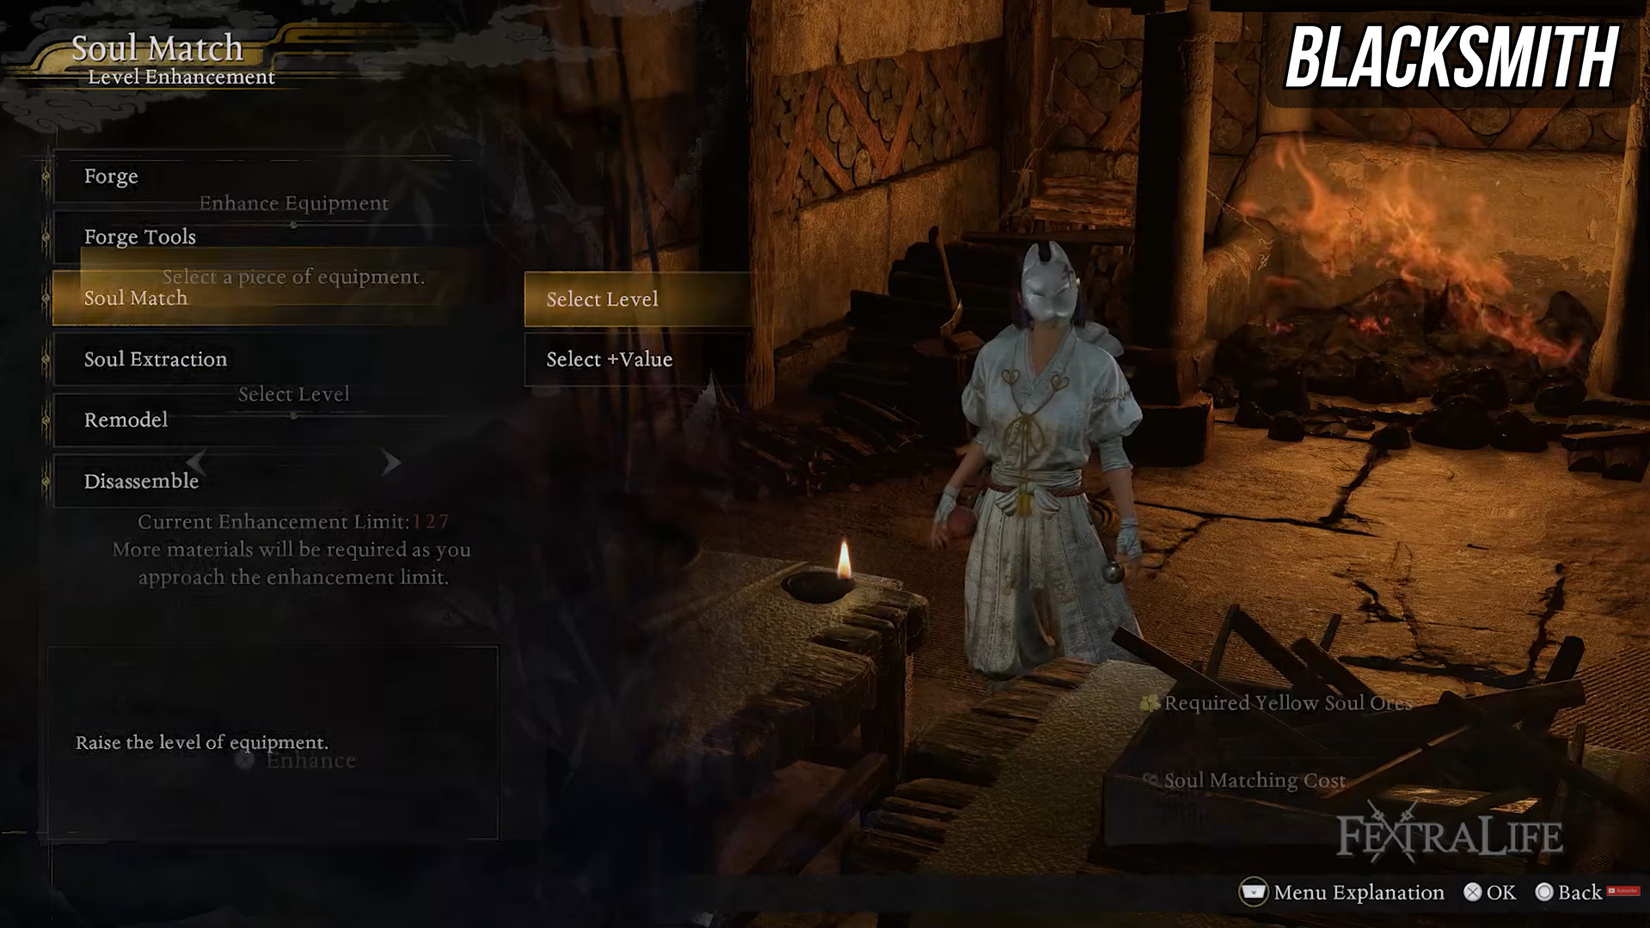
“Choose Stage” in Soul Matching is just the method of accelerating the extent of drugs; when you have one thing you want nevertheless it’s underleveled, you possibly can carry it again up utilizing this method.
“Choose +Worth” in Soul matching can be utilized to show any Epic tools into +worth tools, or degree any +worth tools to a better +worth. Larger +values will give large bonuses to Assault or Protection, which may offset a degree distinction simply.
There’s one extra profit to +worth tools, which is the Transforming system. Transforming lets you change the Reference Stats of any +worth merchandise, making builds utterly versatile.
So to take that instance from earlier of a Spear + Splitstaff, these two weapons have 0 widespread reference stats. However by transforming one, you possibly can match all 3 stats for the weapons to get good scaling.
Turning weapons into +worth weapons is ridiculously costly, requiring you to dismantle tons of +worth tools, so ensure you save your +worth tools and do not usually dismantle them.
When you get far sufficient into the sport, and within the endgame, it is best to start thinking about whether or not you wish to +worth some tools and min-max the reference stats.
Some extra miscellaneous tips about Gear:
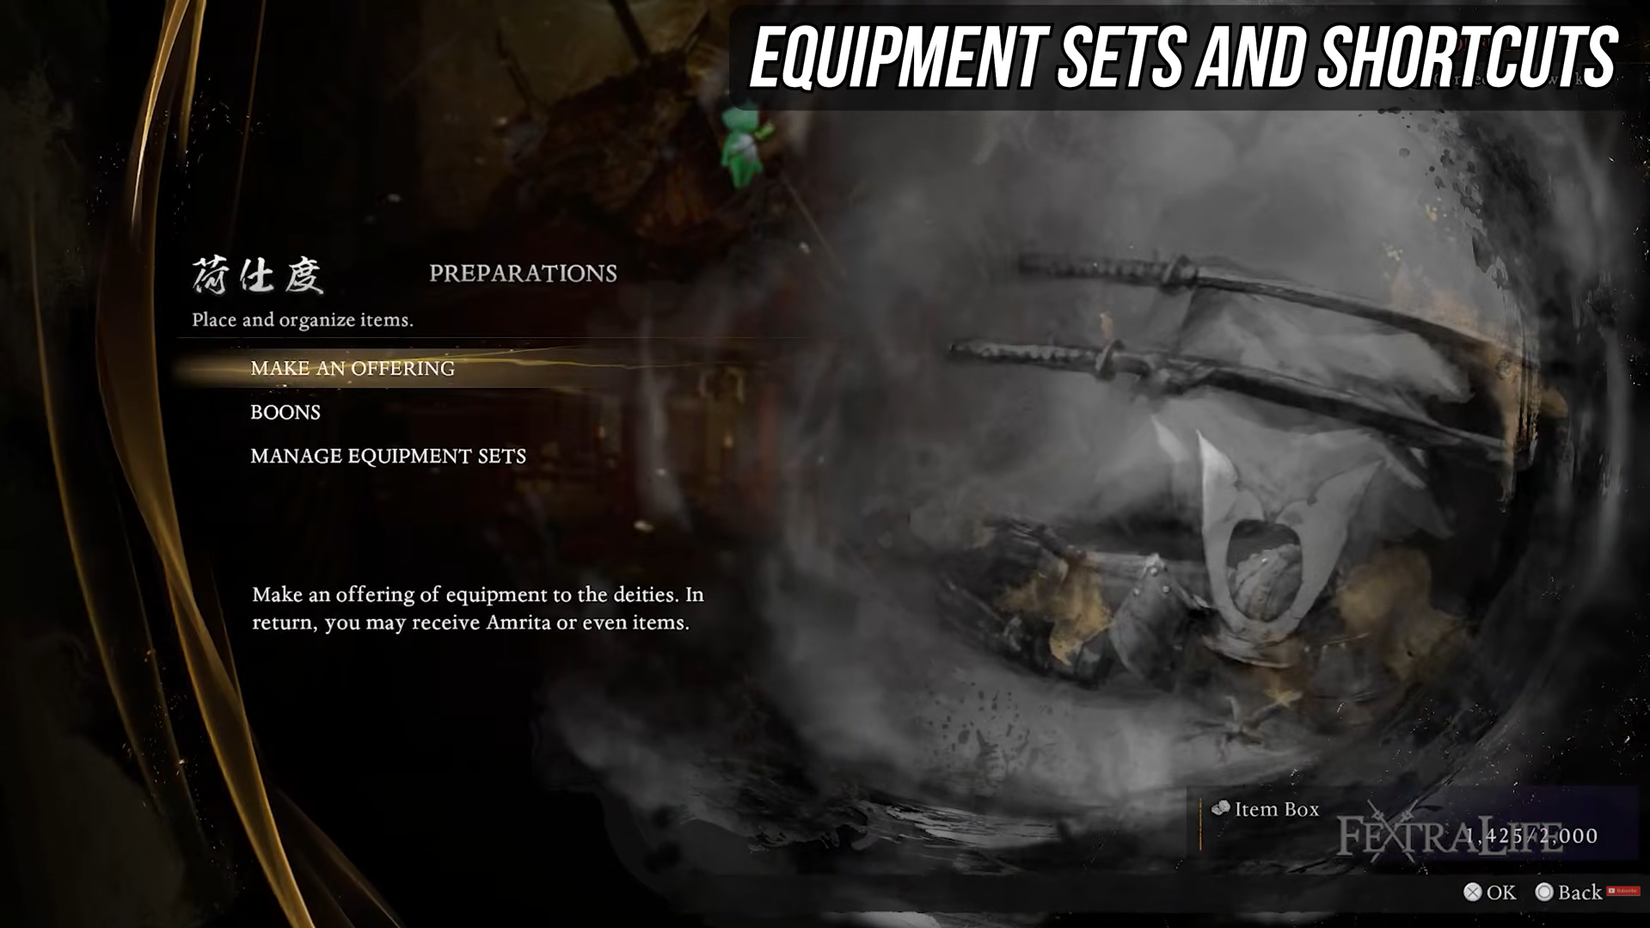
You can too set complete tools units by way of the Shrine beneath Preparations to make and play utterly totally different playstyles on the whim, since each development system within the recreation is resettable for redistributing factors.
You must also allow Auto-Pickup within the settings menu to keep away from getting Arthritis, and add extra shortcuts within the settings menu for these of you who really use consumables, or plan to make use of Onmyo Magic in your playthrough.
Expertise
A model new system you’ll be utilizing in Nioh 3 is the Expertise system, which is a very separate system from the Martial Arts Tree that you just entry from any Shrine.Expertise are bonus passives which you unlock from Secret Expertise Texts discovered once you loot corpses or chests.
There are 3 classes for abilities: Widespread Expertise, Samurai Expertise, and Ninja Expertise. As you possibly can in all probability guess, Samurai and Ninja abilities are passives for these particular types, whereas Widespread abilities will provide you with extra common buffs and passives. Particularly highly effective abilities will likely be referred to as Mastery abilities, which you’ll solely equip 1 of.
Every class has a capability restrict and each ability can have a sure price, so you’ll be restricted in what number of you possibly can equip. Nonetheless, you’ll be capable of improve the capability for every class by discovering related Memorandums or Texts within the map.

You’ll solely be capable of equip a couple of good abilities for every class at any level within the recreation, so choosing and selecting between the perfect passives goes to be key all through your playthrough.
There are a couple of early recreation abilities which I might suggest you prioritize within the Warring States area:
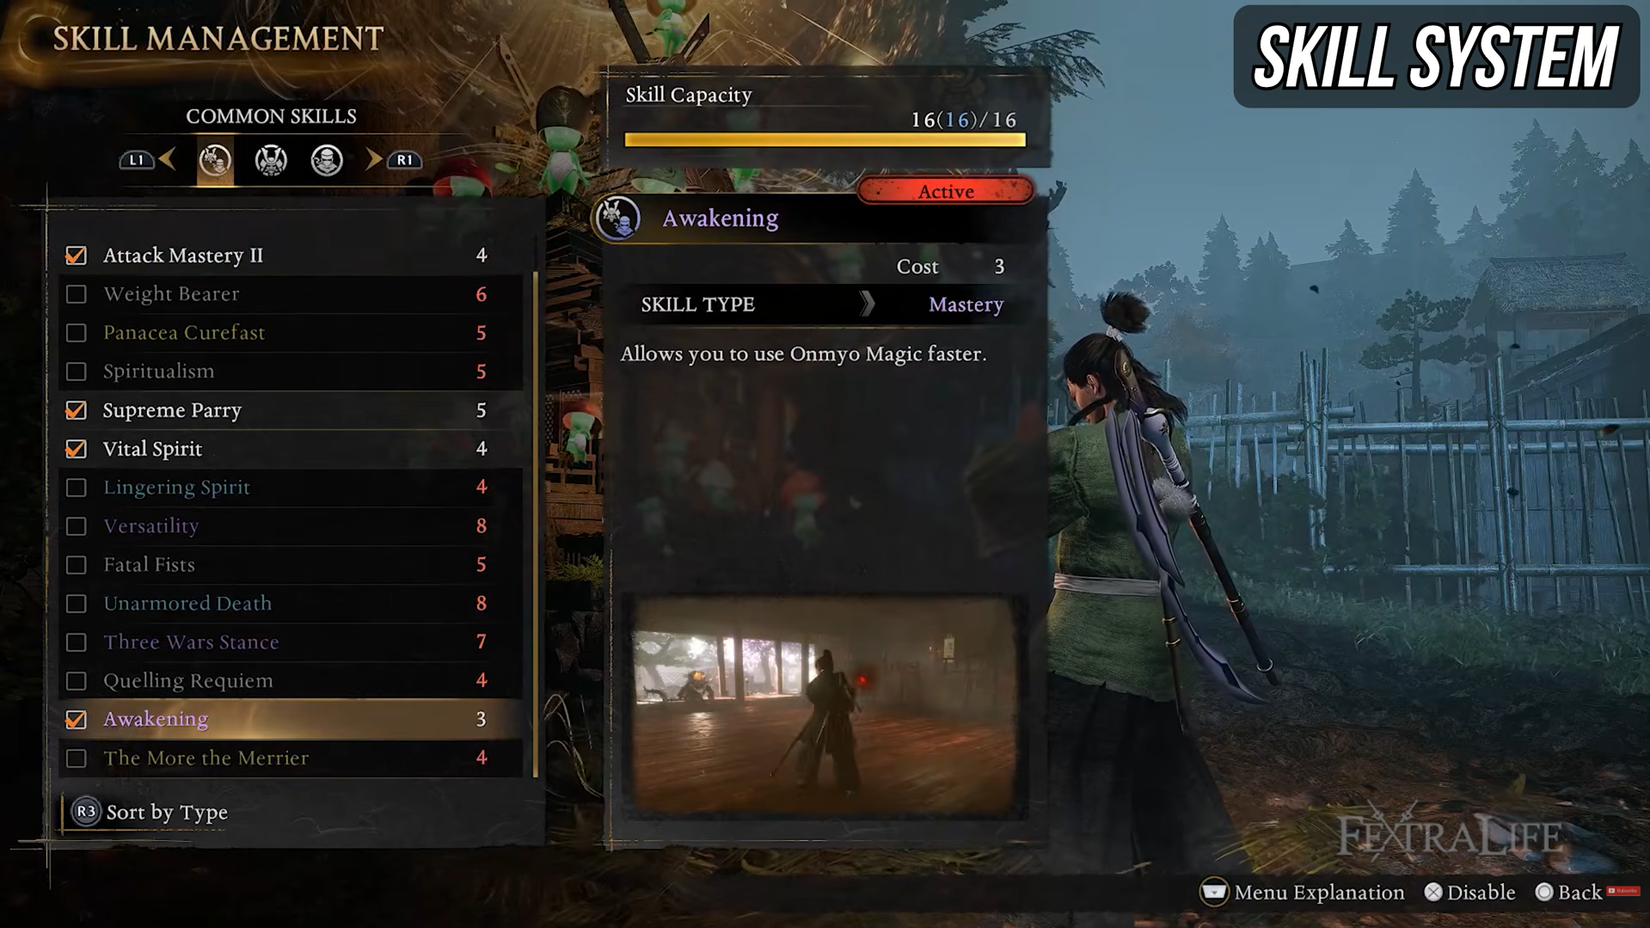
Awakening: A should have if you’re operating an Onmyo Magic construct. For under a price of three, you get to scale back your beginning animation for any Onmyo Magic by round a second, which is big for spellcasting.
You’ll unlock this when you full the “Manner of the Onmyo: Novice” battle scroll quest upon visiting the Everlasting Rift for the primary time.
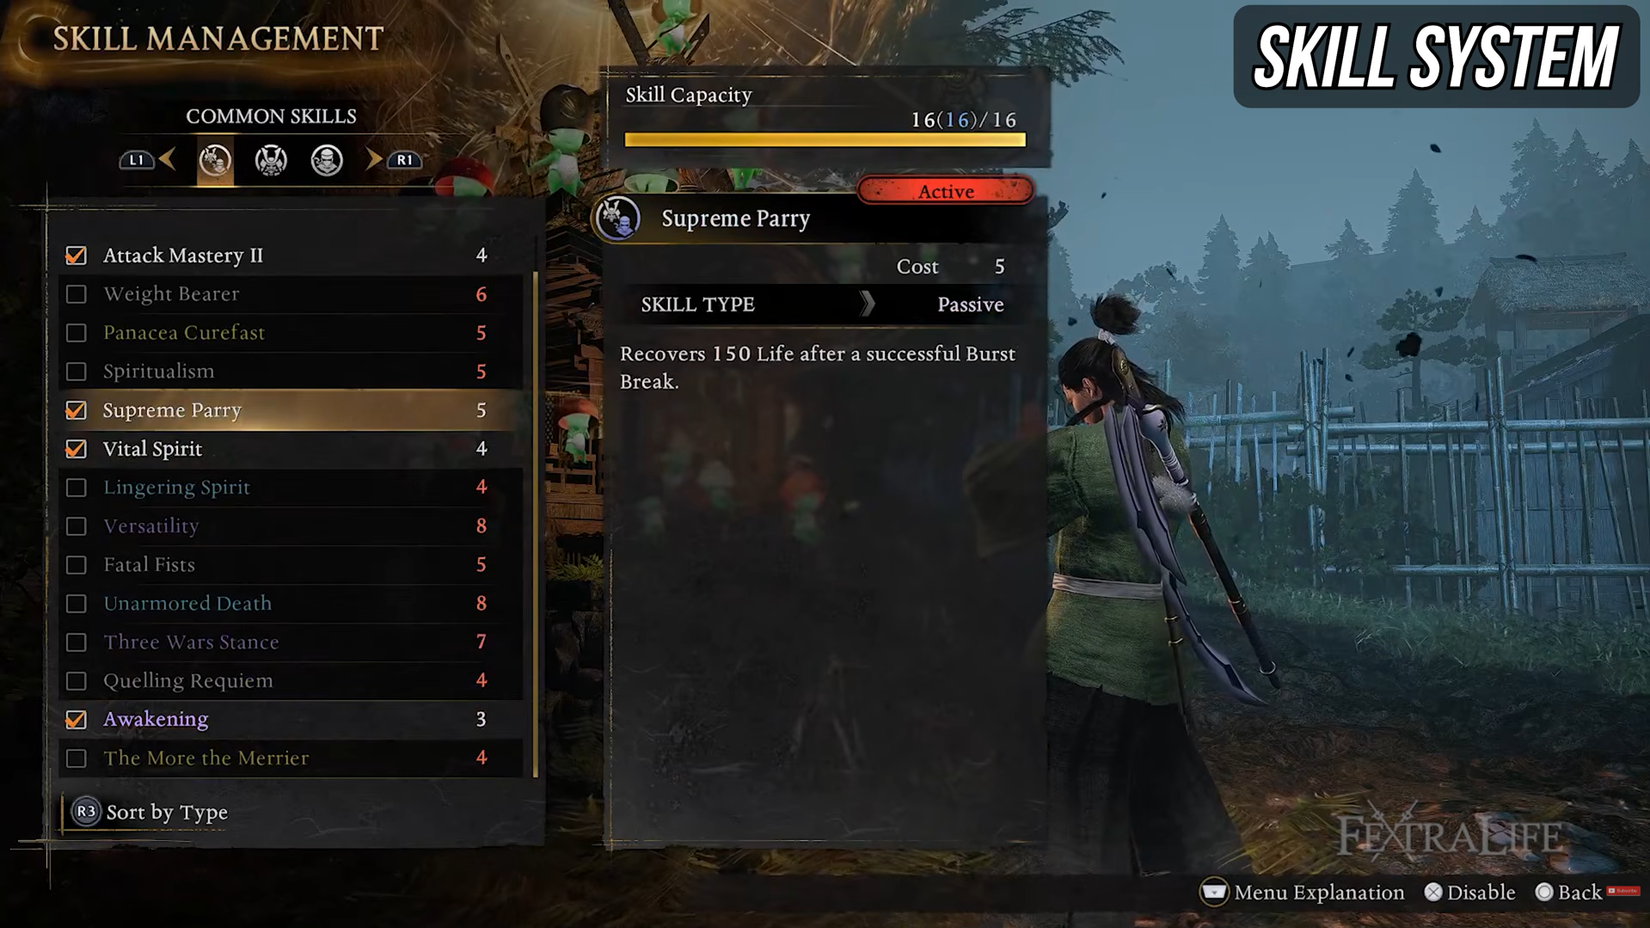
Supreme Parry: Recovers 150 Life after you carry out a Burst Break. This can be a stable ability, particularly within the early recreation the place you don’t have as a lot well being. At degree 50, this will likely be round 10% of your well being restored on a Burst Break, which may prime your healthbar off and prevent an elixir.
You’ll discover this close to the top of the Crucible within the middle of the Warring States, in a chest earlier than the ultimate Bodhisattva Statue.
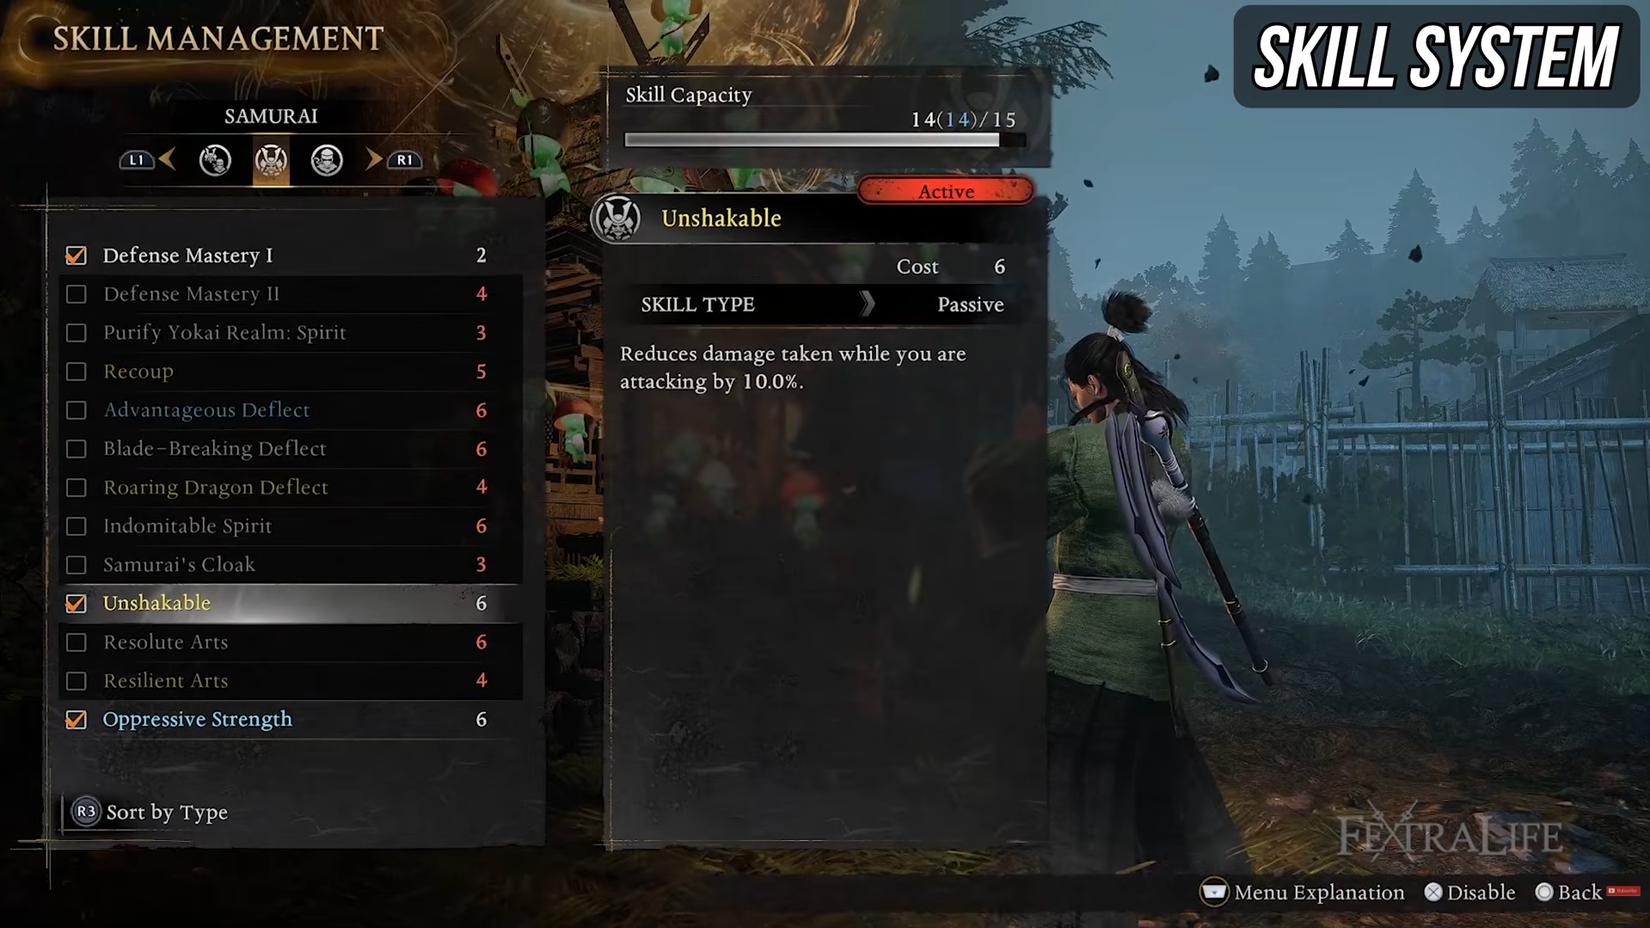
Unshakeable: Reduces harm taken by 10% whereas attacking. In my expertise, more often than not once you get hit by enemies, it’s normally when you’re mid-attack. Enemies may rise up from a stagger sooner than you count on, or have extra assaults in a combo string that you just don’t find out about.
A ten% harm discount from being caught off guard like that may be a nice ability to get some additional tankiness. You’ll find this at the beginning of the sport in Tenryu River on a corpse on the facet of the street close to the massive Yokai with a workers.
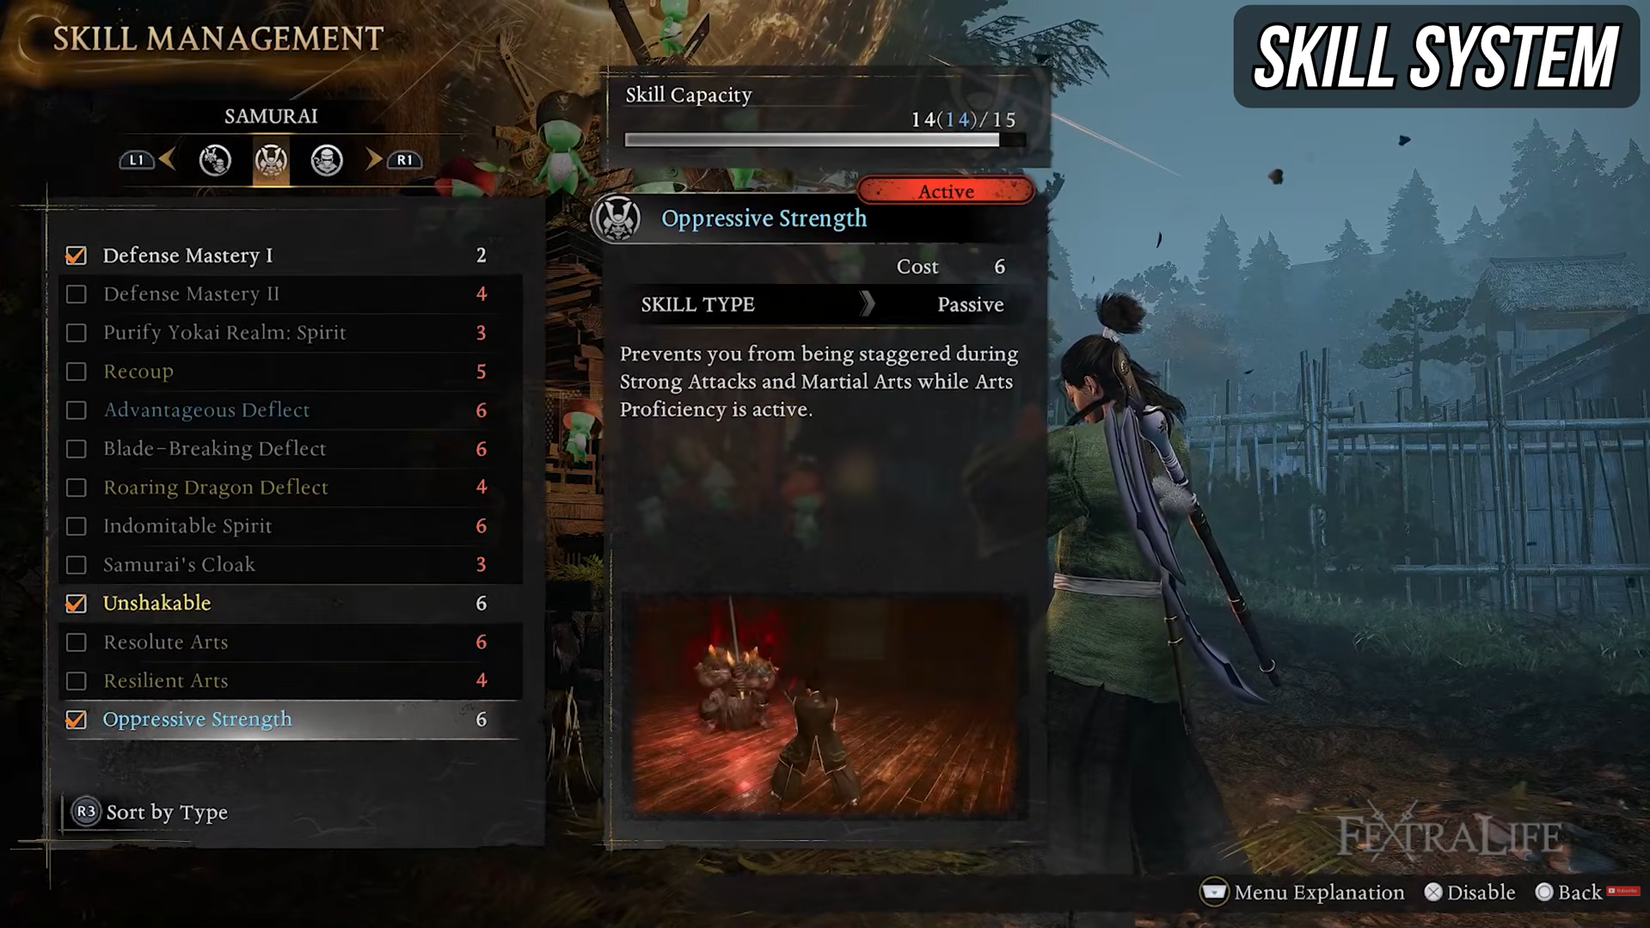
Oppressive Power: Prevents stagger whereas utilizing Robust Arts or Martial Arts whereas your Arts Proficiency is energetic. This ability is nice for circumstances the place you get hit by a small assault that utterly cancels your empowered assaults, and is particularly nice for Martial Artwork Infinites the place you maintain down a button so long as you want, because it lets you do some fairly tacky stuff.
You’ll discover this a bit of later within the Warring States at Iinoya, in a chest west of the Nice Ginkgo Strategy Shrine.
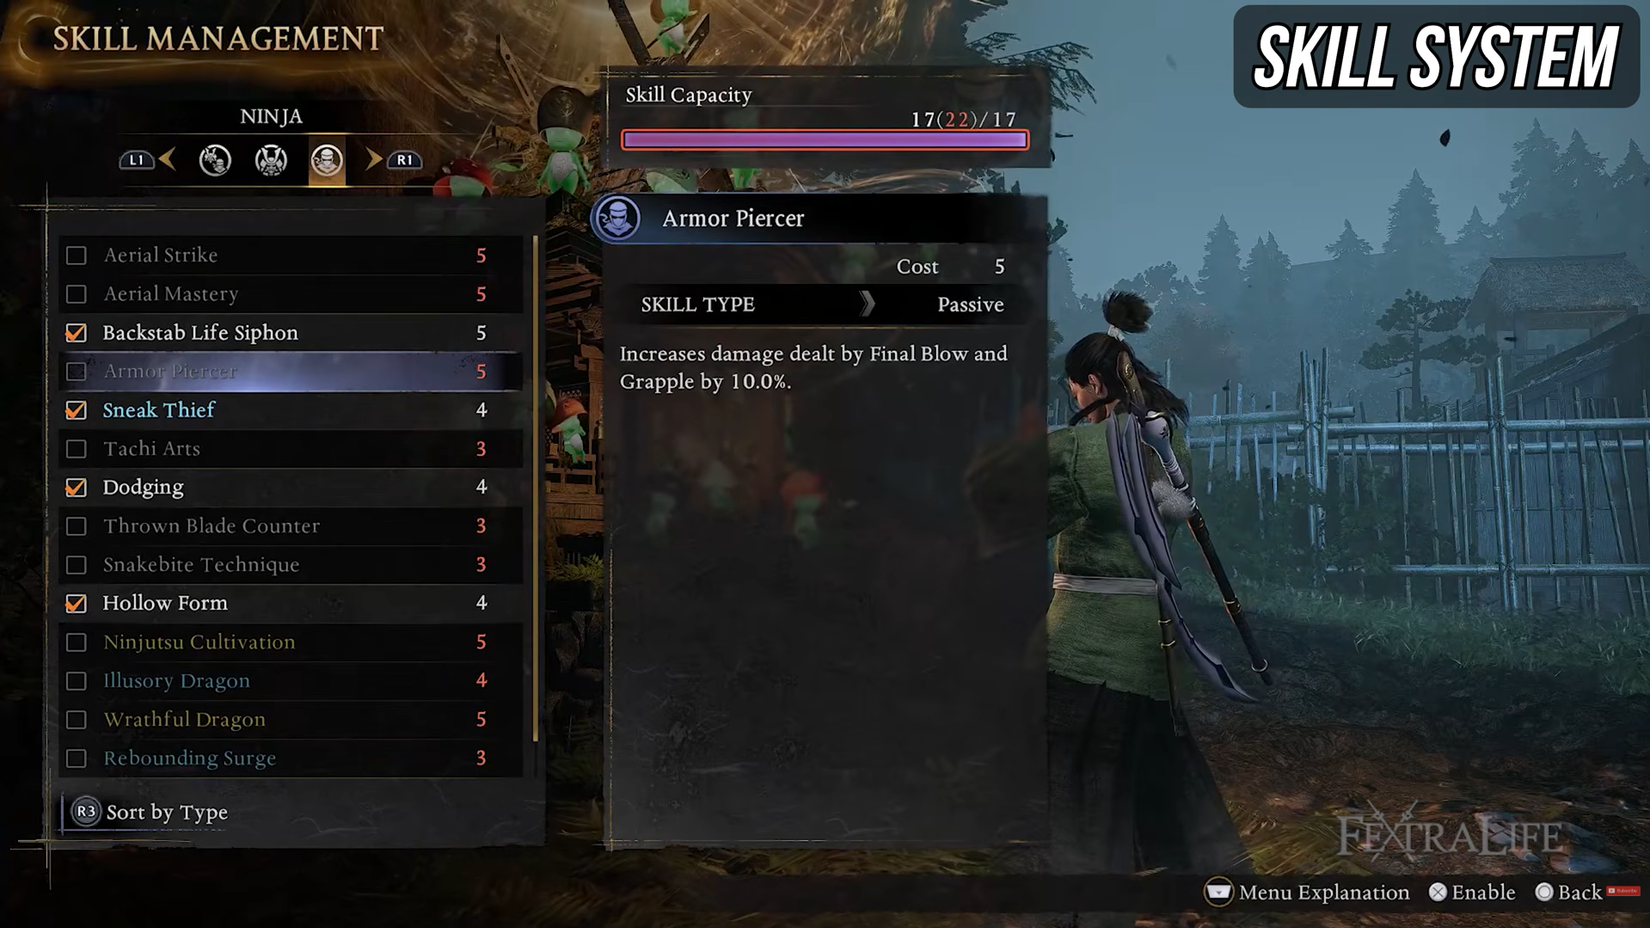
Armor Piercer: A Ninja Talent which will increase your Closing Blow/Grapple harm by 15%. Grapples will likely be your bread and butter of fight, so getting a pleasant 15% harm enhance to generally assure a kill or deal extra harm to a boss is a superb buff.
You may get it proper out of spawn in Tenryu River by killing a Yamainu within the southern village, then utilizing the Soiled Key it drops to unlock a hut with the chest containing the ability.
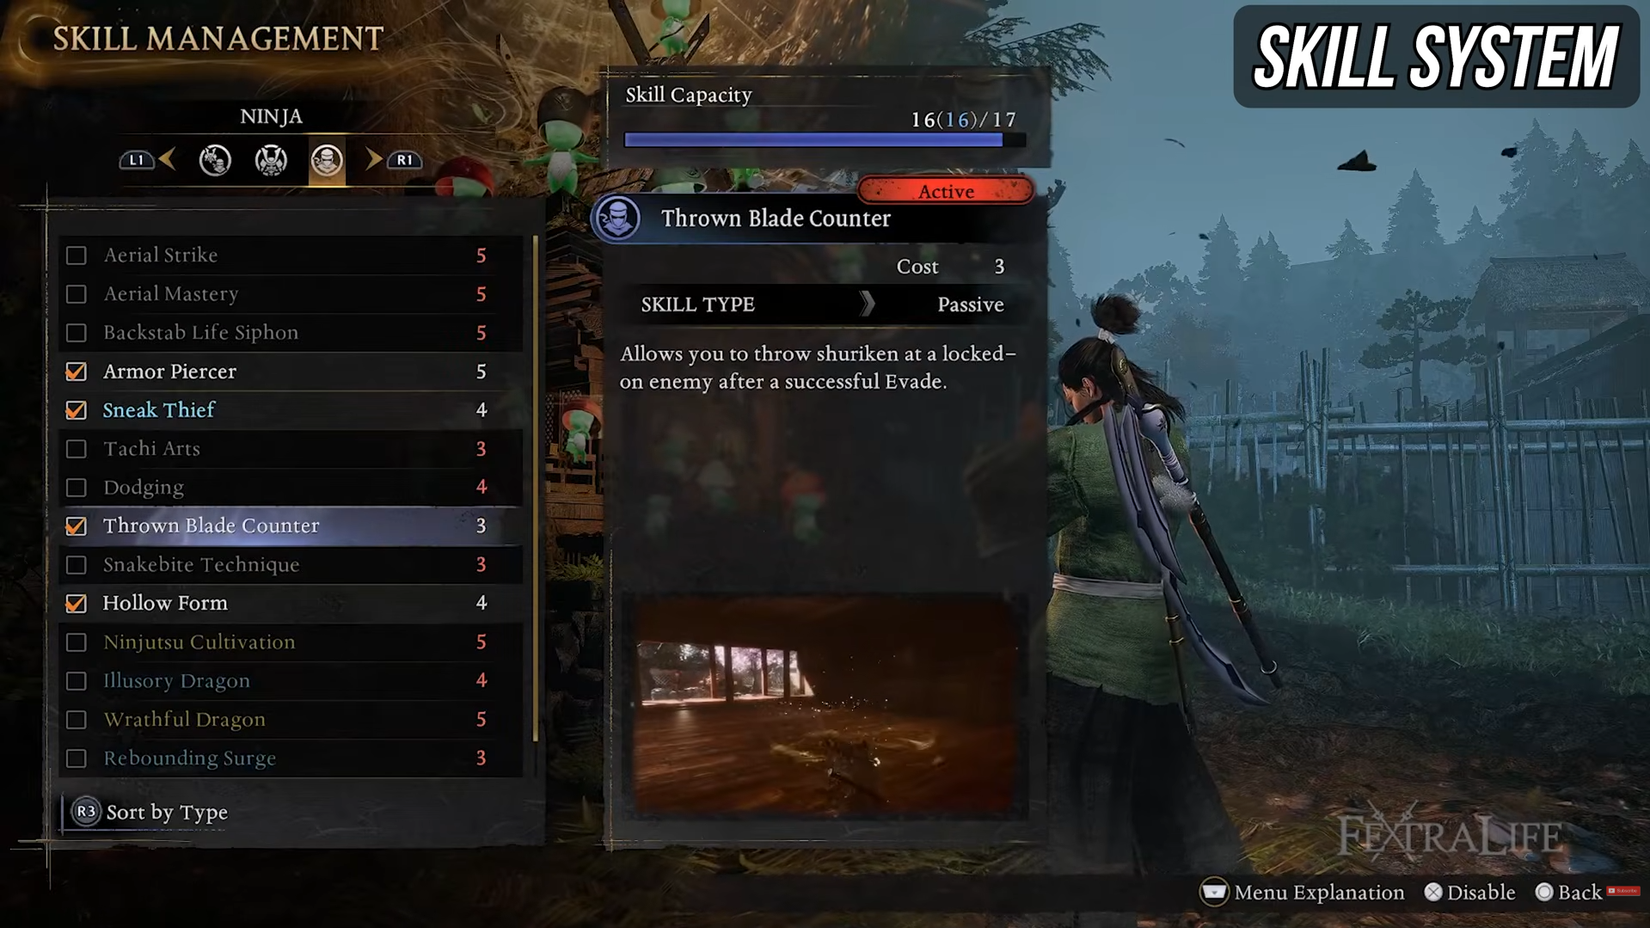
Thrown Blade Counter: A stable ability which throws a free shuriken at your locked-on enemy once you evade. This may generally stagger enemies, and it solely prices 3 to fit in, so it is only a stable choose.
You’ll discover this within the jap village of Hamamatsu, in a chest proper subsequent to the Lesser Crucible.
In case you’re desirous about discovering all of the Secret Expertise or Memorandums within the recreation simply, you possibly can try our interactive map
Onmyo Magic & Soul Cores
Transferring onto an integral a part of a Nioh title, we have now Onmyo Magic and Soul Cores.
Soul cores are gadgets often dropped by enemies which you’ll equip to unlock their summon or their associated Onmyo Magic. Each enemy within the recreation has an opportunity to drop an unpurified soul core, which you need to purify by praying at a shrine. In case you don’t purify it and die, you’ll lose the Soul Core.
Within the Onmyo Field menu on the shrine you’ll have 2 positions: The Yang place and the Yin place.
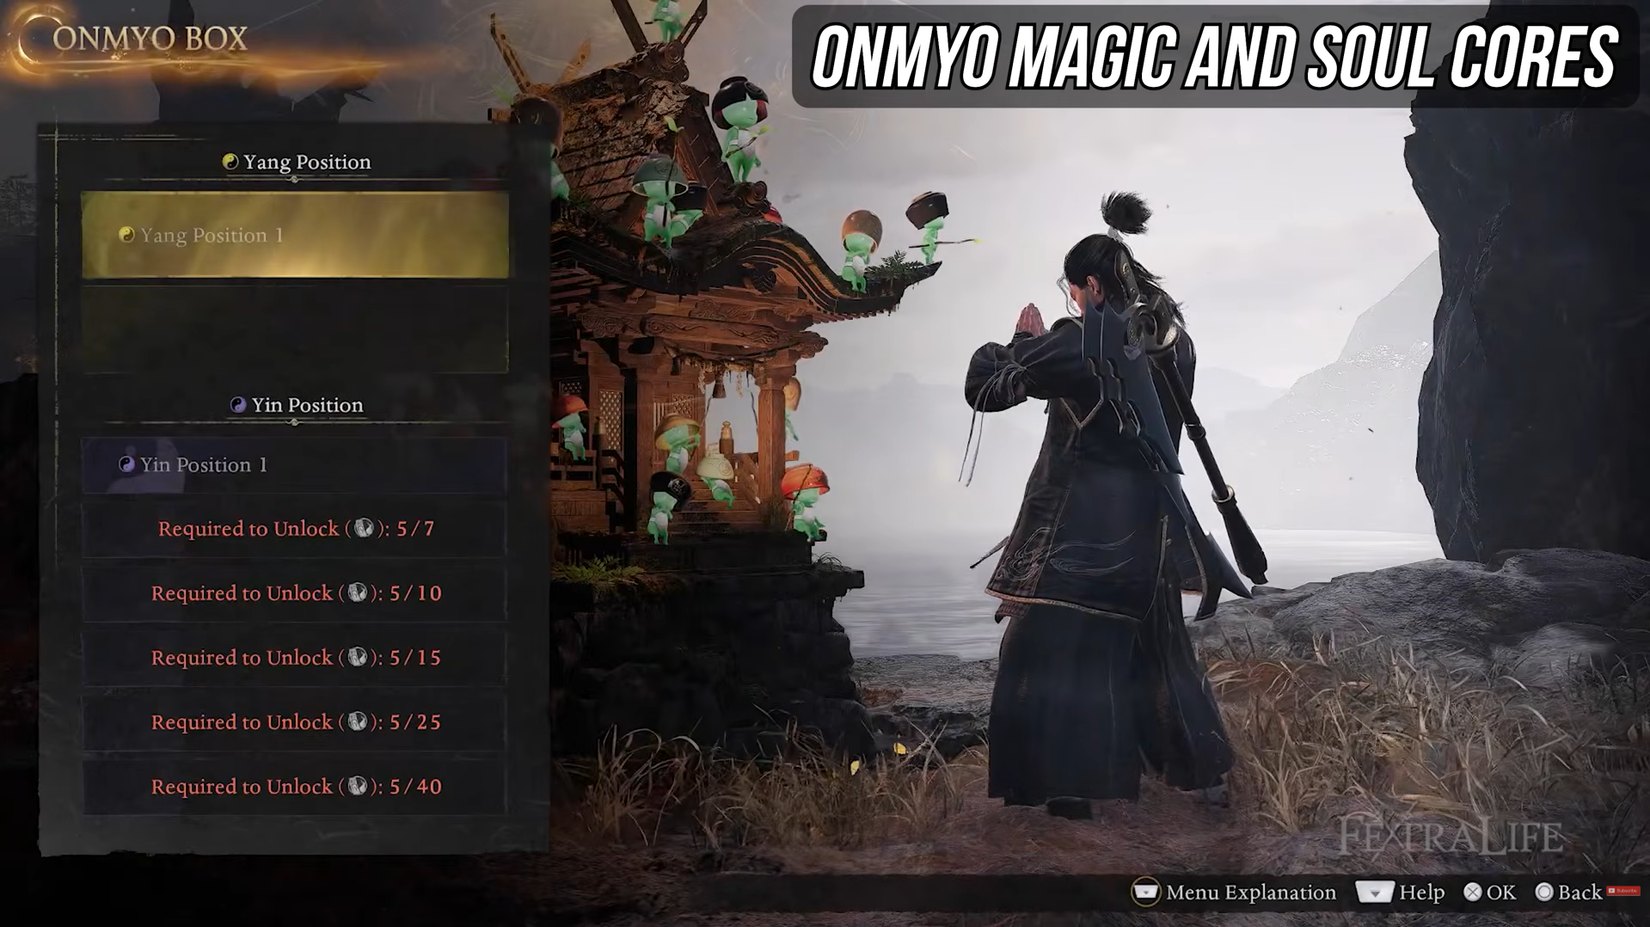
Equipping a soul core within the Yang place will unlock that soul core’s summoning merchandise, so that you’ll be capable of summon a yokai to throw some assaults then disappear.
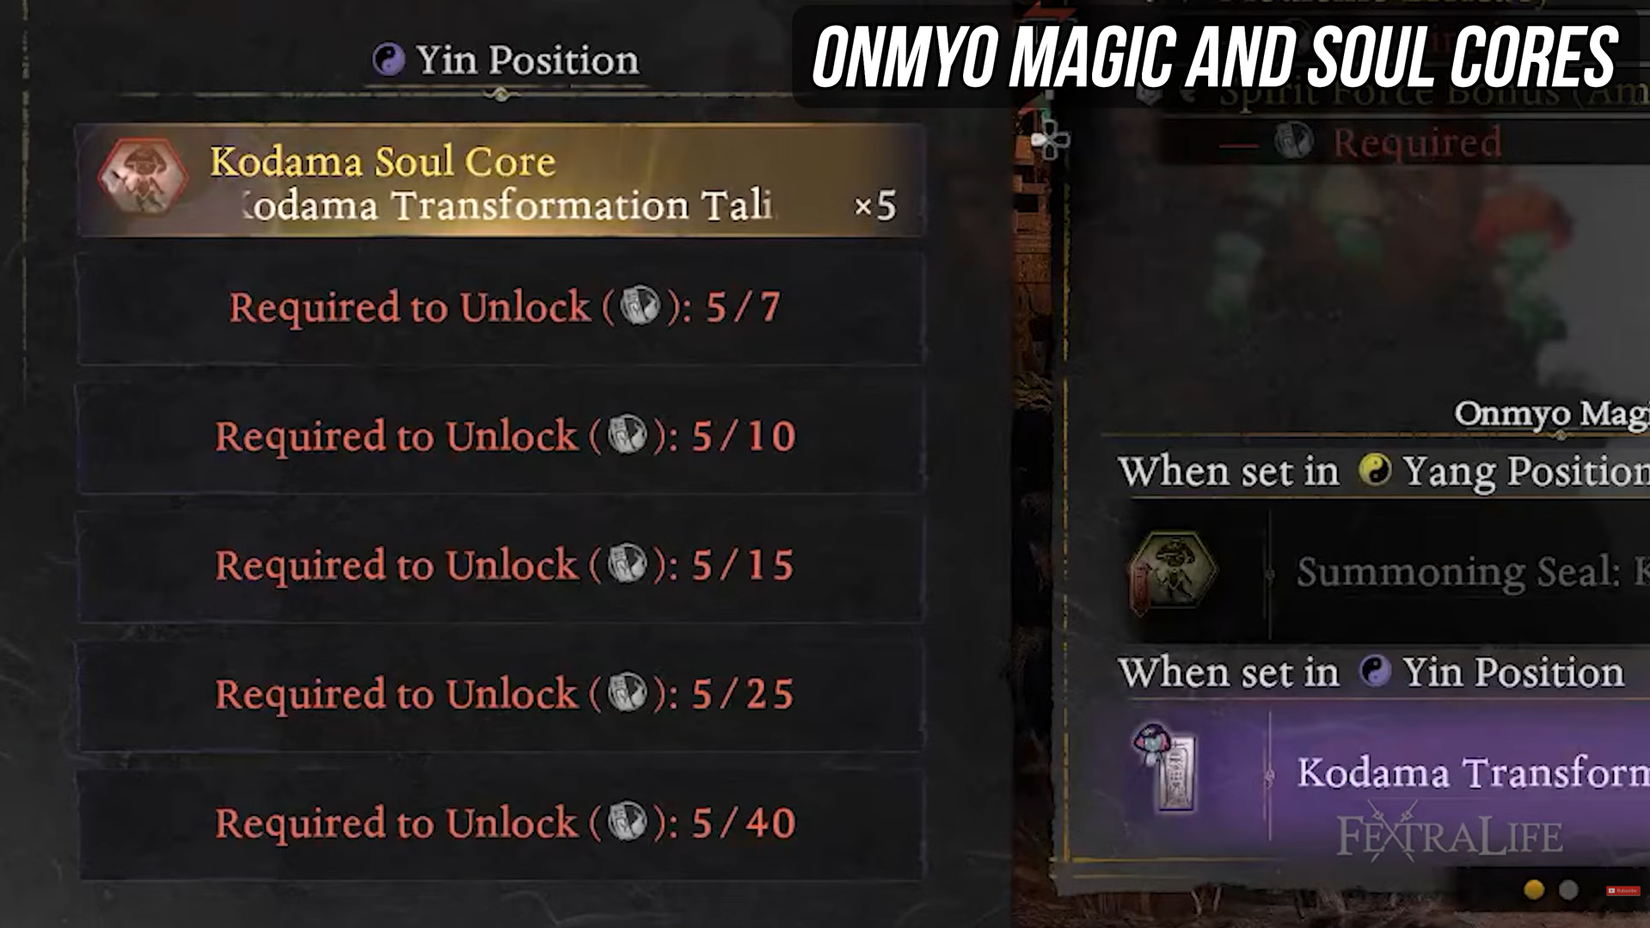
Soul cores within the Yin place will grant you an Onmyo Magic merchandise, which is often a buff, debuff, or offensive spell. Summons and Onmyo Magic are absolutely replenished with no extra price once you relaxation at a shrine, so you possibly can be at liberty to spam these as a lot as you want.
Soul Cores set within the Yang Place may also provide you with some stats assuming you meet a minimal quantity of Magic; for instance, the Kamaitachi soul core offers + Wind Harm when you set it within the Yang place with a minimum of 11 magic, and reduces Ki Dodge Consumption when you have a minimum of 15 magic.
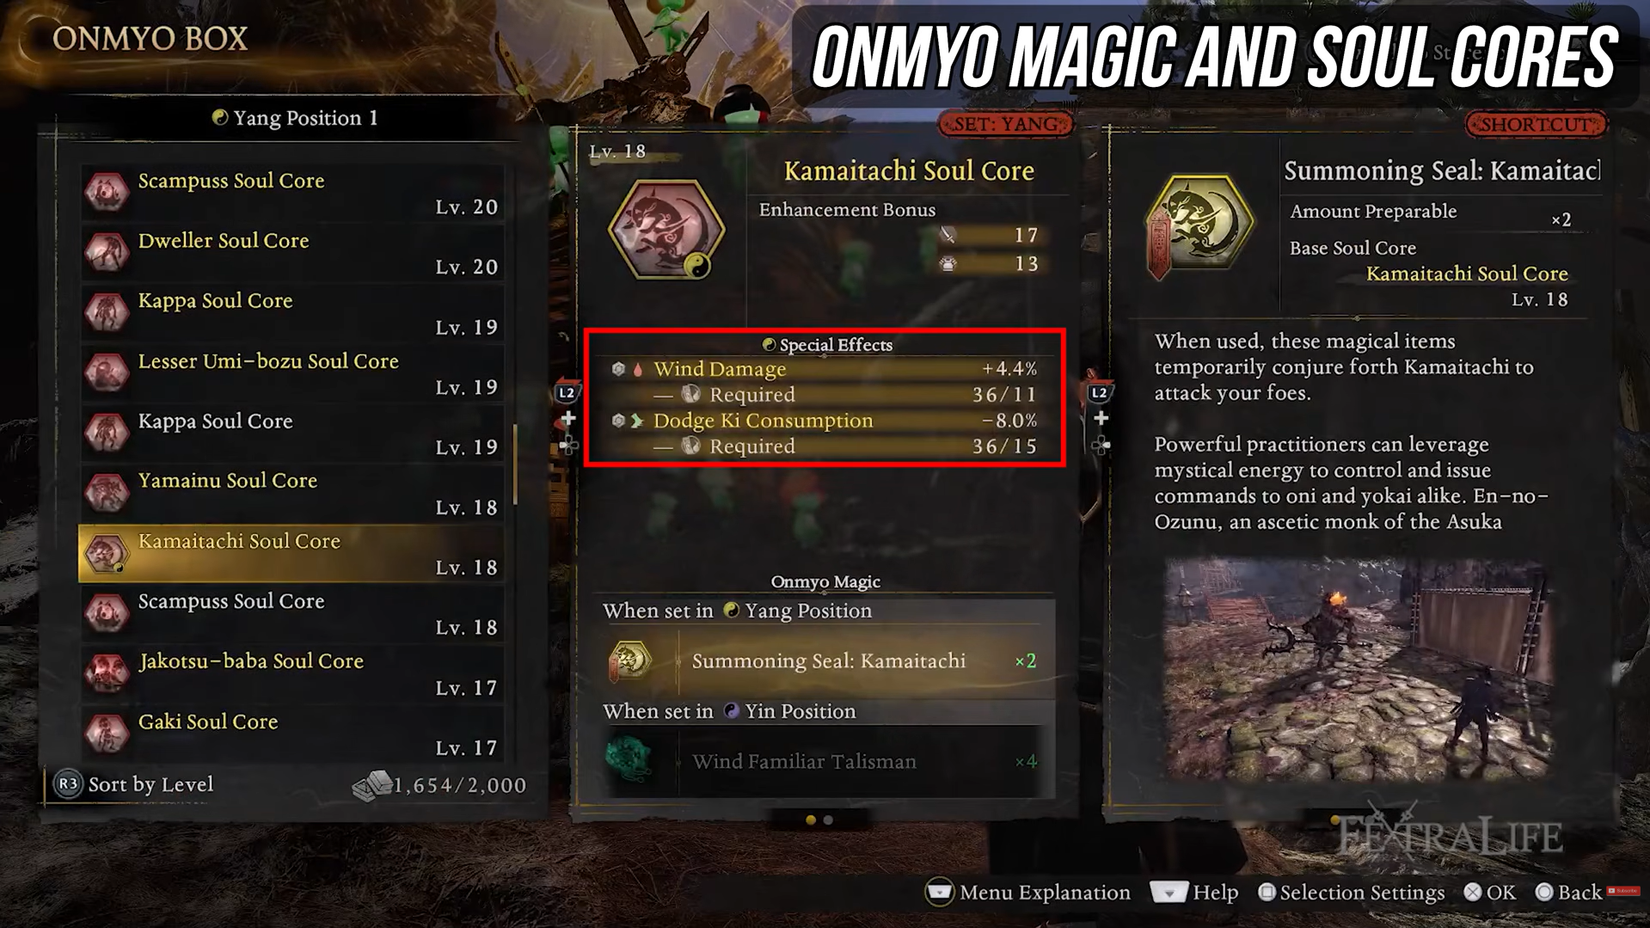
Yang soul cores may also grant you a set quantity of Assault and Protection relying on the extent of the core, so be aware that your low degree cores will finally should be phased out, or upgraded to a better degree.
You’ll later be capable of improve your soul cores by performing Resting Rites to “dismantle” your unneeded soul cores, then improve those you wish to use, so hold your favourite soul cores even when they get outphased by greater degree ones.
For these of you on the lookout for a Magic construct, leveling up magic will unlock extra Yin Positions and get you extra slots for Onmyo Magic. You’ll should get a set quantity of Magic to unlock every slot; these thresholds are 7, 10, 15, 25, and 40 magic every.
In case you’re not going for an Onmyo Construct, I might suggest solely placing factors into magic when you actually need some particular stats for a soul core or are min-maxing; in any other case simply placed on a powerful Yang Soul Core that you just wish to summon and depart it at that.
For the Yin place, when you have some Mind in your construct, you’ll get bonus impact time in your Onmyo magic, so you possibly can go for impact talismans that debuff your enemies or buff your self.
There are a couple of Soul Cores which I like to recommend searching for within the early recreation:
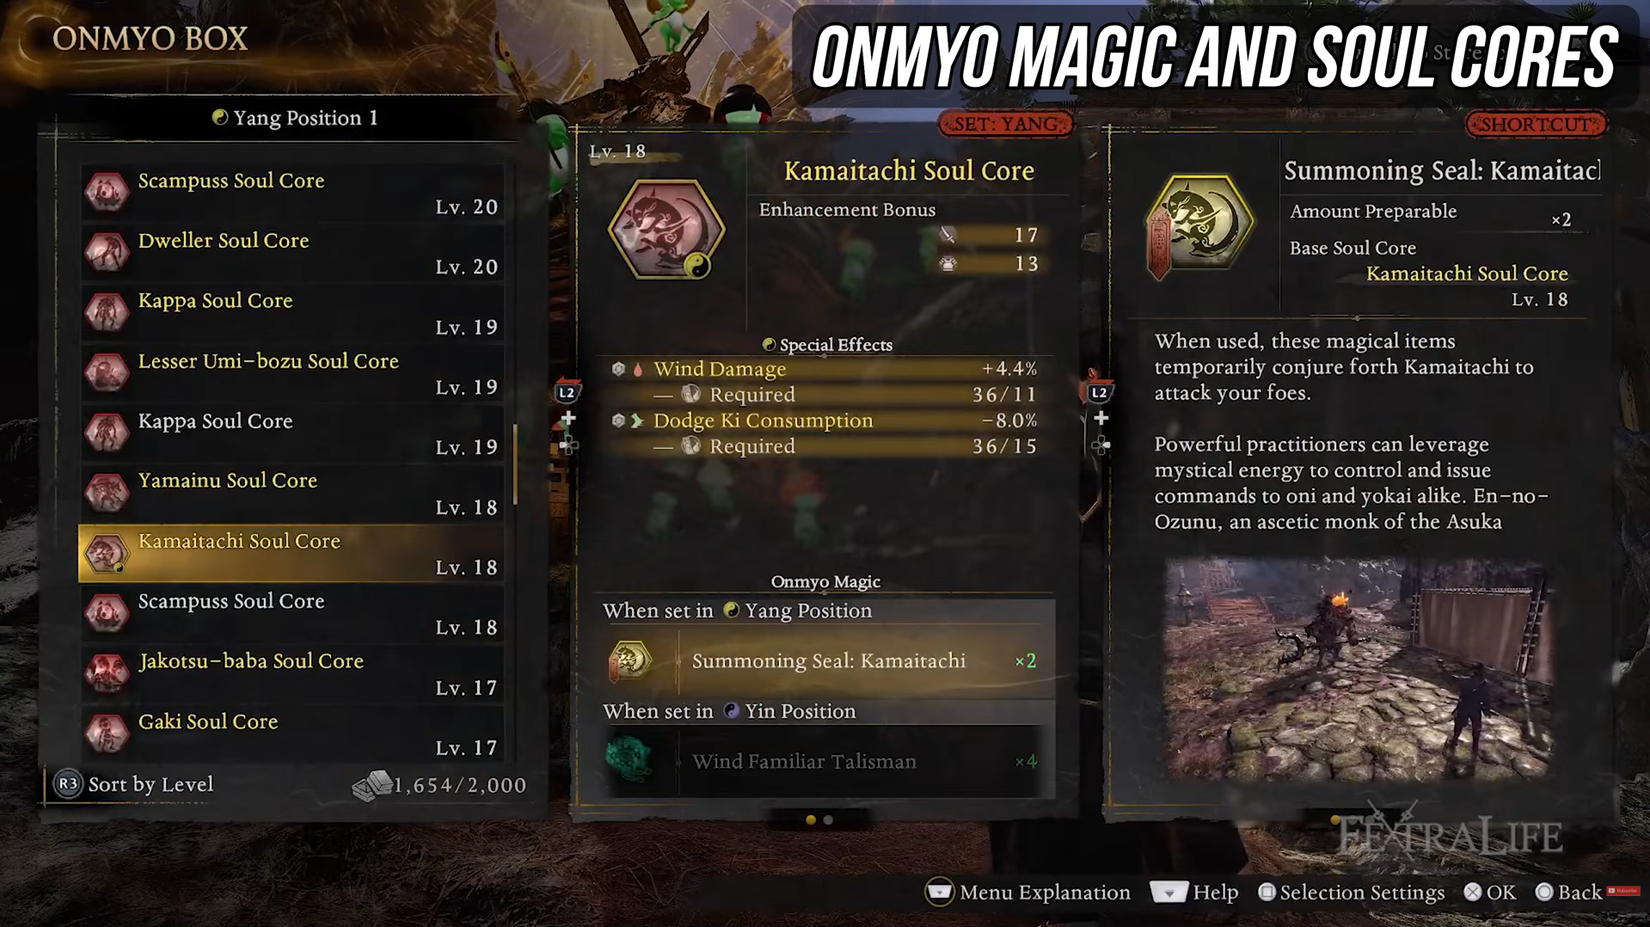
Kamaitachi Core: In Maisaka, east of the Maisaka Junction Shrine, you’ll discover the Kamaitachi, an open world boss who will drop the Kamaitachi Core. This core is improbable as a summon, dealing tons of injury in an AoE, and has first rate stats on it, with bonus Wind Harm and decreased Dodge Ki Consumption.
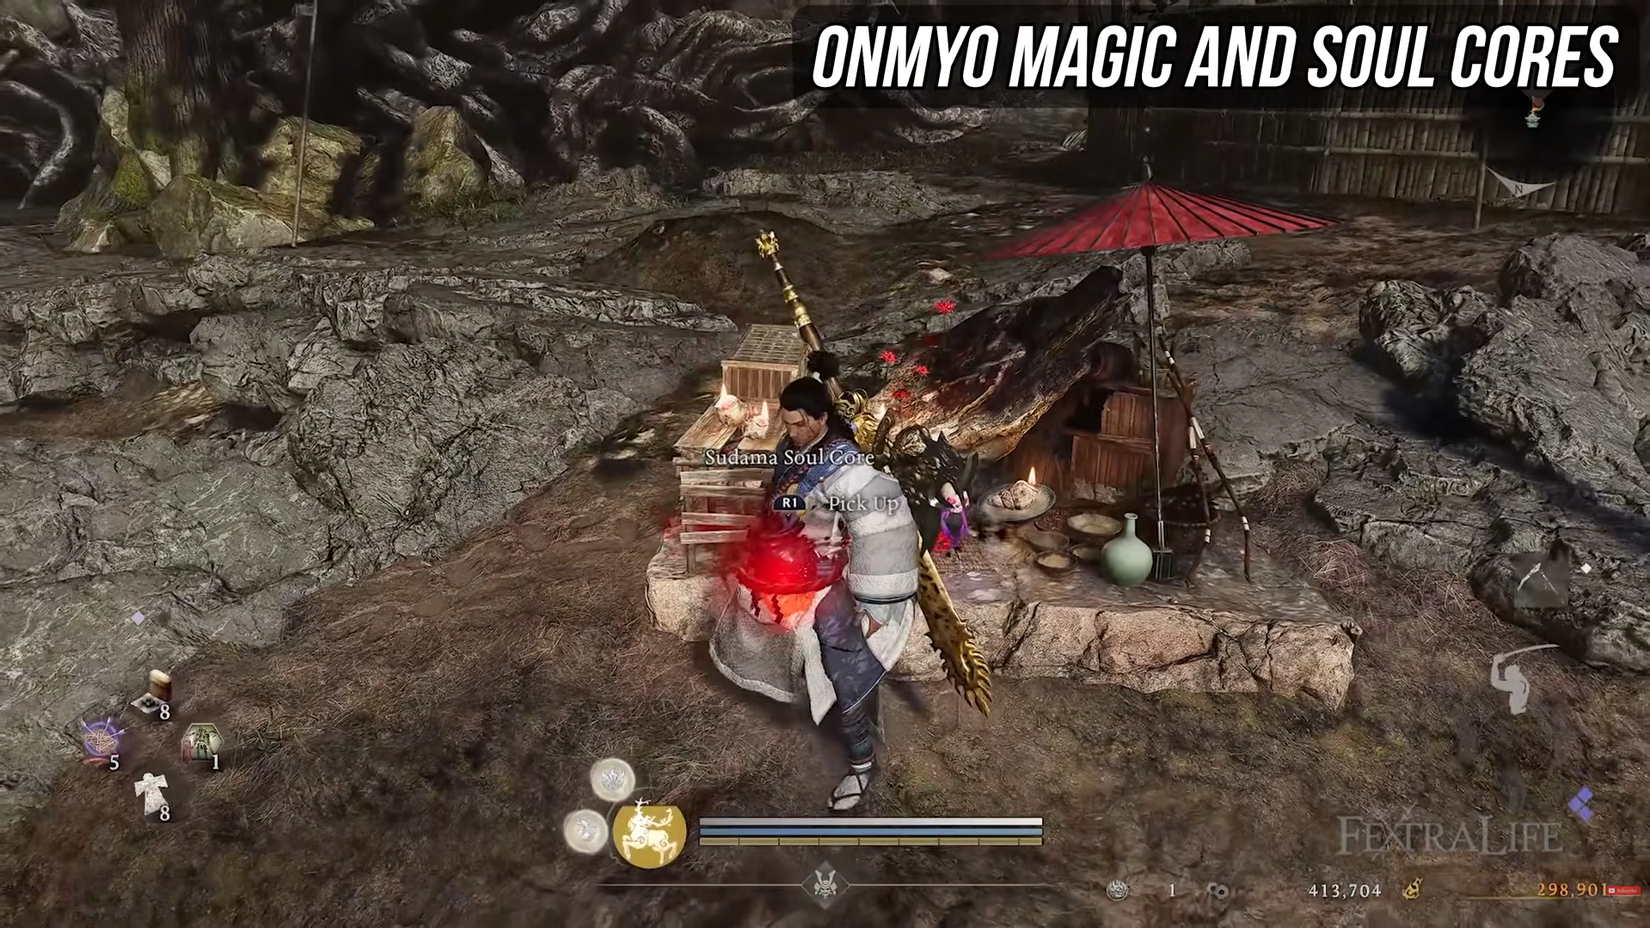
Sudama Core: Proper earlier than the Crucible mission in Hamamatsu, you’ll discover a Sudama close to the Hamamatsu Fortress City (East) Shrine. In case you discuss to any Sudama on the map, then click on Change and purchase all their stuff for Yokai Tears, they’ll provide you with a Sudama Core, which is a improbable Yin place Soul Core. This soul core grants you x8 Thunderstorm Shot Talismans, which summons 3 strikes of lightning overhead in a vertical line, dealing large harm for such an early recreation talisman. Positively a missable one, and a should have.
We’ll have a extra intensive information of the perfect Soul Cores as soon as the sport is absolutely out, however for now these are the 2 I wish to shout out essentially the most for the early recreation.
Ninjutsu
As talked about within the Fundamental Fight, Ninjutsu are 3 particular skill slots in your Ninja Fashion which recharge upon attacking enemies. These skills can vary from Lengthy Vary assaults to Bodily Assaults and even simply distinctive actions.
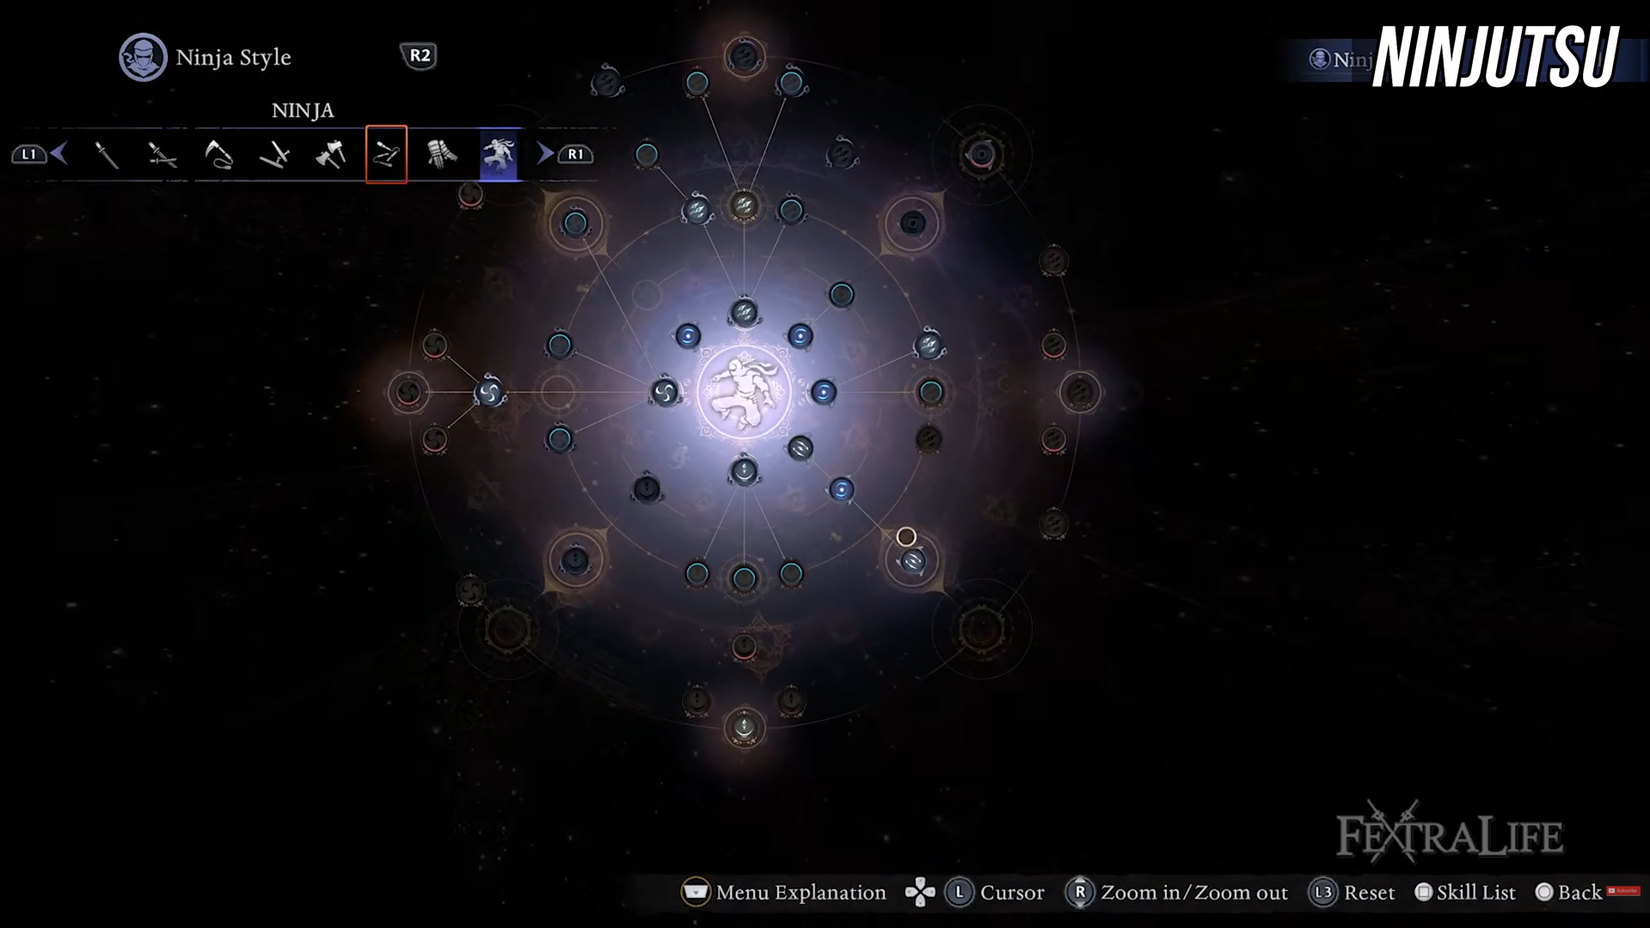
You may equip ninjutsu from the Customise possibility within the menu, beneath the Ninja Fashion “Fundamental Controls”. You may unlock new Ninjutsu by spending Ninja Factors within the Ninja ability tree, or discovering handbooks on this planet or by missions.
If you wish to think about a full Ninjutsu playstyle, then investing into Talent will enhance your Ninjutsu harm whereas additionally boosting your Arts harm in samurai type, so do think about that if you end up utilizing Ninja Fashion as a rule.
When you full “The way in which of the Ninja: Novice” after you unlock the Everlasting Rift, you’ll have a ton of fine early recreation choices for Ninjutsu to get your self began. There are a couple of good Ninjutsu which I like to recommend early on:
Pinwheel Shuriken: A stable ninjutsu which throws out a big shuriken that rebounds to you, dealing double harm when hitting enemies on the again within the rebound. In case you press the ninjutsu once more proper because it returns to you, you’ll get a free use as much as 2 occasions.
Paralysis Shuriken: In case you throw sufficient of those at an enemy, it utterly paralyzes them for round 3 seconds. Do observe that towards bosses, they’ll construct resistance for each time you paralyze them.
Lightning Step: An prompt hole nearer or retreat button which may turn out to be useful in a number of conditions.
Map Exploration
Transferring on from construct customization, let’s lastly discuss in regards to the Open World, and the principle path of the sport.
From the get-go, you’re dropped into the Warring States map at Tenryu River with the principle quest an entire zone and a half away from you.
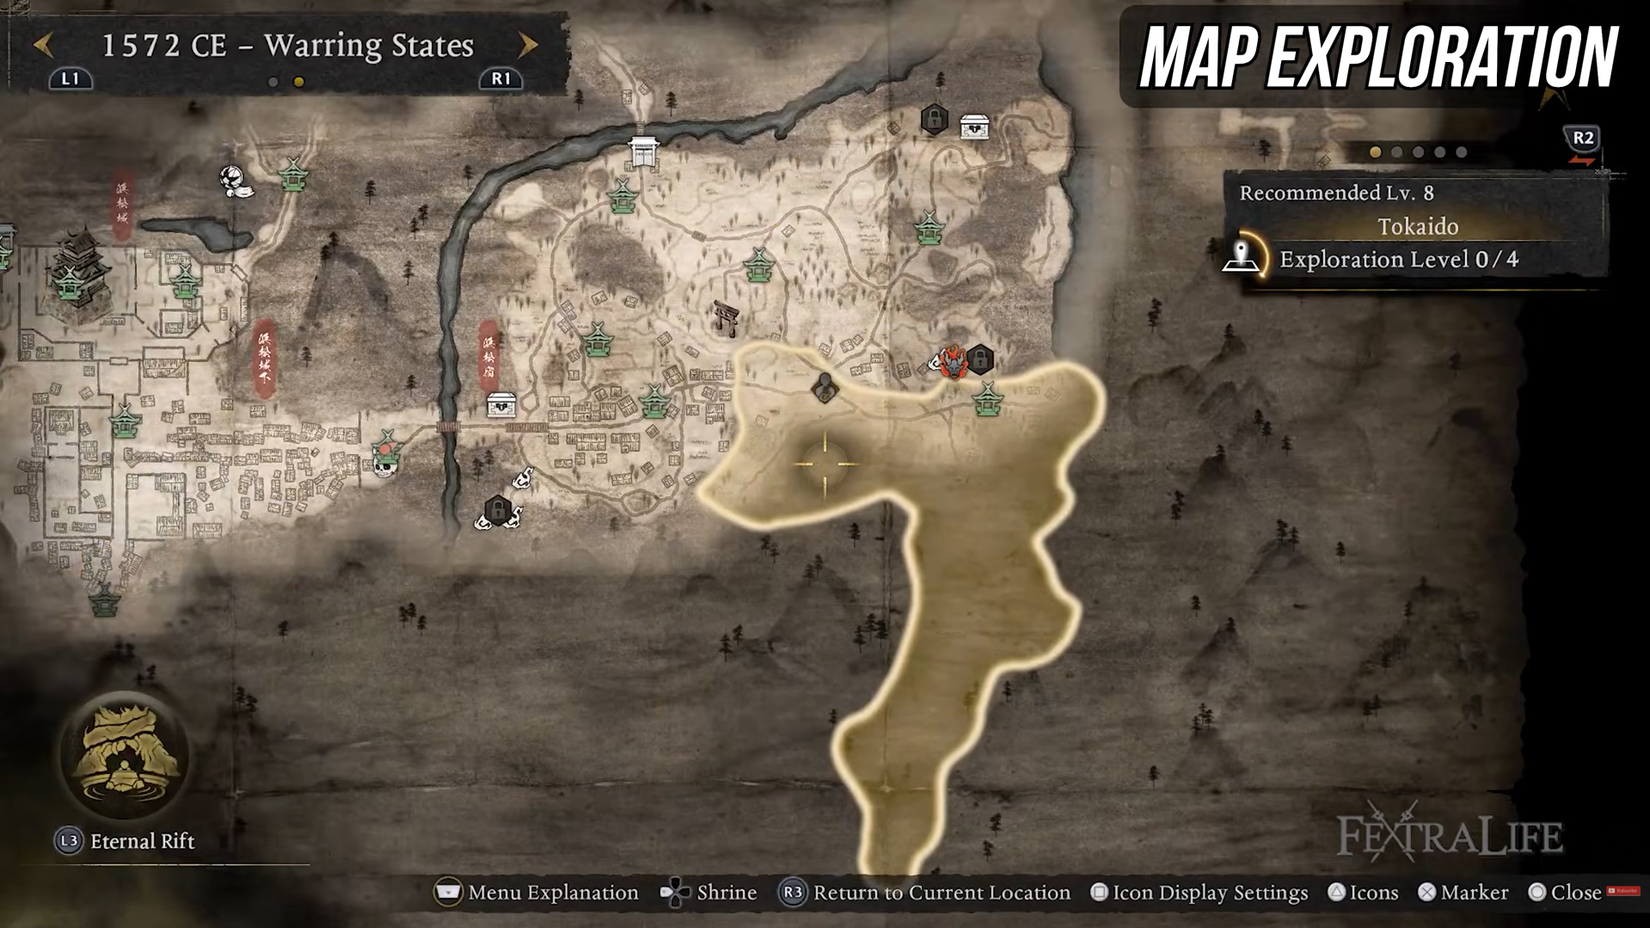
You’ll in all probability be confused about what you ought to be doing at this level, and also you’ll be confused once more later when the following important quest desires you to go to the endgame space.
For the complete recreation, you possibly can simply observe the really useful degree of the zones as your perfect path by the sport. Within the Warring States, you’ll simply observe the loop of clearing a zone, leveling up, shifting on to the following one and so forth till you lastly attain the Foremost Quest.
You’ll additionally often get Battle Scrolls, that are missions you entry from the Shrine that provide you with some particular rewards; these are primarily the outdated model of Nioh ranges for you veterans.
On the subject of really clearing the open world, let’s go over the stuff you’ll find inside it.
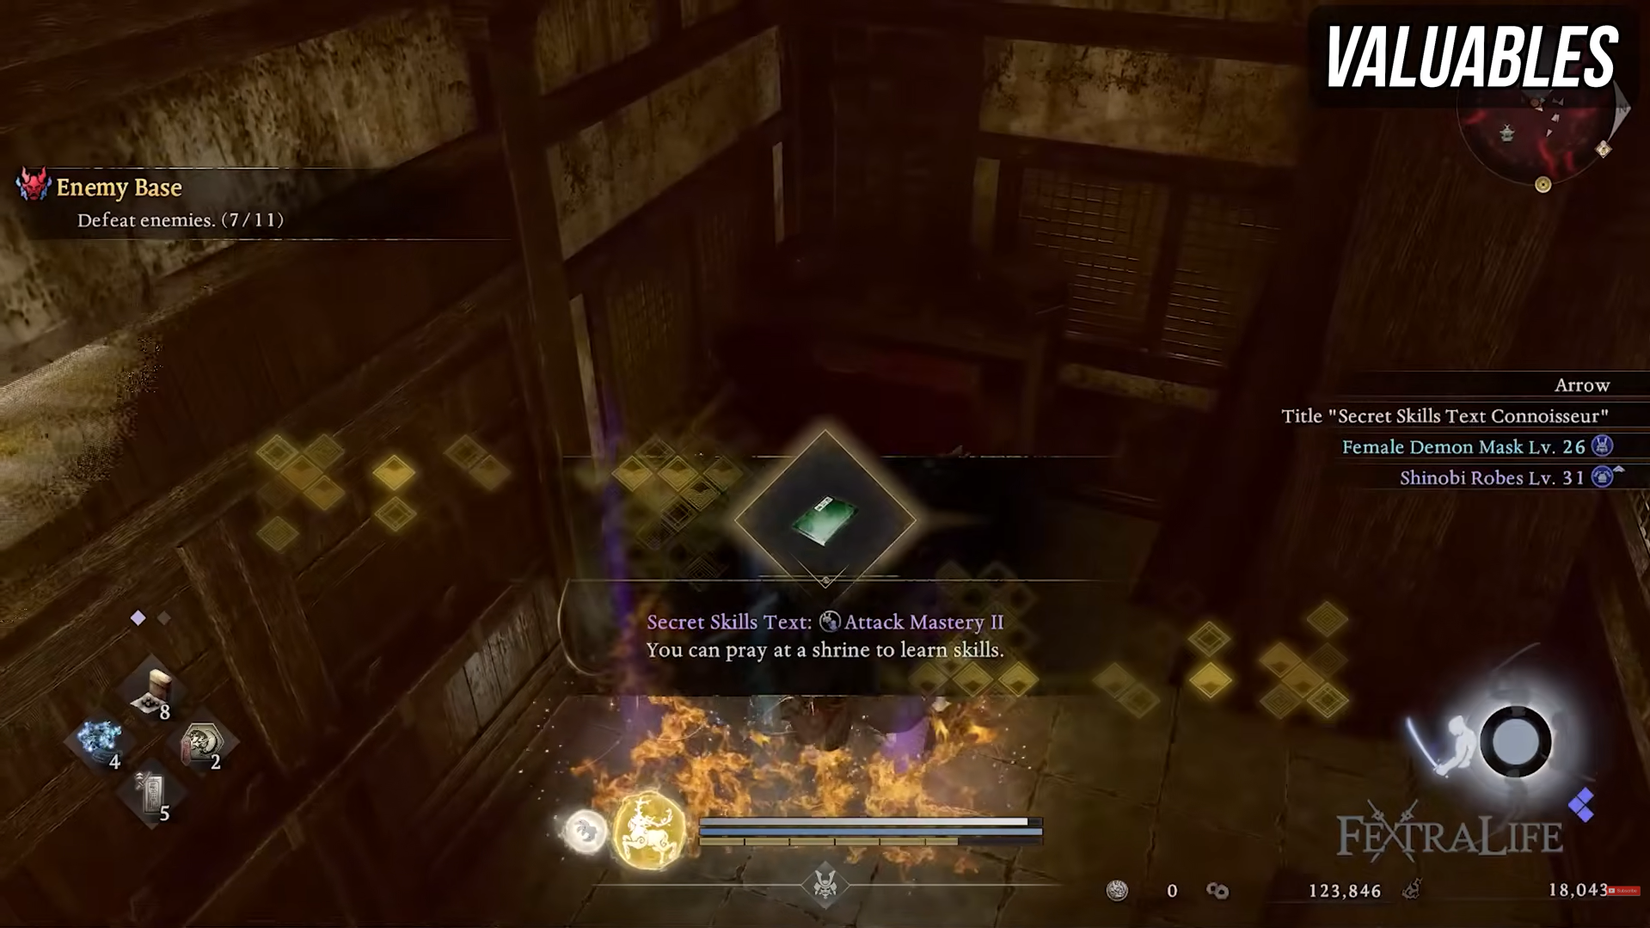
Firstly, we have now valuables: These embrace Ninjutsu Handbooks, Secret Expertise Texts on your passive Expertise, Texts and Memorandums on your ability capability, Ninja/Samurai Locks on your Martial Arts tree, and some other miscellaneous invaluable gadgets that could be associated to quests.
Subsequent are Shrines, that are your respawn factors and construct customization portal.
Scampusses, Chijiko, Kodama/Jizo, and Sudama are pleasant Yokai you’ll find all through the map:
Scampusses will make you observe them round for a Ninja/Samurai Lock.
Chijiko wish to be shot down and supply a Remodeled Martial Artwork (Often an elemental model of a martial artwork).
Kodama will provide you with Kodama Benefit and further Elixir Capability. You may spend Kodama Benefit at a shrine beneath the Blessings tab for Elixir bonuses.
Jizo are the identical as Kodama, with their blessings targeted on buffs if you are within the Crucible.
Sudama are little retailers which you could purchase/promote gadgets with, or trade Yokai Teardrops for Secret Expertise and Crafting Guides.
Subsequent within the map you may have Spirit Guardian Veins.
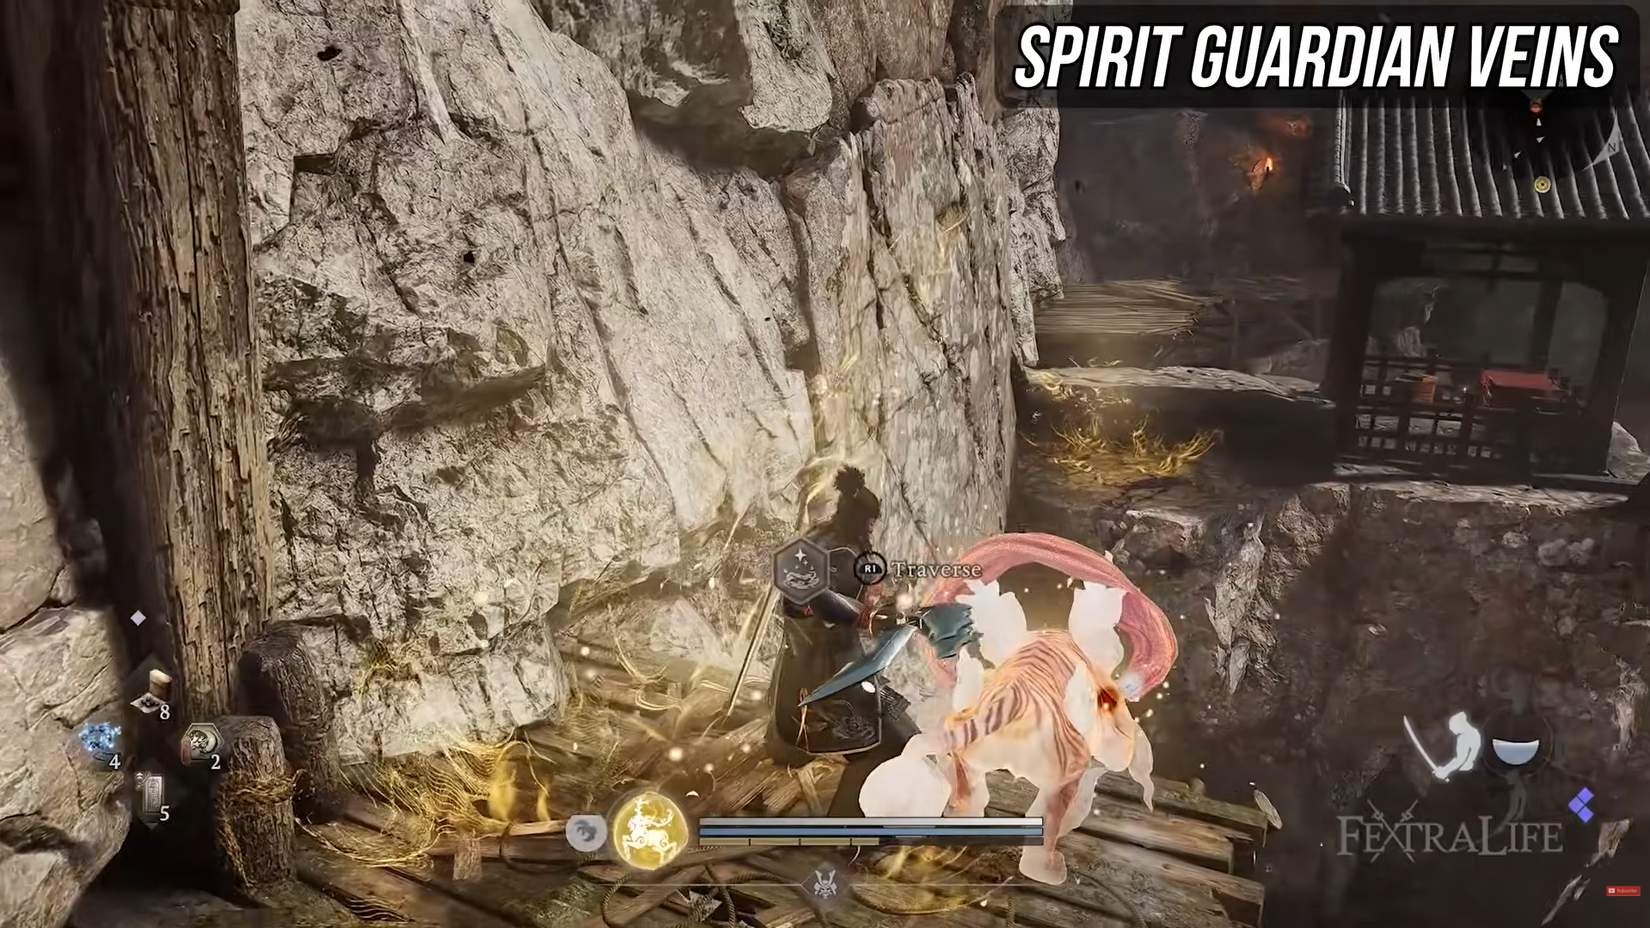
These will seem as glowy areas on the bottom or wall that allow you to traverse to a location, which you’ll not be capable of work together with. As you progress by the principle story, you’ll unlock extra Spirit Guardians which unlock these traversal strategies, not not like a Metroidvania.
Suppose Hole Knight, the place you return to areas after you have new abilities to get to model new areas. Do observe that you just don’t really should equip the associated Spirit Guardian to entry these areas, so you possibly can equip no matter you need.
When it comes to Fight areas, we have now Enemy Bases, Lesser Crucibles, Crucible Spikes, and Crucible Wraiths.
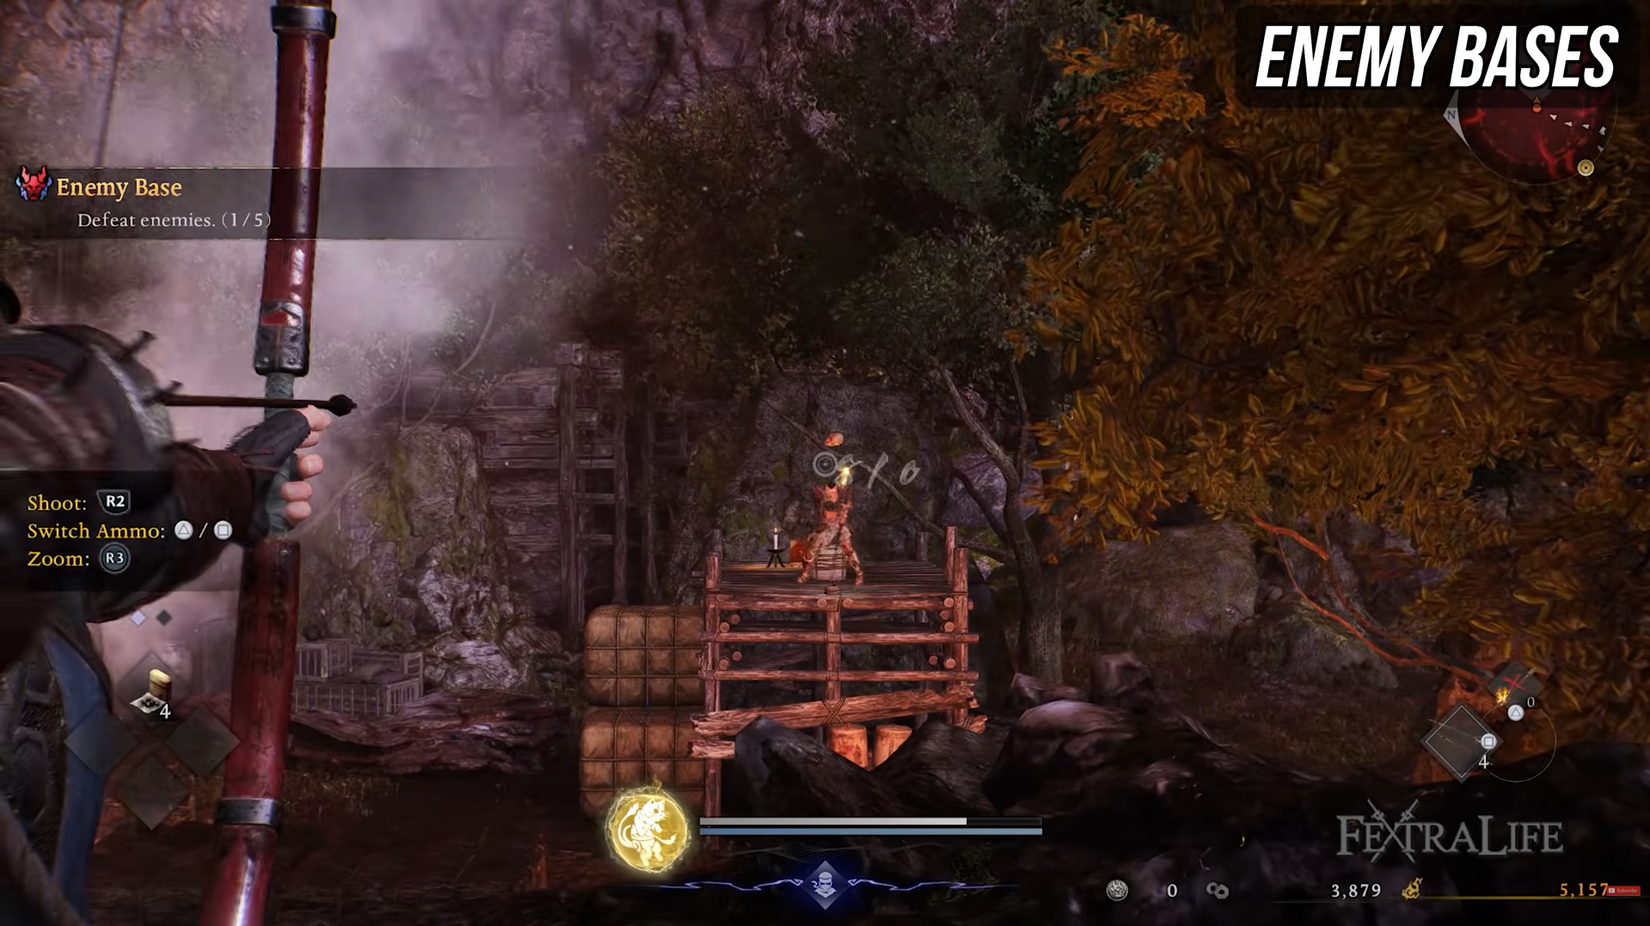
Enemy bases are only a assortment of enemies in an space. When you kill all of the enemies, the place will likely be cleared. Generally these bases are a Darkish Realm of Yokai, and when you defeat all of the enemies, some chests will likely be unlocked, so look out for that.
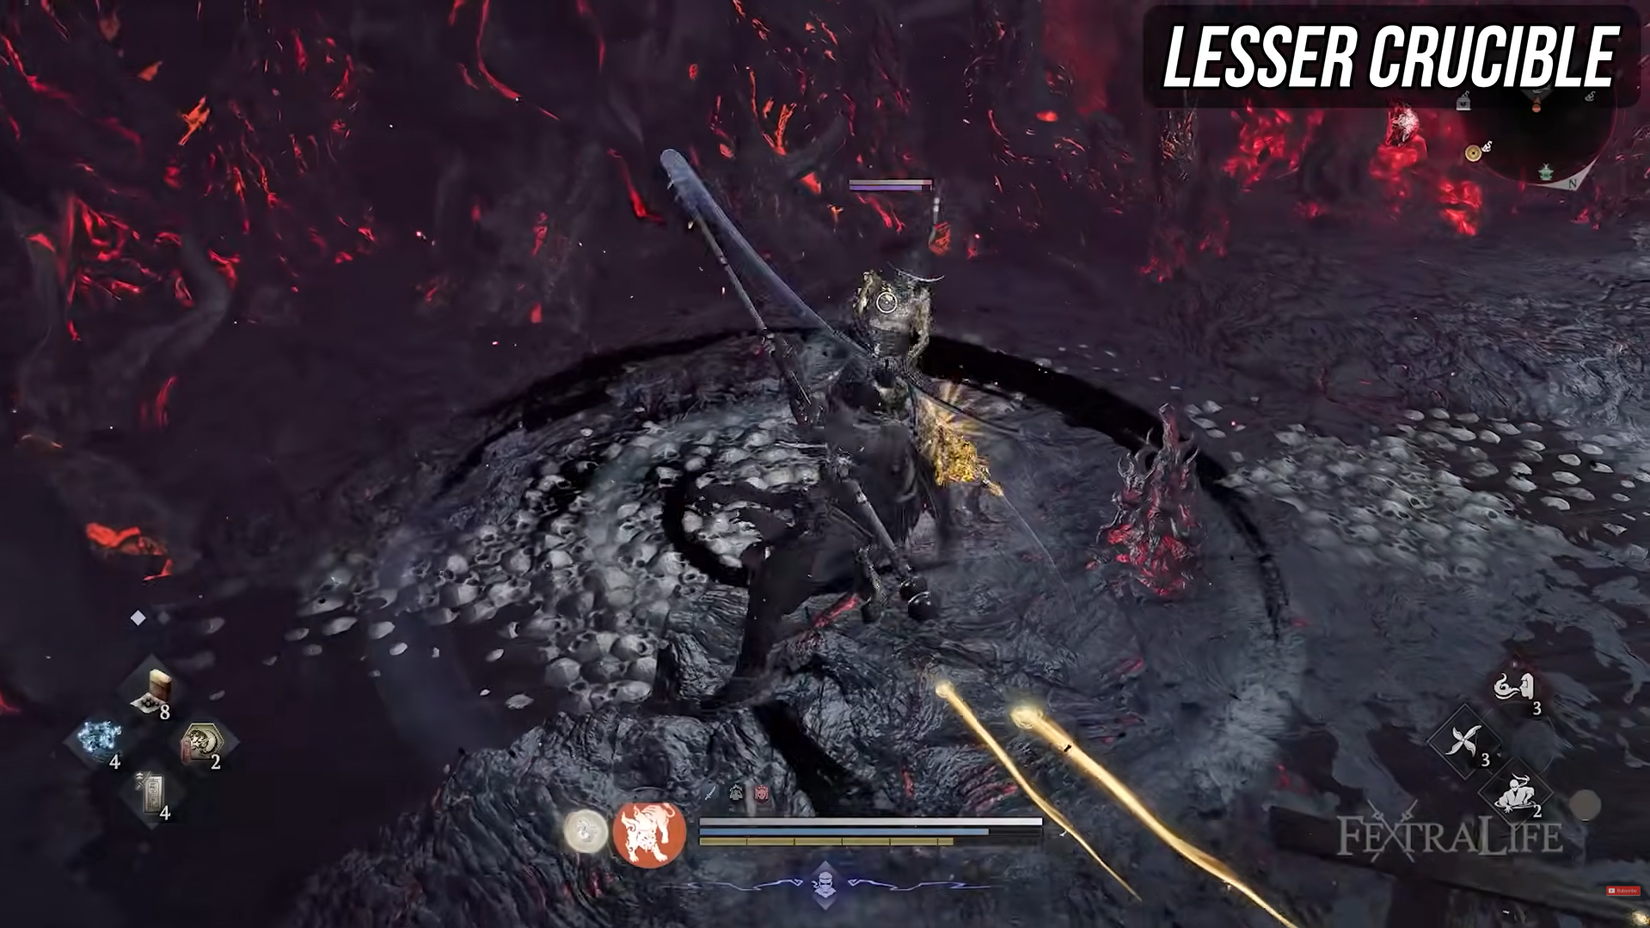
Lesser Crucibles are gauntlets of 3-5 waves of empowered enemies that provide you with corrosion on hit, which means they take off a portion of your max well being. Do observe that your Yokai Summons do extra harm right here, and your Dwelling Artifact will cost sooner.
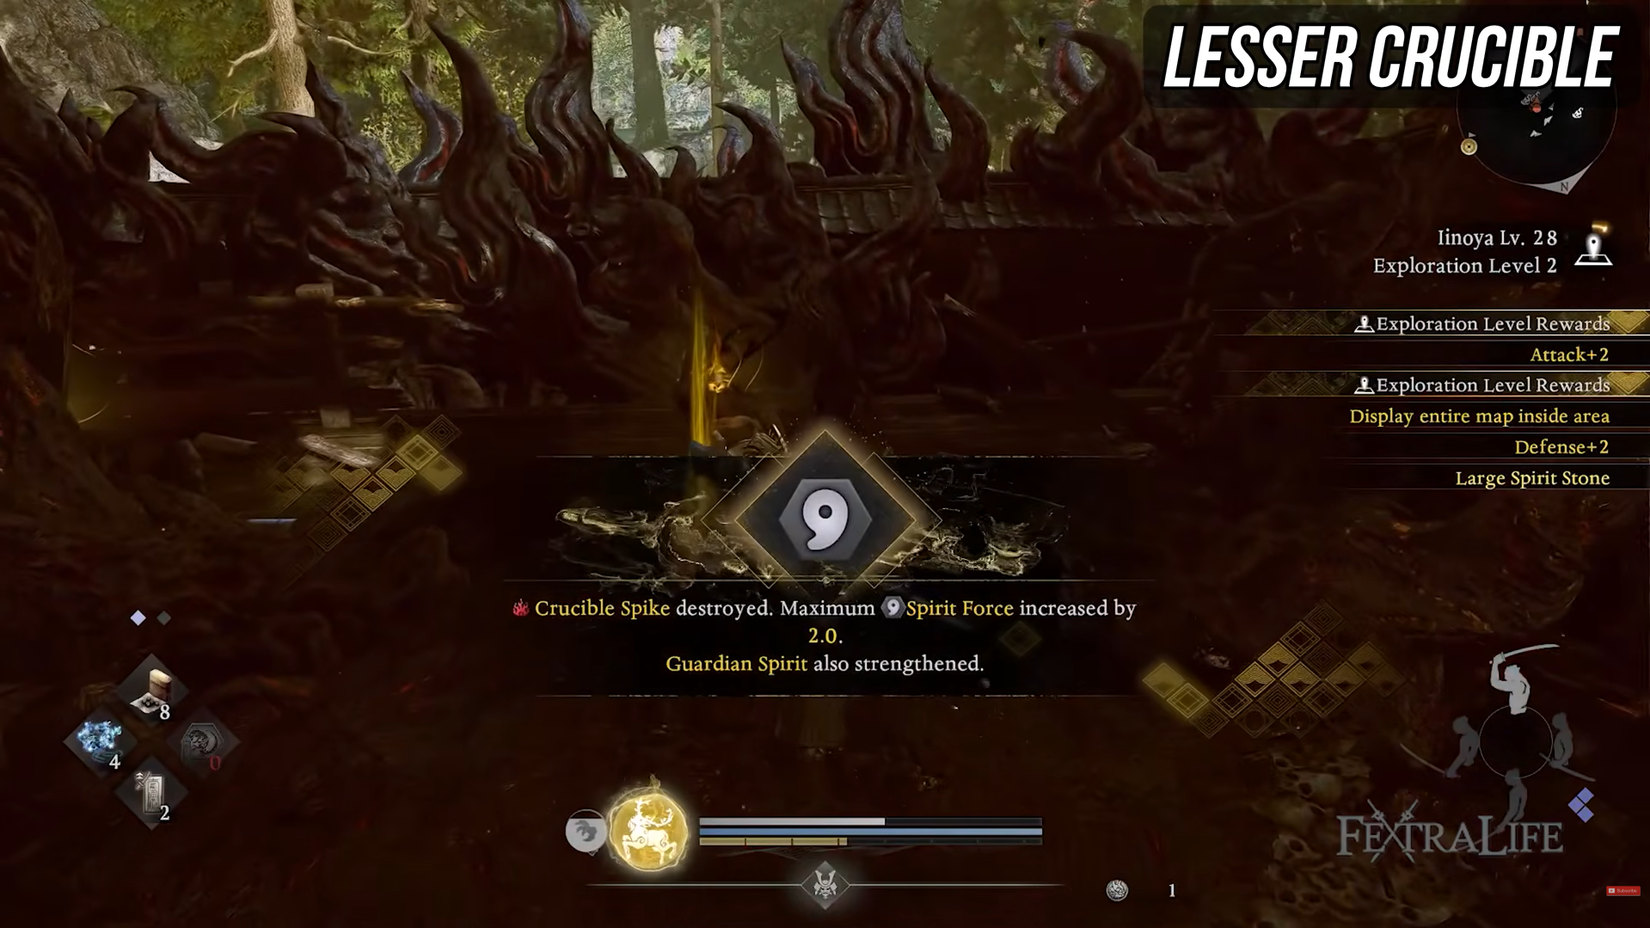
When you full a Lesser Crucible, you destroy the associated Crucible Spike which will increase your Spirit Drive Cap (the orange bar useful resource on your Spirit Guardian Expertise) and also you’ll unlock extra Guardian Spirit Expertise. Generally you can too discover Crucible Spikes simply out within the open, not gated behind a crucible, so look out for these as nicely.
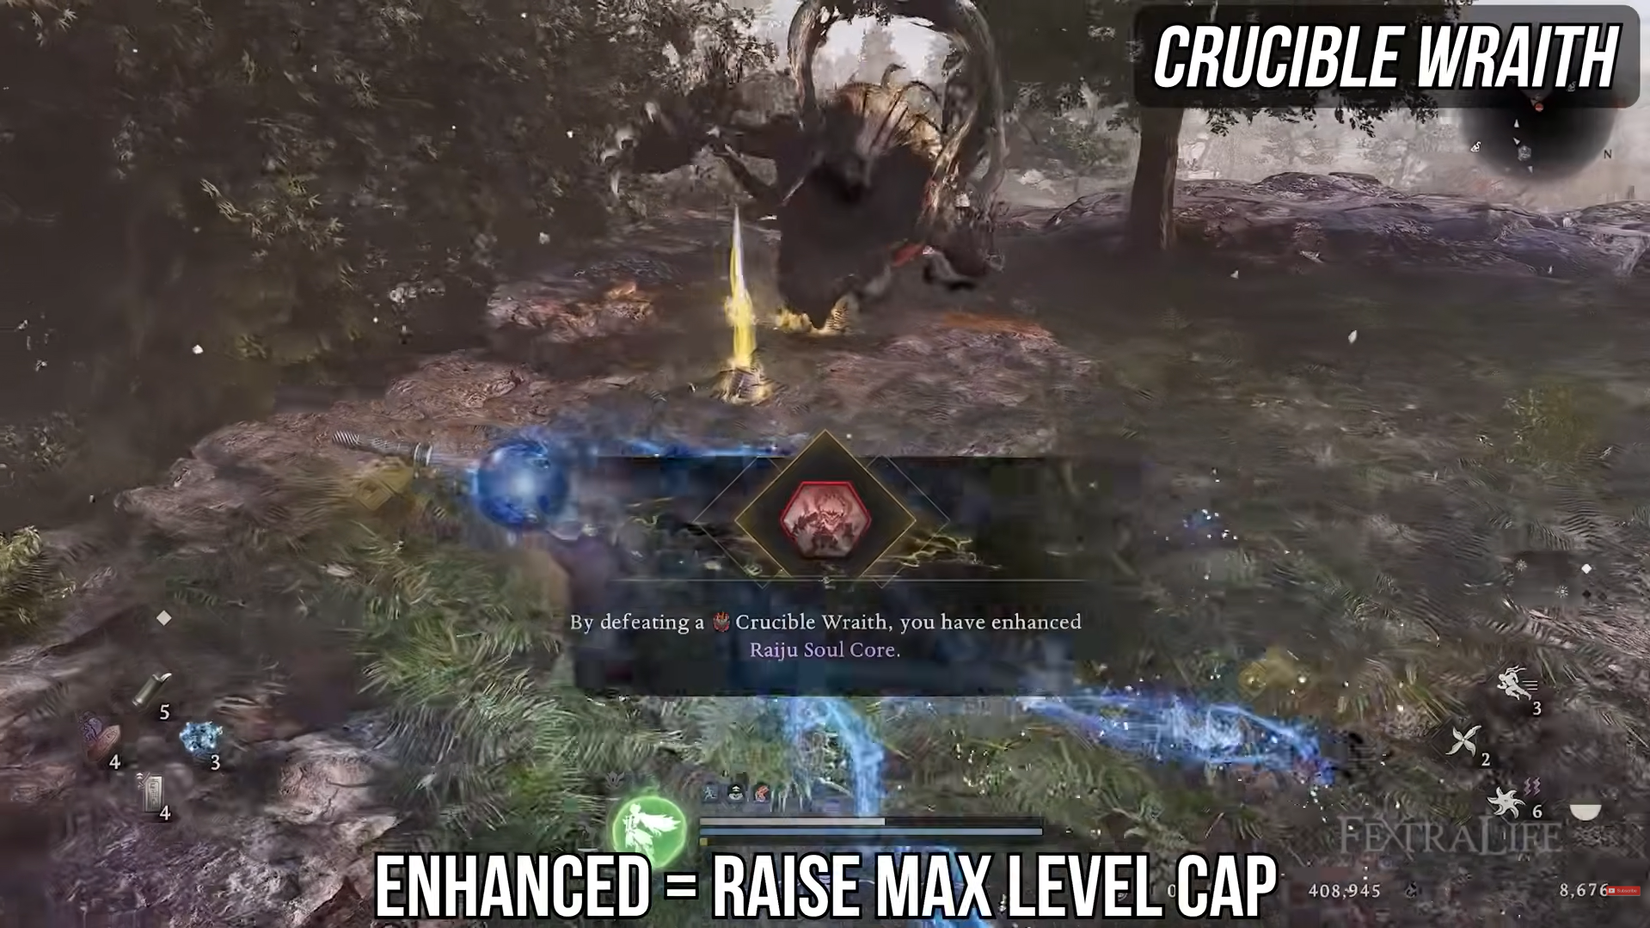
Crucible Wraiths are empowered Yokai on the map which all the time drop their associated Soul Core, improve that kind of soul core, and provide you with Remodeled Arts.
Lastly on the map, we have now Masters, Myths, Sizzling Springs, and Nurikabes.

Masters are duelers across the map which might be fought as a boss combat. They’ll reward you with a Remodeled Artwork and a few good gear associated to the dueler.
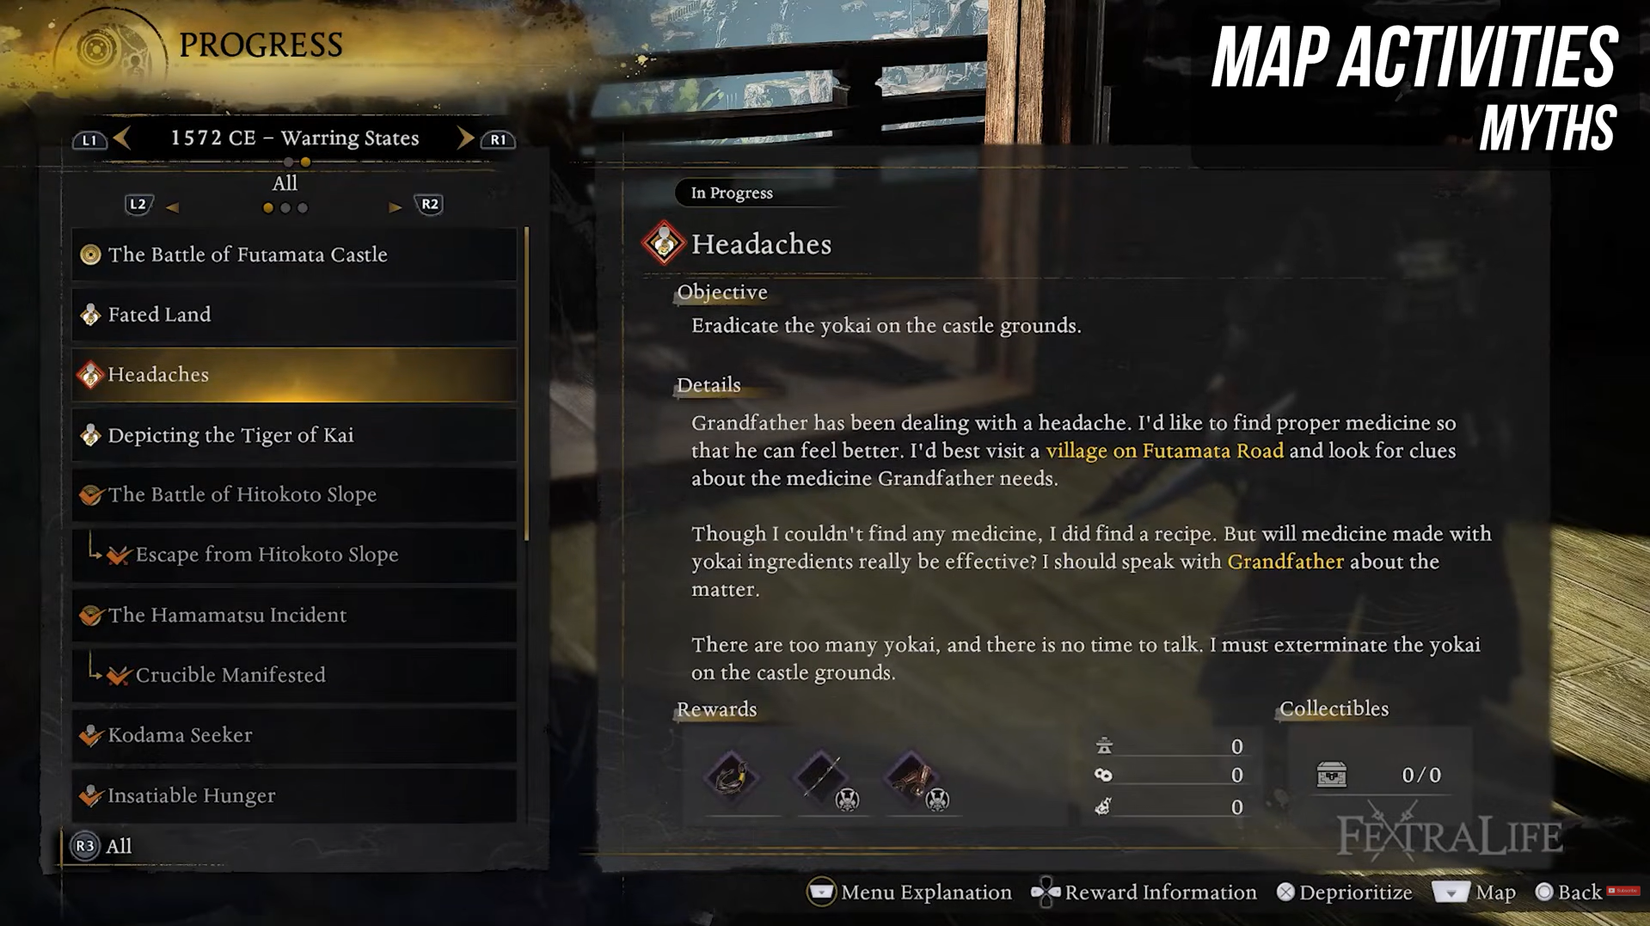
Myths are your facet quests; they’ll take you to varied spots within the map to finish some boss, kill some enemies or gather some loot. I like to recommend choosing these up as quickly as you possibly can, and generally checking your map for brand new ones that seem after you do steps in the principle quest.
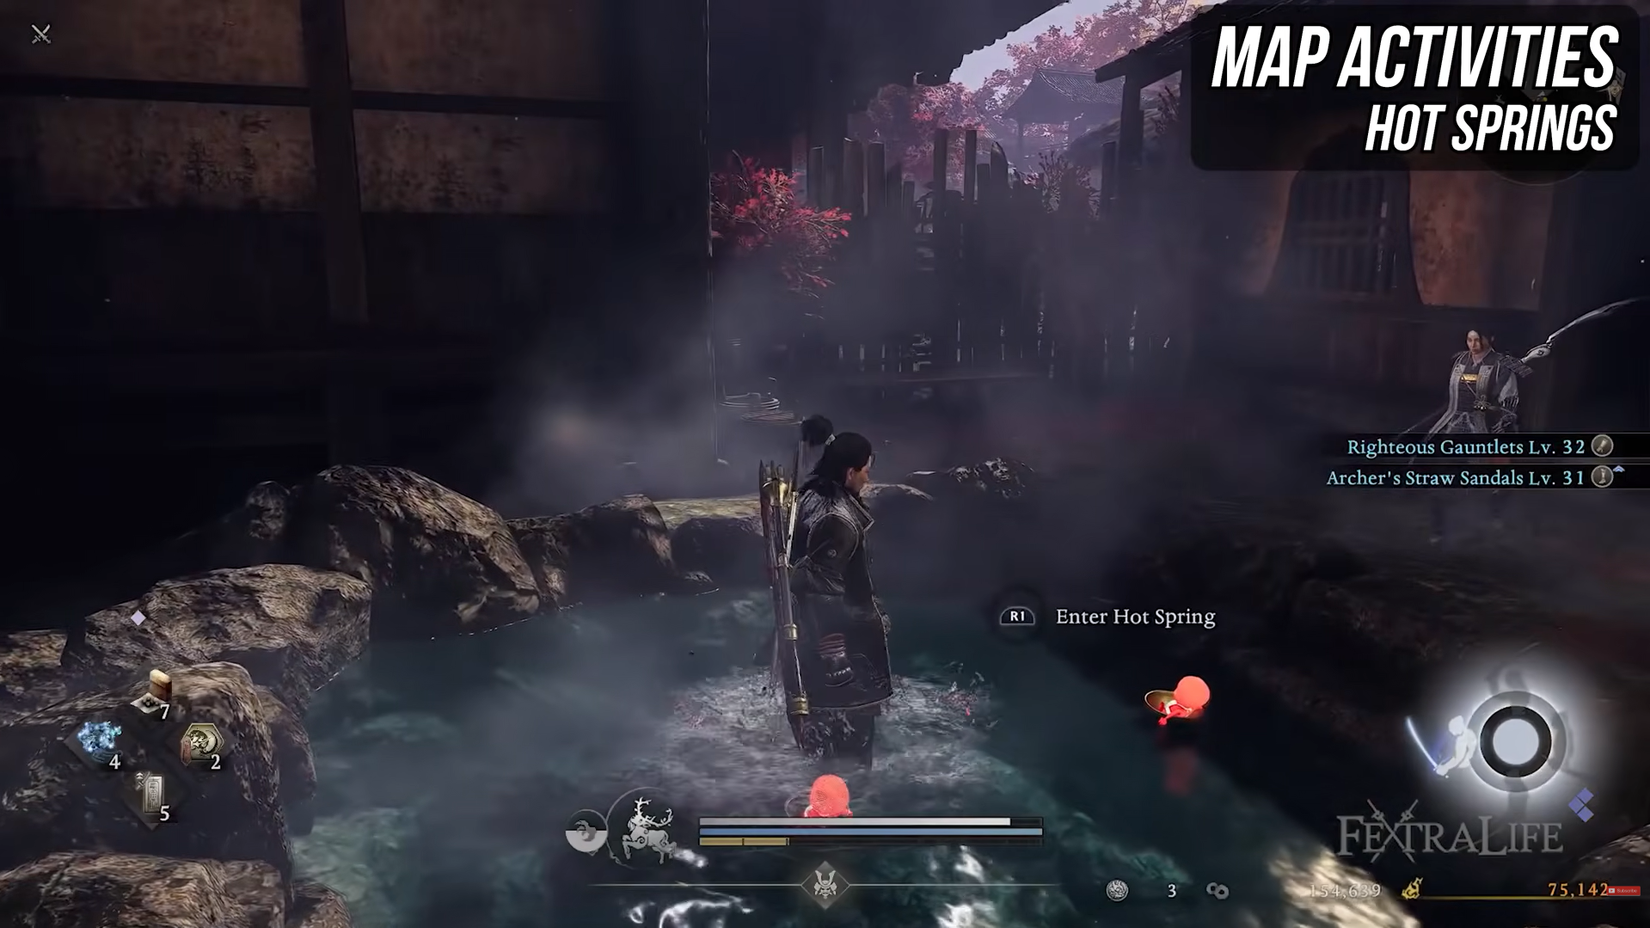
Sizzling Springs are fairly easy; they’re normally hidden areas which you could soak in to get some passive well being regeneration for a bit, and get 2 Yokai Teardrops for Sudama trades.

Nurikabe are these faux partitions that may begin showing close to the top of the Warring States. You may get by them by both going round them and eradicating their seal, killing them, or doing the proper gesture; every nurikabe has a couple of gestures it is going to reply to.
With all of these map actions out of the best way, I do have a bit of recommendation for if you end up exploring the map.
Firstly, all the time be sure that to examine for breakable objects that reveal a hidden path, comparable to pots or bamboos which block some gap or entrance. These will normally block off invaluable chests and gadgets.
If you see a nicely in any space, hit the rock on prime of it to disclose both an merchandise, a kappa, or an Umi-Bozu.
I extremely suggest utilizing Prayer Beads with an Amrita Sensor to see close by valuables, and equipping the Shin Roku Guardian Spirit to see close by Scampusses, Kodama, and Chijiko on the map if you’re a completionist.
When it comes to how a lot of the map it is best to do, attending to degree 4 exploration degree on all of the zones is a stable purpose for making certain that you just aren’t underleveled or underprepared for the principle quest.
Greatest title/jizo/kodama
One final thing to cowl on construct customization is the perfect Titles and Jizo/Kodama blessings.

Titles will come naturally from simply enjoying the sport, and will provide you with factors to spend on 9 totally different classes, just like Kodama or Jizo.
The most effective factors to spend on will rely in your most well-liked playstyle, however usually, there are a couple of all-round first rate choices:
Samurai: Melee Assault Ki Consumption
Ninja: Dodge Ki Consumption
Techniques: Ki Restoration OR Dwelling Artifact Period
Subjugation: Amrita Earned
Formidable Enemies: Melee Ki Harm
Crucible: Luck
Exploration: Medication Efficacy
Amenities: Gear Drop Fee
Assortment: Luck
For Kodama Blessings, I like to recommend going for Elixir Efficacy, then Drop Fee, then Spirit Drive Bonus, Harm Taken, and Harm Dealt in that order.
For Jizo Blessings, I like to recommend prioritizing Life Corrosion Restoration, Drop Fee, Melee Harm, then Corrosion Restoration in that order.
Attempt to unfold out your factors at any level within the recreation so you are not sitting on a bunch of benefit ready for a closing improve.
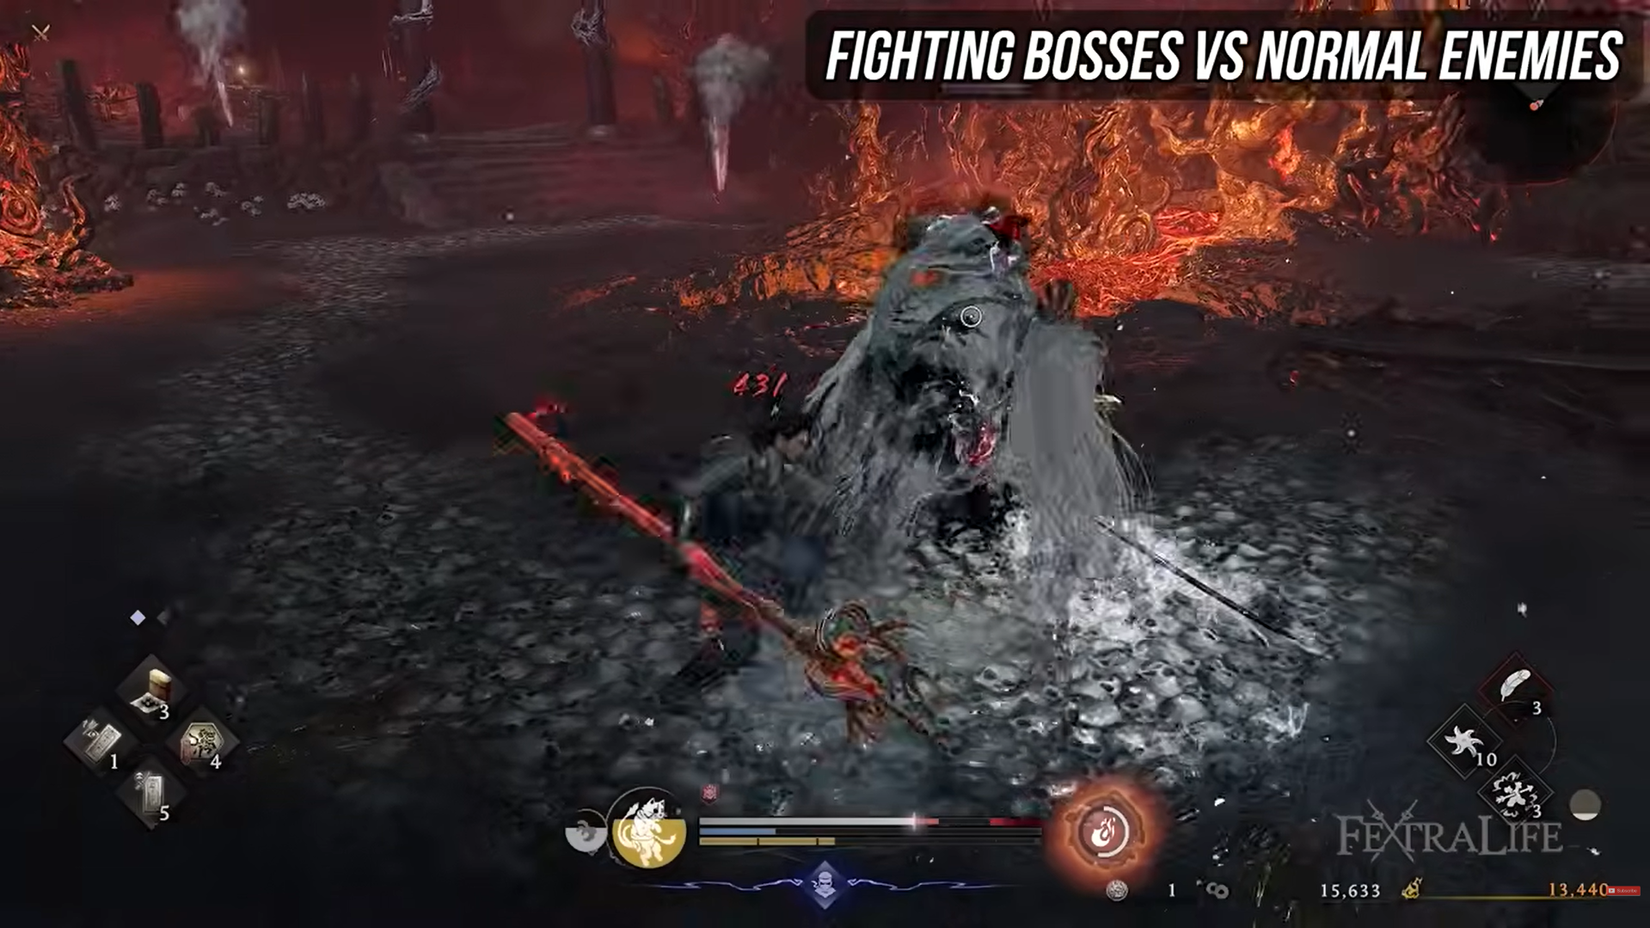
Preventing Bosses vs Regular Enemies
The subsequent factor I wish to discuss, which is extra private recommendation reasonably than a information, is the way you really wish to be preventing enemies and executives on this recreation.
The playstyles you possibly can adapt on this recreation are actually preferential; you possibly can play what you’re feeling snug with and have a very totally different expertise from one other participant.
That being mentioned, I do assume there are some common issues anybody can apply to their gameplay to make their life simpler.
Firstly, switching between Ninja and Samurai mode will all the time rely upon the enemy you might be preventing; generally you need that additional protection and different occasions you want that additional mobility.
Sometimes, what I discovered works is utilizing the Ninja Mode for giant bosses to dodge the unknown massive AoE assaults and get behind them for a bunch of injury, and Samurai Mode for virtually some other enemy, because it tends to deal extra DPS.
Ninja Mode does a bunch of Ki Harm, however will solely actually do actual harm when you’re hitting the enemy from the again.
For bosses, although the sport seems like a hack and slash, you simply can’t deal with the bosses as such. It’s possible you’ll be tempted to simply go loopy on a boss always, however the recreation does demand a variety of endurance and timing from the participant for a lot of bosses.
There are some really powerful bosses afterward that require Darkish Souls degree endurance from you. So whereas enemies are fairly simply demolished within the open world, simply observe that for main Bosses, you’ll have to regulate your playstyle and attempt to play patiently.
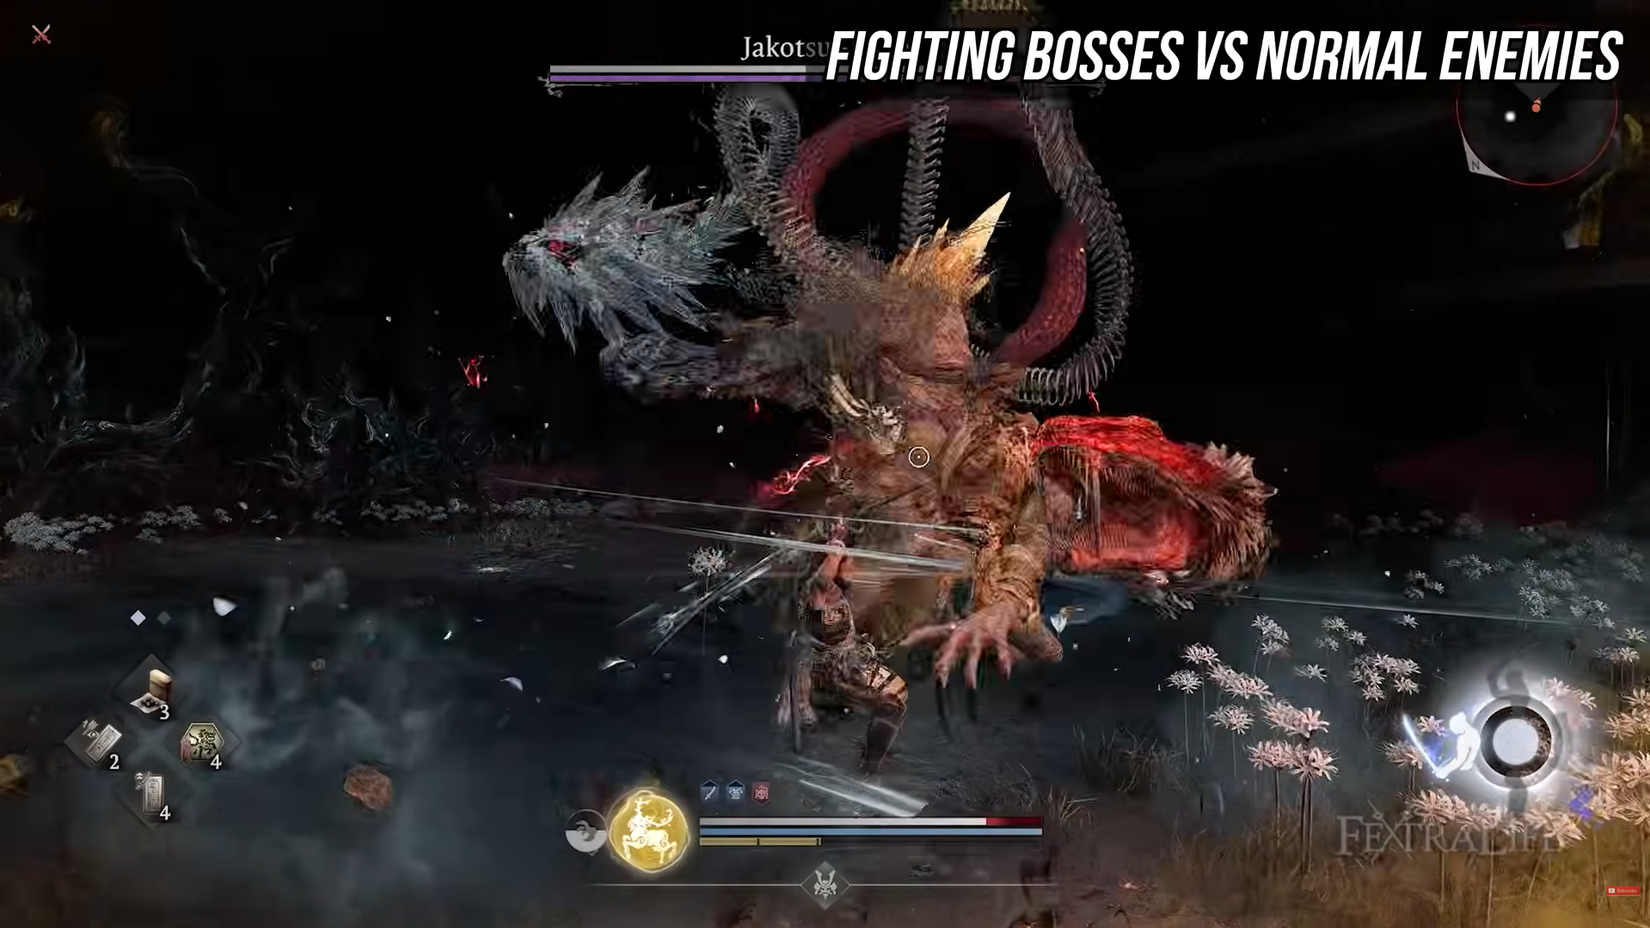
Getting a boss’s Ki Meter down will likely be your precedence if attainable, and spamming them with assaults in Ninja Mode when their Ki Meter is 0 is ideal for getting massive chunks of injury.
When you get the Max Ki Bar to 0, it is best to grapple and consider any wakeup assaults that bosses could have. When you get bosses low sufficient, some have Darkish Realm phases which can be simply ridiculous and depart completely no window for assaults.
In these situations, I like to recommend simply going to Ninja mode and dodging round like loopy till they get out of it. The sport will train you to press your benefit well, and humble you when you deal with it like a cakewalk.
Multiplayer Information
The very last thing to go over as we start to shut up this encyclopedia of a information is primary Multiplayer options, which is able to apply to you even when you’re a single-player individual.
Firstly, you’ll discover Blue Graves as you discover the open world, and when you’re on-line these will usually be gamers. These are Benevolent Graves which you’ll summon utilizing Ochoko Cups to get an AI that will help you out.
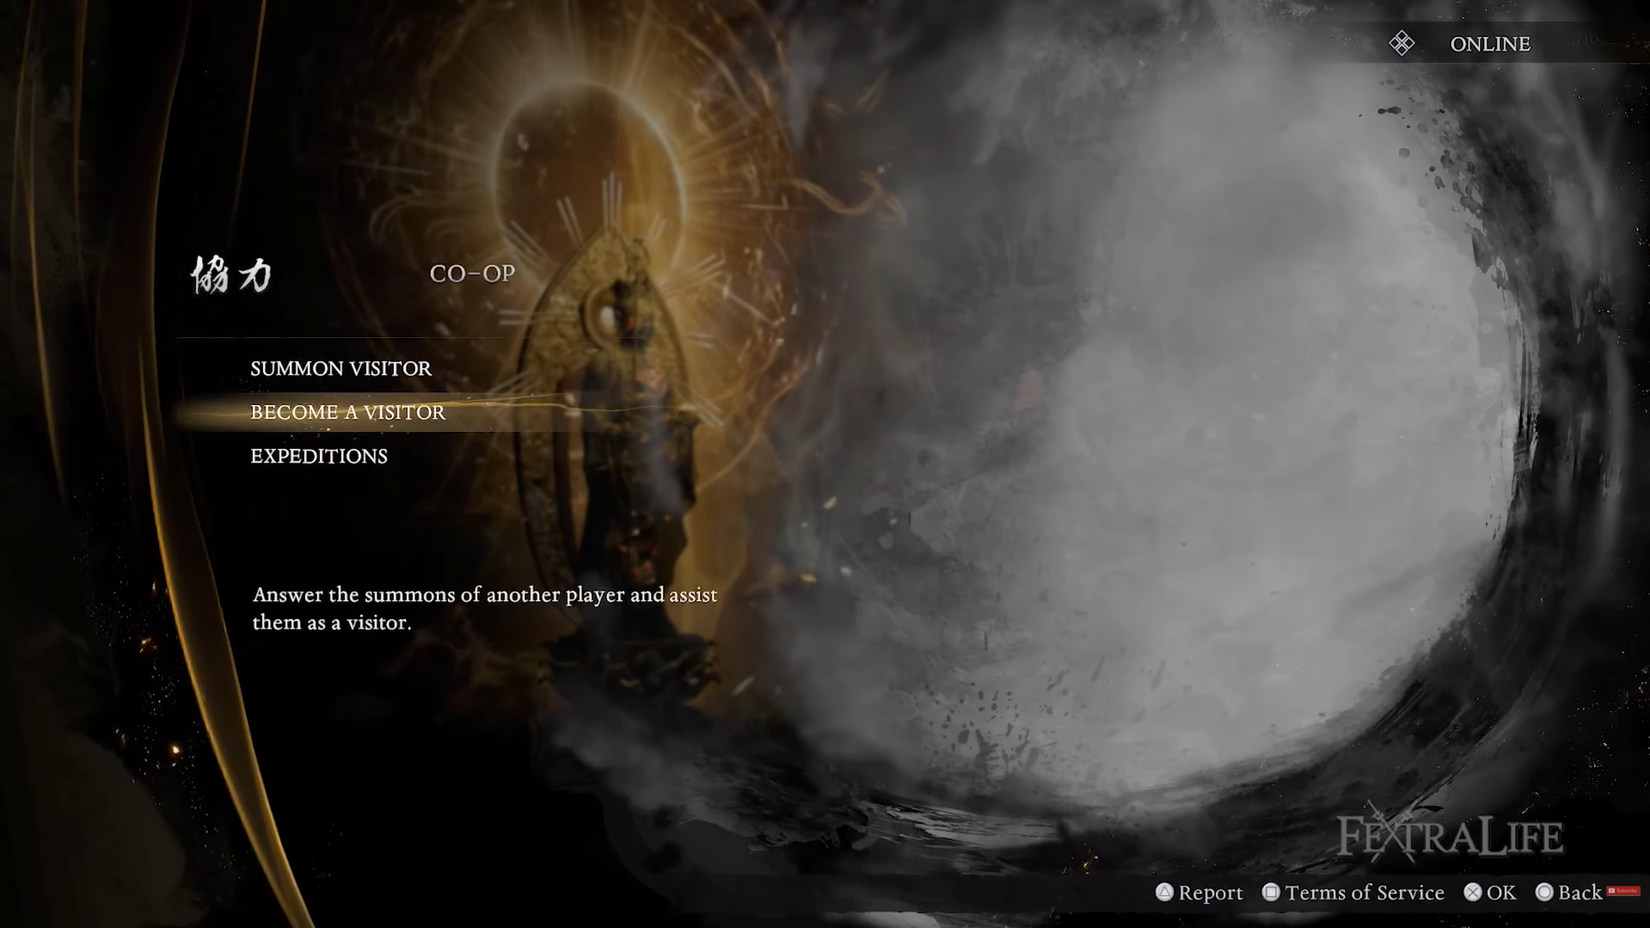
You may spawn your individual Benevolent Grave utilizing Righteous Jasper for different individuals to work together with; in the event that they win along with your graves, you’ll get Ochoko Cups and Glory as a reward from the Boons possibility within the Shrine menu, so it is worthwhile to take action. You can too defeat Revenants (Crimson Graves) for Ochoko Cups and Glory.
You sadly can’t do Co-Op within the open world, however you possibly can co-op in missions to get tools assured at your degree, in addition to Ochoko Cups and Glory.
So what’s Glory really for? When you get to a sure level within the recreation, you’ll unlock Clans, which offer you buffs primarily based in your standing, which will increase the extra Glory you earn. You’ll additionally be capable of spend Glory on gadgets, however that will likely be out there a lot later.

