
A number of nights in the past, I used to be enjoying rental retailer simulator Retro Rewind once I obtained distracted by the ultimate 20 minutes of The Terminator. As I watched the film in my retailer on a tiny CRT display screen within the nook, I forgot I used to be presupposed to be operating the place. Fortunately, the digital worker I’d employed a couple of days earlier than checked clients out. And should you, too, need to watch outdated films in a digital recreation of a ’90s-era rental store, properly, I can assist you out.
I like Retro Rewind, a not too long ago launched video rental retailer simulator out now on Steam. As somebody who grew up loving journeys to our native Blockbuster, Retro Rewind is a really cozy sport for me. One thing about being surrounded by cabinets crammed with films and garish carpet coated in stars and cartoon cameras makes me completely happy. And like every good rental retailer, your retailer in Retro Rewind has TVs. However by default, these play brief, pretty generic clips created in-game. One video clip, nevertheless, tells you to switch this file with your individual video file.
After I noticed that, I obtained excited. May I play any ’90s film I wished on these TVs? The reply was sure. Sure certainly.
That’s the true function of those TVs. And I’ve taken benefit of this nifty characteristic to, as talked about above, put all of The Terminator (through VHS rip) in addition to a bunch of ’90s trailers and extra into my humble rental store. If that sounds superior to you, then let me stroll you thru the pretty simple steps to get this working in your individual retailer. Simply watch out you don’t get distracted watching a film whereas you ought to be working.
Resolve on and obtain the video you need to play in your in-game TVs
First off, it is advisable to determine what you need enjoying in your TVs in Retro Rewind. There actually isn’t a restrict to what you may add to the in-game TVs, assuming you could find a digital video of it on-line. I’ve seen folks put ’90s-era cartoons, films, commercials, and trailers into the sport. You might do music movies. Or create your individual complication of stuff that can then loop endlessly in your store’s TV screens.
I’d advocate trying out the Web Archive for cool VHS rips if you wish to hold your content material applicable for the period, and hitting up YouTube for trailers and adverts. For the aim of strolling you thru how to do that, I’ve chosen this two-hour-long Blockbuster TV in-store promo tape I discovered on the Web Archive.
One factor to bear in mind is that for the time being, you may solely get three movies, every with its personal channel, working in Retro Rewind. So you may’t dump 50 trailers or TV episodes into the sport. As an alternative, they’ll should be mixed into one longer video.
Changing movies to work in Retro Rewind
Okay, when you’ve downloaded a video so as to add to the sport, you’ll subsequent must convert it so it really works correctly in Retro Rewind. This isn’t too difficult. The best option to go about that is downloading and putting in the free program Handbrake, which is a really helpful video conversion and porting software.
As soon as that’s put in, drag your required video file into Handbrake. Then be sure that the format is ready to MP4. Subsequent, jump over to the “Video” tab and ensure H.264 is chosen below “Video Encoder.” Lastly, go to the “Dimensions” tab and look below “Decision and Scaling.” There, it is best to discover an choice to vary the “Decision Restrict” from 1080p HD to customized. That can allow you to set the precise dimension for the transformed video. You’ll need to go along with 512×512 as that is the really helpful dimension for video information in response to Retro Rewind. Change the identify of the file on the backside to one thing memorable and pay attention to the place it’s being saved, doubtless your movies folder in Home windows.
Now hit that huge inexperienced button on the prime to start out encoding the file. Relying in your laptop and the dimensions of the video file, this might take a couple of minutes or rather a lot longer. Watch for it to fully end earlier than transferring on or closing Handbrake.
Putting your customized movies into the sport
As soon as the file has been transformed to the format and dimension we’d like, it’s time to position it in Retro Rewind. Discover the sport in your Steam library, be sure that it’s put in, after which right-click its identify in Steam. Search for “Handle” and click on “Browse native information.” This could open up the sport’s set up folder. Click on the folder labeled “Retro Rewind,” then in there click on “Content material,” after which “VHS,” and eventually open up the “Films” folder inside. This can carry up an inventory of folders which are the channels obtainable on the TV.
As of April 2, the sport solely helps three of those channels: Police, Sci-Fi, and Public.
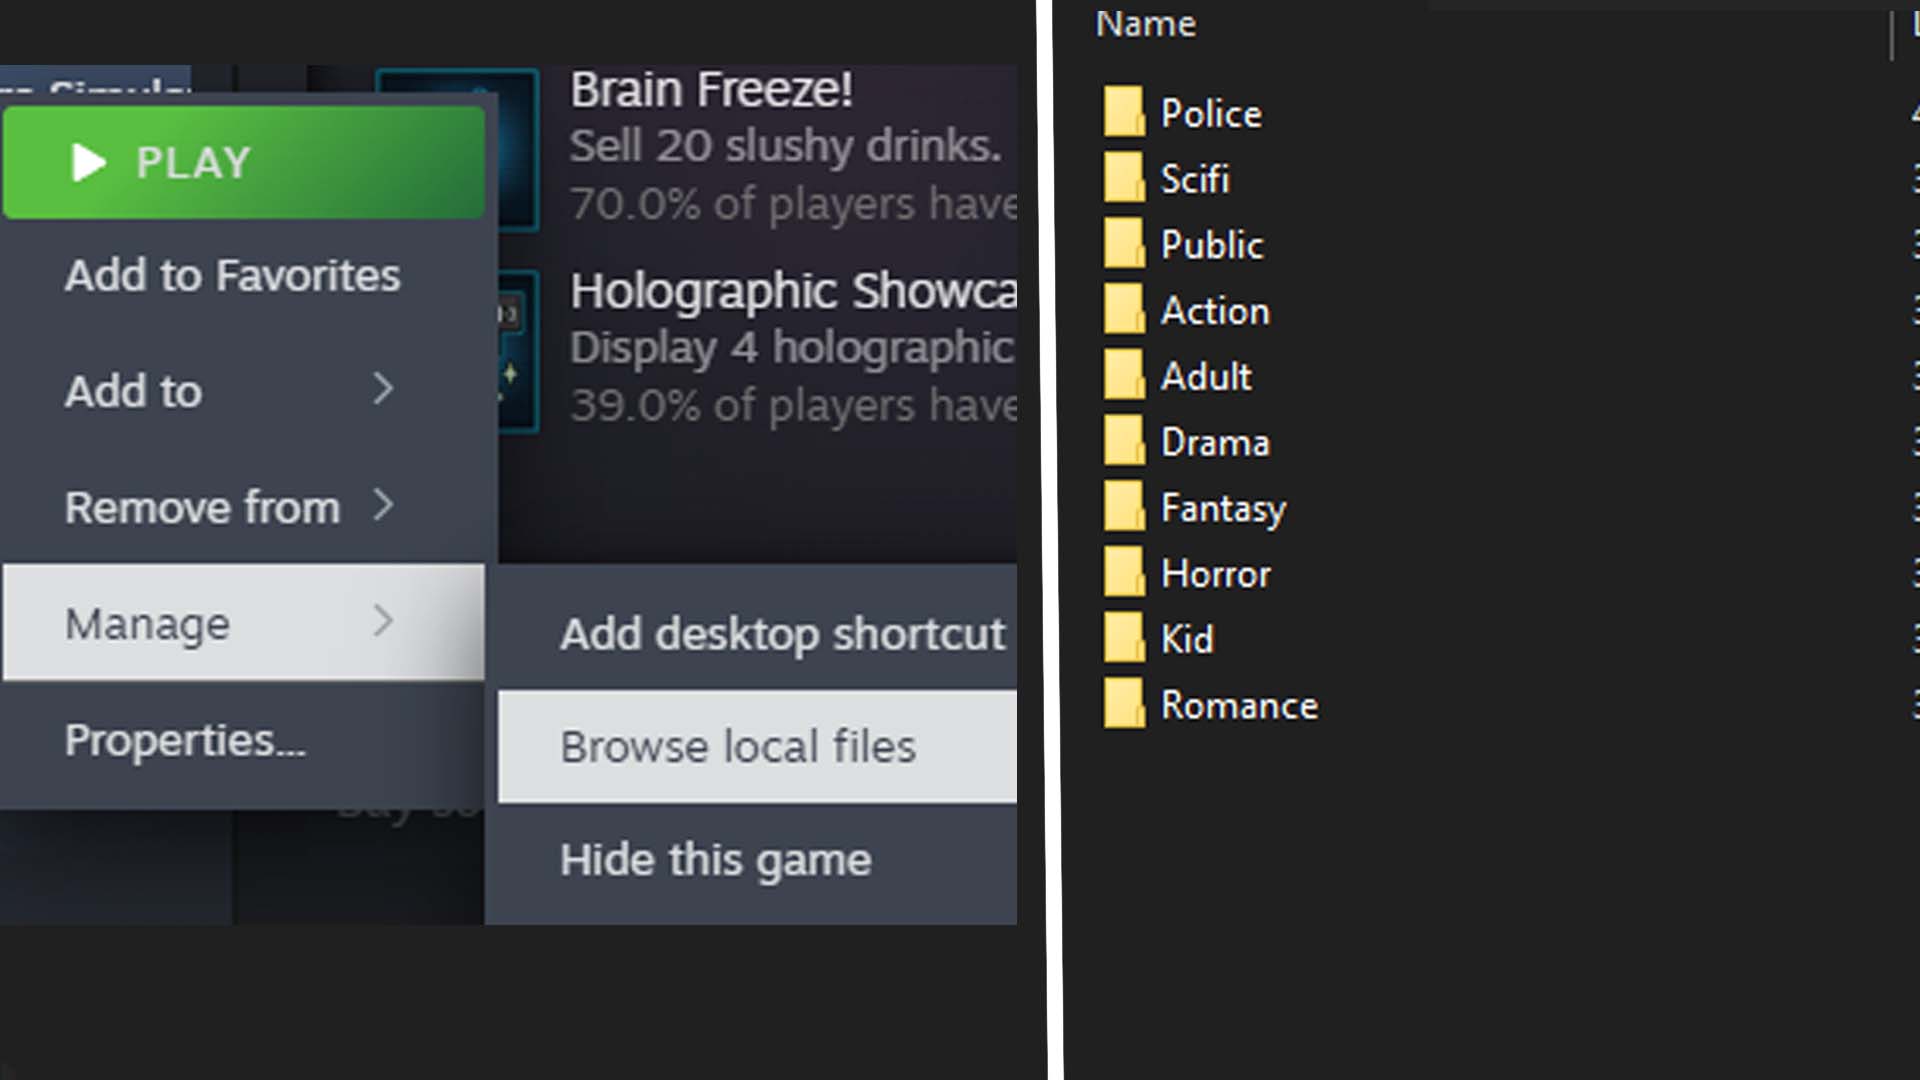
Choose a kind of three folders and open it. In right here, it is best to discover one file named one thing like “RR_Channel_ Public.mp4.” That is the place we’ll place that transformed video from earlier. Seize it and drop it in right here. Now, rename the unique file that was in right here and add a easy X, A, or 2 to the file identify. Copy that file identify onto the newly added video you transformed, however be sure that to delete the additional letter or quantity you added. (This step will ensure you can all the time return and substitute your video with the OG video simply in case you need to or one thing breaks later.)
Now shut that folder and hop to Steam. It is best to be capable of boot up Retro Rewind and alter the channel till you discover your video there ready to be watched. Now watch out you don’t get too distracted by it and overlook to run your rental store. Belief me, it may well occur.

